CNC
Most DIYer's do NOT have access to CNC machines, so I must assume that your post gets this point. My point would be that "pin cushion" frames have been around for decades so as woodworkers we would have accepted the challenge of transferring this pattern to the baffle. Not rocket science! Not easy! See what I mean?
Most DIYer's do NOT have access to CNC machines, so I must assume that your post gets this point. My point would be that "pin cushion" frames have been around for decades so as woodworkers we would have accepted the challenge of transferring this pattern to the baffle. Not rocket science! Not easy! See what I mean?
Most DIYer's do NOT have access to CNC machines
might be a good idea if Jordan could supply a Solidworks cad file for download, then DIYers cd then just get everything done cheaply on any 3 axis
Last edited:
The old fashioned way of inscribing the pattern with a sharp knife and the hand chiseling with a sharp wood carvers chisel is actually not that time consuming. By the time you program your cnc, clamp and fix the workpiece, calibrate the xyz toolbit, etc. You could be done using a chisel. Really, we should stop complaining about a non-round frame. Cnc is for multiple unit production, making two relief cuts is no big deal.
might be a good idea if Jordan could supply a Solidworks cad file for download, then DIYers cd then just get everything done cheaply on any 3 axis
as phivates notes above, not all DIYers have access to this type of CNC
The old fashioned way of inscribing the pattern with a sharp knife and the hand chiseling with a sharp wood carvers chisel is actually not that time consuming. By the time you program your cnc, clamp and fix the workpiece, calibrate the xyz toolbit, etc. You could be done using a chisel. Really, we should stop complaining about a non-round frame. Cnc is for multiple unit production, making two relief cuts is no big deal.
CNC = Carefully Nudged Chisel
yes, that's true, but once you have those programs saved and if you like the driver enough to use dozens of times, a pair of baffles can be machined in less time that it takes to resharpen your chisel
")
as phivates notes above, not all DIYers have access to this type of CNC
yeah understood; but useful for those with access to the internet and can locate a nearby workshop with a 3 axis
Last edited:
...due to one pair being damaged, a second pair from the group buy of several years ago...
I have a pair from that group buy, as well as an earlier set purchased from CSS when they were still the Canadian vendor. The latter sound much better. Having gone through highly praised TBs and 103 clones, slagging the Jordan is a difficult concept to parse.
The latter sound much better.
THose would be VIFA made, i'm pretty sure all the 3 pair we have had thru hear were Chinese made (none of which we were enamoured of)
dave
THose would be VIFA made, i'm pretty sure all the 3 pair we have had thru hear were Chinese made (none of which we were enamoured of)
dave
You my be right. I recall the first being Vifa. The difference isn't subtle, the others are fairly aggressive.
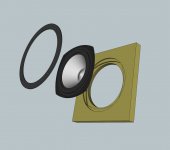
or cut the fancy pattern in thin ply, fitted over the driver screwed to the baffle. You can then give out with "Baffle Optimized Constrained Lyer Damping" or some such guff. Less dust, no machines - Ned Ludd strikes again!The old fashioned way of inscribing the pattern with a sharp knife and the hand chiseling with a sharp wood carvers chisel
Cheers Steve
the others are fairly aggressive.
Something annoying in the top end was my choice of wording. Certainly something neither Chris or i coud live with.
dave
or cut the fancy pattern in thin ply, fitted over the driver screwed to the baffle. You can then give out with "Baffle Optimized Constrained Lyer Damping" or some such guff. Less dust, no machines - Ned Ludd strikes again!
Cheers Steve
Not a bad idea at all. David Berriman designed a DIY speaker for Hi-Fi News some time in the 1990s which took this approach. He had a straightforward circular cutout for the Volt driver and then had a thin sheet of MDF or ply cut to the shape of the driver frame. He suggested covering this with leather material, wrapped round the back, before fitting to the baffle.
A bit old-school but it looked smart enough in the photos, once the restof the cabinet was veneered.
Certainly something neither Chris or i coud live with.
More than recommended toe-in helped. The real solution might be a little series LRC tailoring.
The 'bad' Jordan still left any well-regarded TB in my experience far behind for high freq performance, the Vifa version is in a completely different class top to bottom. I find hem a high value driver because, while much less expensive, alternatives like the TB Bamboo ultimately ended up in the closet. Very much looking forward to what Ted pulls of with this one.
Not a bad idea at all. David Berriman designed a DIY speaker for Hi-Fi News some time in the 1990s which took this approach. He had a straightforward circular cutout for the Volt driver and then had a thin sheet of MDF or ply cut to the shape of the driver frame. He suggested covering this with leather material, wrapped round the back, before fitting to the baffle.
A bit old-school but it looked smart enough in the photos, once the restof the cabinet was veneered.
If these were the DB6, with the 8 inch poly cone, then my dad built a pair. It didn't use a volt driver, but the construction technique you described is exactly how they were build. He still uses them, but I did redo the cover, which originally had quite a rolled off upper treble.
Front Panel Designer
The best way I've found when covering an oddly shaped chassis, though not necessarily the cheapest, is to get a panel CNC cut and anodised, I use Schaefer for Europe though they do have services in the US.
So in this case, CNC out the driver rebate slightly deeper, then the circular rebate on top, screw in the covering panel over the driver, making sure you've aligned the fixing holes on both!
Attachments
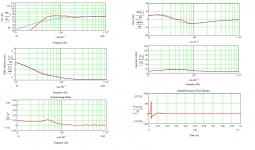
Oh well, since the Eikona now appears to have been officially released, here's an MLTL for it, FWIW. This is from the published data on the Jordan site BTW.
40in x 7.5in x 10.625in (internal HxWxD).
Zd = 8in.
Slot vent 1.625in tall, full internal width. 0.75in long at the bottom of the box.
Stuff 0.75lbs ft^3 dacron or similar throughout box.
This is one of my favourite MLTL alignments since you've got a reasonable amount of LF extension & some assistance for step-loss, with a TL-style impedance load through the extensive damping. Basically, it's a similar style box to the pensil cabinets I did for the MA units.
Interesting the new Jordan looks like it's taken the same approach as the MA drivers by providing a lift in the LF, presumably to help with step-loss.
Attachments
- Status
- This old topic is closed. If you want to reopen this topic, contact a moderator using the "Report Post" button.
- Home
- Loudspeakers
- Full Range
- New Jordan driver - preliminary details