OK well I did make some more progress yesterday afternoon ") Only the fiddly routing still to go, ie the front baffle speaker rebate and cutout and the slot port. Also two sides need their port shelf rebates cut, but that's it. Maybe I will get time again next weekend. If not the week after I have the week off to spend some time with my daughter in her school holiday period so we surely can make some progress then
Only the fiddly routing still to go, ie the front baffle speaker rebate and cutout and the slot port. Also two sides need their port shelf rebates cut, but that's it. Maybe I will get time again next weekend. If not the week after I have the week off to spend some time with my daughter in her school holiday period so we surely can make some progress then
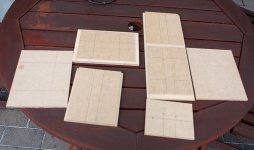
Progress on second box so far attached.
Tony.
Only the fiddly routing still to go, ie the front baffle speaker rebate and cutout and the slot port. Also two sides need their port shelf rebates cut, but that's it. Maybe I will get time again next weekend. If not the week after I have the week off to spend some time with my daughter in her school holiday period so we surely can make some progress then Progress on second box so far attached.
Tony.
Attachments
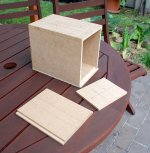
Well Miracles will happen and we have almost finished the second box! This one had a few mishaps but nothing that is too severe
First problem was I got a bit enthusiastic with the router and took the slot for the slot port out a bit far on the front baffle. Shouldn't be a major problem... There is also a small nick where I incorrectly measured my line for the fence when doing the slot port, luckily I had the depth set at 3mm for a test before doing it properly.
The second problem was I was drilling a hole in something and stuck the rear baffle under what I was drilling (not realising it wasn't a scrap piece of MDF! Luckily it only went in about 3 mm deep.
Third problem was when I was clamping the rear baffle for gluing, the weight of the clamp caused the box to roll of the bench and onto the concrete floor. That put a small dent in the bottom right corner of the box but nothing more. phew!!
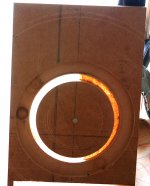
I also discovered that the original hole I made for the first speaker was quite a bit bigger than it should have been. I think about 6mm bigger in diameter. This time around I made it the recommended size (95mm diameter which is what is in the plans). This turned out to be a little small and I had to rasp and sand the hole a little to get the speaker to fit. SO I would say if you are using this driver you need to make the cutout 96mm or maybe 97mm for an easy fit
I've attached a few more images.
The first shows that I set the depth on the router to be not quite 100% through when doing the speaker cutout (I did a number of passes adjusting by 1/2 mm or so till I got down to paper thin). The reason I did this was because on the first speaker once I got right round I didn't realise and the router wandered a bit since nothing was holding the centre in place any more. I figured if I didn't go quite all the way through I'd get a cleaner hole. It worked
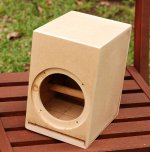
Second pic shows the glued and (roughly) sanded box (you can see the problems with the slot port, but it is only 9mm then it hits the side wall of the speaker.
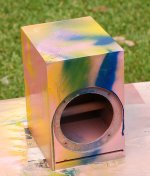
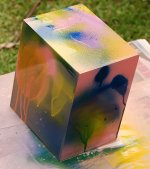
The last three pics show (not dry yet) my Daughters spray painting efforts. This one is even more funky than the first one! She didn't hold back this time. I said a few times I think you have enough paint there now, and she just responded: "Dad you don't know what I'm trying to do here!"
Wiring will hopefully get done tomorrow or Monday It may be a while before the little amp and line level BSC circuit is done, I might concentrate on some other long overdue projects first. But I will be trying them out with my p2p gainclone in the interim
Tony.
First problem was I got a bit enthusiastic with the router and took the slot for the slot port out a bit far on the front baffle. Shouldn't be a major problem... There is also a small nick where I incorrectly measured my line for the fence when doing the slot port, luckily I had the depth set at 3mm for a test before doing it properly.
The second problem was I was drilling a hole in something and stuck the rear baffle under what I was drilling (not realising it wasn't a scrap piece of MDF! Luckily it only went in about 3 mm deep.
Third problem was when I was clamping the rear baffle for gluing, the weight of the clamp caused the box to roll of the bench and onto the concrete floor. That put a small dent in the bottom right corner of the box but nothing more. phew!!
I also discovered that the original hole I made for the first speaker was quite a bit bigger than it should have been. I think about 6mm bigger in diameter. This time around I made it the recommended size (95mm diameter which is what is in the plans). This turned out to be a little small and I had to rasp and sand the hole a little to get the speaker to fit. SO I would say if you are using this driver you need to make the cutout 96mm or maybe 97mm for an easy fit
I've attached a few more images.
The first shows that I set the depth on the router to be not quite 100% through when doing the speaker cutout (I did a number of passes adjusting by 1/2 mm or so till I got down to paper thin). The reason I did this was because on the first speaker once I got right round I didn't realise and the router wandered a bit since nothing was holding the centre in place any more. I figured if I didn't go quite all the way through I'd get a cleaner hole. It worked
Second pic shows the glued and (roughly) sanded box (you can see the problems with the slot port, but it is only 9mm then it hits the side wall of the speaker.
The last three pics show (not dry yet) my Daughters spray painting efforts. This one is even more funky than the first one! She didn't hold back this time. I said a few times I think you have enough paint there now, and she just responded: "Dad you don't know what I'm trying to do here!"
Wiring will hopefully get done tomorrow or Monday
It may be a while before the little amp and line level BSC circuit is done, I might concentrate on some other long overdue projects first. But I will be trying them out with my p2p gainclone in the interim Tony.
Attachments

none as yet
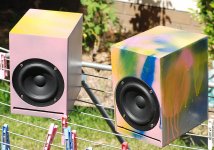
Picture of the finished speakers. I've also today been playing with a simulated notch filter on the high end, and think I have something that will probably work ok. It's a parallel notch 22uH 12uF and 7 ohms. Blue is the original repsonse, black is response with simulated notch.
I know a lot of people don't particularly like notches, but I've had good success with them (at lower frequencies) so I'm going to give it a try. I think that, combined with some line level BSC should really clean it up.
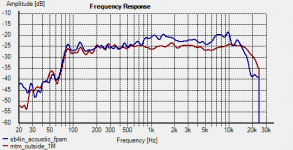
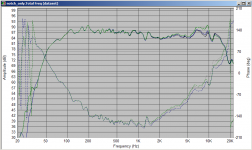
Just as a comparison I've shown the sb 4in response compared to my MTM's. Both of these measurements were taken in the same place on the same day (as per earlier in the thread). The MTM's have BSC applied. What I find interesting is that the bumps in the low end follow fairly consistently for both so I suspect that they were reflections or something else.
Tony.
Picture of the finished speakers. I've also today been playing with a simulated notch filter on the high end, and think I have something that will probably work ok. It's a parallel notch 22uH 12uF and 7 ohms. Blue is the original repsonse, black is response with simulated notch.
I know a lot of people don't particularly like notches, but I've had good success with them (at lower frequencies) so I'm going to give it a try. I think that, combined with some line level BSC should really clean it up.
Just as a comparison I've shown the sb 4in response compared to my MTM's. Both of these measurements were taken in the same place on the same day (as per earlier in the thread). The MTM's have BSC applied. What I find interesting is that the bumps in the low end follow fairly consistently for both so I suspect that they were reflections or something else.
Tony.
Attachments
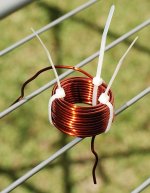
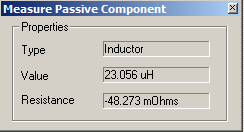
Well that was quick!! At least something I'm doing with these is able to be done in less than a whole afternoon... haven't checked the value yet, hopefully close enough to 22uH
edit: close enough I didn't bother going through the calibration process with speaker workshop so DCR is screwed up, but should be about 27 milli ohms.
Tony.
edit: close enough
I didn't bother going through the calibration process with speaker workshop so DCR is screwed up, but should be about 27 milli ohms. Tony.
Attachments
OK so I had an 11uF Axon, a 1uF axon and an 8.2 ohm 10W resistor sitting around.
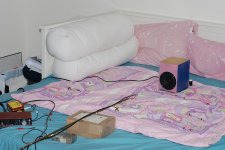
I took a quick and dirty measurement of the speaker in the study sitting on the daybed. Distance about 50cm and only about 5cm off the surface of the bed. Sort of like a mini ground plane measurement
I then put the RLC in series with the speaker and measured again. It is pretty much working as expected from the sim.
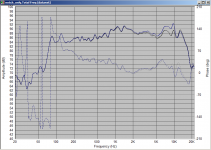
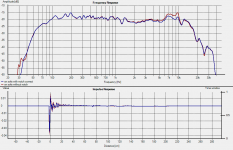
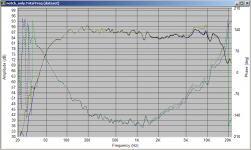
Pics attached of the test setup, and the comparison in holm with and without the notch. Finally I loaded the new measurement into speaker workshop and compared the simulated result (using the new measurement) with the actual measurement of the realised notch. I changed the values in SW to match what I now had.
Pretty good correlation, and I think shows the worth of speakerworkshop in prototyping notch filters. Interestingly if I leave the original values in SW (ie 22uH instead of 23uH and 7 ohms instead of 8.2 ohms) it is almost an exact match for the actual measurement...
1st pic, the (dodgy) measurement setup.
2nd pic, SW showing green actual no notch measurement, blue actual measurement with notch filter, black simulated response.
3rd pic the measurement in holm with and without the notch filter.
4th pic same as 2nd execpt with original vals of 22uH and 7 ohms in the sim.
Tony.
I took a quick and dirty measurement of the speaker in the study sitting on the daybed. Distance about 50cm and only about 5cm off the surface of the bed. Sort of like a mini ground plane measurement
I then put the RLC in series with the speaker and measured again. It is pretty much working as expected from the sim.
Pics attached of the test setup, and the comparison in holm with and without the notch. Finally I loaded the new measurement into speaker workshop and compared the simulated result (using the new measurement) with the actual measurement of the realised notch. I changed the values in SW to match what I now had.
Pretty good correlation, and I think shows the worth of speakerworkshop in prototyping notch filters. Interestingly if I leave the original values in SW (ie 22uH instead of 23uH and 7 ohms instead of 8.2 ohms) it is almost an exact match for the actual measurement...
1st pic, the (dodgy) measurement setup.
2nd pic, SW showing green actual no notch measurement, blue actual measurement with notch filter, black simulated response.
3rd pic the measurement in holm with and without the notch filter.
4th pic same as 2nd execpt with original vals of 22uH and 7 ohms in the sim.
Tony.
Attachments
Last edited:
Good question Dave. I can't remember if I did any off axis measurement yet, I know I thought about it, but I suspect that I decided I'd do it next time (as my "gauge" for my speaker test stand had gone missing). It would be revealing to do a set with and without the notch filter.
I probably should wait till I've done something about the baffle step first though. edit2: BTW the dodgy measurements above are shown with 1/16th octave smoothing.
Tony.
I probably should wait till I've done something about the baffle step first though. edit2: BTW the dodgy measurements above are shown with 1/16th octave smoothing.
Tony.
Last edited:
Tony,
Looks like a great liitle speaker, I was checking out the driver wrt use in a 3 way, you mentioned you wanted to ***** its viability for use in a 3 way at the begining of the thread... can you share your thoughts following your experiences so far with the drive unit?
Looks like a great liitle speaker, I was checking out the driver wrt use in a 3 way, you mentioned you wanted to ***** its viability for use in a 3 way at the begining of the thread... can you share your thoughts following your experiences so far with the drive unit?
Hi Nannoo, I think that they would make an excellent mid driver in a three way (though not a high efficiency one as they are only 88.5db efficiency).
The tonality and clarity of them is very good. The main problem is going to be sensitivity, and baffle step I think. With only 88.5 db to start with if you drop say another 3db for baffle step compensation it is starting to get pretty low in the efficiency stakes. With a narrow baffle like here they start to drop off below about 1Khz. Obviously in the wider baffle of a three way that will be lower so it *may* not be too much of an issue.
I'll have to do some off axis measurements as well as Dave suggested. That will help with showing how high you could cross to the tweeter as well
Tony.
The main problem is going to be sensitivity, and baffle step I think. With only 88.5 db to start with if you drop say another 3db for baffle step compensation it is starting to get pretty low in the efficiency stakes.
Best to deal with BS by XOing at or just below the BS frequency to more sensitive woofer(s) so that the full sensitivity of the mid can be used.
dave
- Status
- This old topic is closed. If you want to reopen this topic, contact a moderator using the "Report Post" button.
- Home
- Loudspeakers
- Full Range
- SB acoustics SB12MNRX25-4 "full range" Build thread