Good evening,
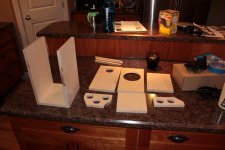
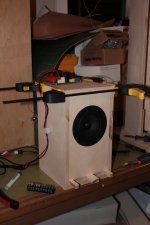
I just finished getting one mMar-Kel70 roughed together for a listen. It's built with the recommended 5/8" baltic birch plywood and UltraTouch lined. I'll get the other side together tomorrow and perhaps the trimming as well. I really need a larger chamfer bit though, I think a 3/4" one should see me through most projects.
The -ken enclosures are challenging to build but then results are great. Hopefully this set will be a stepping stone to building a trapezoidal set later this year.
The amp in the last photo is a Helder Hifi TA2020 MKII. Seems to be a good match for the EL70. I am going to get it into an enclosure soon as well.
Kyle
Attachments
Good evening,
I just finished getting one mMar-Kel70 roughed together for a listen. It's built with the recommended 5/8" baltic birch plywood and UltraTouch lined. I'll get the other side together tomorrow and perhaps the trimming as well. I really need a larger chamfer bit though, I think a 3/4" one should see me through most projects.
The -ken enclosures are challenging to build but then results are great. Hopefully this set will be a stepping stone to building a trapezoidal set later this year.
The amp in the last photo is a Helder Hifi TA2020 MKII. Seems to be a good match for the EL70. I am going to get it into an enclosure soon as well.
Kyle
looks vaguely familiar
enjoy
looks vaguely familiar
enjoy
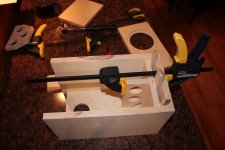
They seem to breed like rabbits! Second box assembly tonight with any luck.
KM
Can you say how you made the holes in the baffle (and the groove to have the driver flush with the baffle)? Why are the wooden sticks poking out of the vent?
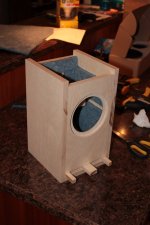
The hole in the baffle, I assume you mean the speaker opening, was cut with a router. I have a small jasper jig for guiding the cut. For the EL70 I cut a 4 7/8" by ~1/4 deep inset and a 4" hole. The back of the 4" cut has a 45deg. bevel.
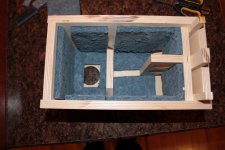
The wooden sticks are the vent spacers that I have yet to trim off! They will be flush with the baffle when complete. The plan for this speaker can be found at the Planet 10 HiFi site.
KM
Can you say how you made the holes in the baffle (and the groove to have the driver flush with the baffle)? Why are the wooden sticks poking out of the vent?
lemme guess:
lotsa ways to cut the rebated driver cut-out - if you don't have access to a CNC, either a home made or Jasper circle jig for router would be the most likely
the port spacers are sticking out 'cause they simply weren't cut off yet, and could be just as easy to trim flush after front panel glued in place
edit - that'll teach me to talk to Dave on the phone while typing a post
nice work Kyle
pps - the bevel to rear side of cut-out is particularly important with drivers of this size
Last edited:
;-) Thanks Chris!
Getting a nice chamfer bit for cutting the back side of the speaker opening as well as cutting bevels on sides of the baffle is a great investment. Once the hole is cut running the chamfer bit around with the guiding bearing is dead easy.
As a general question: Is there any downside or concern with using a large chamfer bit for putting a bevel on the baffle edge? Something like 1-1/4"? Am I better off doing that with my table saw?
KM
Last edited:
When I cut the sides from the stock, I cut with a 45 deg angle to end up with two rows of stock wide enough for the sides, and then straight cut to the correct depth and length. Then I just have to knock off the front corners of the top and bottom pieces.
After the fact I was wondering about that too... table saw with a finished box scared the bejebus out of me.
After the fact I was wondering about that too... table saw with a finished box scared the bejebus out of me.
;-) Thanks Chris!
Getting a nice chamfer bit for cutting the back side of the speaker opening as well as cutting bevels on sides of the baffle is a great investment. Once the hole is cut running the chamfer bit around with the guiding bearing is dead easy.
As a general question: Is there any downside or concern with using a large chamfer bit for putting a bevel on the baffle edge? Something like 1-1/4"? Am I better off doing that with my table saw?
KM
aside from the cost of big a$$ router bit (good quality bit could easily be $100 - I have a couple bevels and round-overs this size) and the advisability of running on router table, no
cutting smaller boxes like this on table saw is pretty simple - run with the blade tilted away from rip fence (on the left side for many saws), and the waste cut can't get pinched and kicked back like it can with cutting "into" the fence - fun to watch when that happens - but wear a kevlar vest
it might take a couple of passes the get the width/height of cut just right, but after than likely less than one minute to cut all four edges on a pair of boxes this size
After the fact I was wondering about that too... table saw with a finished box scared the bejebus out of me.
as I noted in above post, finished boxes this size are very simple to cut on table saw - easier in fact than with hand held router, although depending on blade sharpness and feed rate, you might need some touch-up block sanding before finishing
That would be wear a kevlar vest AND brown pants!!
Best
Don
well at our age, we just go for the full coverage depends
There's an image that's going to stick. ")
well at our age, we just go for the full coverage depends
The saw I use cuts very cleanly. I may use it to do the baffle chamfer. I'll post my results/injuries when I do.
KM
got your Form 7 handy?
It's really not that tough a job on boxes this size - just take a few test cuts first to establish the degree of exposure you like, then run all 4 sides at a nice slow feed rate
The whole process should take less than 5 minutes.
Remember, tile the blade away from the fence and the off cut won't kick back
I'm guessing Form 7 covers self-inflicted dismemberment? ;-)
Understood. I might glue some scrap for a test run to see if I like the results. Thanks Chris!
KM
WCB - Employer's Report of Injury or Occupational Exposure
actually if fully dismembered, you might need help with the two page form, and don't even think about filling this one out online
(hmm, can I fill one out for standing downwind of Yosu after his refried beans and cottage cheese lunch?)
- Status
- This old topic is closed. If you want to reopen this topic, contact a moderator using the "Report Post" button.
- Home
- Loudspeakers
- Full Range
- mMar-Kel70 Build