The goal is to push panel resonance as high as possible. They results from Tappan's AES paper
dave
Right, but not my point. A single large hole should give you nearly the same cross panel strength as a lot of little holes. A large round hole is just as effective as a window brace. And note that I stated that panel stiffening is more important that cross panel bracing, which is what you just said.
My current bracing scheme is a crosswise brace at the top and bottom of the driver to tie the panels together and longitudinal braces ( 12mm x 50mm) from the bottom of the driver to the bottom of the cabinet, i.e. picture #5 in your quote.
Bob
A well placed brace can work wonders, I learnt this on my first diy build back in '97 - a pair of DB 9's from the part kit and artical in HFN&RR, 2 off cross braces spaced un-equally and an angled bottom panel to quell standing waves.
One thing I am certain of is the need to tie the front and rear baffles together, holding a 12lta while its running test tones OR music gently really brings it home why this feature is there.
My front to back braces are all marked out now")
One thing I am certain of is the need to tie the front and rear baffles together, holding a 12lta while its running test tones OR music gently really brings it home why this feature is there.
My front to back braces are all marked out now
Report:
All panels cut including rounding over the holes in the brace
All stock ripped for vent spacers and battens.
So, I'm waiting for the 7pm re-run of the Simpsons then its glueing and pinning the sides together.
Neighbours have been asking what I'm making, guesses ranging from book cases to cupboards, the look on their faces when given the answer 'Loudspeakers' has been priceless, even more so when I showed 'em a front baffle an a top.
(evil laugh) HaHaHaHa
Report:
All panels cut including rounding over the holes in the brace
All stock ripped for vent spacers and battens.
So, I'm waiting for the 7pm re-run of the Simpsons then its glueing and pinning the sides together.
Neighbours have been asking what I'm making, guesses ranging from book cases to cupboards, the look on their faces when given the answer 'Loudspeakers' has been priceless, even more so when I showed 'em a front baffle an a top.
(evil laugh) HaHaHaHa
emphasis on the Loud part - which they'll be experiencing soon enough
hope you find them worth the wait
Aye, that there will - so we're still part of an exclusive club. It just struck me, I could / can not only tune the vents symmetrically, but asymmetrically as well.
Dave's thoughts on this would be welcome.
When Chris shortened the vents i left myself some opportunity to do some trick tuning. Stay tuned.
I don't know what different length vents would do. Some smoosh of the tuning frequency
dave
http://www.diyaudio.com/forums/subwoofers/144331-multiple-ports-different-tunings.html
Smooshing of the tuning frequency would appear to be correct.
Probably worth messing around with, anyway.
Chris
Smooshing of the tuning frequency would appear to be correct.
Probably worth messing around with, anyway.
Chris
I have 4 channels of LM3875, I can steal a pair of channels back off mother, a Cyrus 2/PSX and a Kenwood A-91 that I use for game noises.
The latter is possibly the sweetest sounding of the bunch, the C2/PSX and LM3875 are about the same unless the latter are fed with the simple 6922 pre.
Once I have listened to the Em's here at home, I'm going to speak to Big Ears Audio in Newquay and see if I can take them there to audition with some valve kit.
I've thought about working my way through the single ended Zen's, Z4 would seem to (me) to be the best bet or perhaps Papa's ACA or IRF F5, PLH or JLH.
Decisions decisions.
Well, final afternoon of doing chaps.
Jobs left:
Drill pilot holes in the removable vent parts (will take a photo of the parts for all to see).
Glue and screw the panels together + pilot holes for removable backs.
Bolt in drive units.
Take photo of completed 'speakers.
Make noise.
Jobs left:
Drill pilot holes in the removable vent parts (will take a photo of the parts for all to see).
Glue and screw the panels together + pilot holes for removable backs.
Bolt in drive units.
Take photo of completed 'speakers.
Make noise.
Make noise.
Yeah baby! Noise sweet noise!
The loudest noise in the hood was made by Matt and myself swearing on Friday as we battled to try and keep A box strait.
The cuts are bang on 90deg and the battens are square. Sides were assembled on a very flat surface, so the slight twists in the side panels we taken out when the whole lot was clamped / glued, pinned and screwed. I guess the easy way to make them is to make the outer side and battens square with the front baffle line and chop on a HUGE table saw when the box is together, same way P10 does. I went to a 'Do' Friday night and got asked by a stranger how my speakers were sounding - turns out the guy was the one from the wood place I purchased from and they have a HUGE table saw / offer a cutting service:
68 pence a cut and a rough quote of £20 each box for assembly.
GUESS what I'm going to do next time?
Matt's told me that we couldn't odds them being this difficult - or rather awkward.
Still, at least they're closer to done in one week than the previous six and I find myself chuckling about things
Pictures - my cameras dead and so is my cellphone (died Sat am), which had a camera, so I'm on a hunt to borrow the former and will post a pic of a side and vent extensions later IF I can reduce it and get it to attach.
In the mean time I have a Sim race league event this evening at Zandvoort to prepare for and I'm expected by my team to win..... the pressures of motor sport *sighs
Thanks for the hint JKRO.........
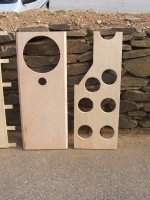
First picture shows front baffle and brace - might have taken a bit too much out when cutting holes.
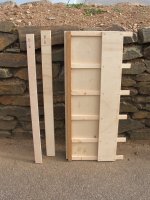
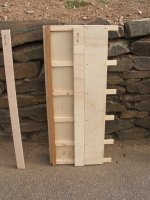
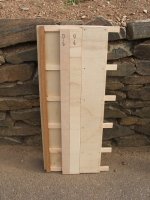
Picture 2 - 4 show alternate vent parts, When all are in place these give a vent length 'close' to JKRO's, the wider of the two parts installed gives 'close' to Dave's modified porting.
A cunning arrangement with plenty of scope for twiddling state of tune.
First picture shows front baffle and brace - might have taken a bit too much out when cutting holes.
Picture 2 - 4 show alternate vent parts, When all are in place these give a vent length 'close' to JKRO's, the wider of the two parts installed gives 'close' to Dave's modified porting.
A cunning arrangement with plenty of scope for twiddling state of tune.
Attachments
- Status
- This old topic is closed. If you want to reopen this topic, contact a moderator using the "Report Post" button.
- Home
- Loudspeakers
- Full Range
- Ladies & Gentlemen - The Emken