spit from http://www.diyaudio.com/forums/full-range/65061-full-range-speaker-photo-gallery.html 
Nice. How do you cut the 45 degree sides? In one operation or separate, one and one board before gluing?
Nice. How do you cut the 45 degree sides? In one operation or separate, one and one board before gluing?
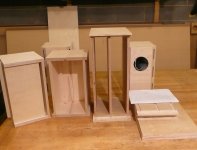
I build them a little different than the plans.
I dado cut groves in the top and bottom for the, sides, brace and back.
A good “trick” is to cut the pieces at the same time; next to impossible to re-set the fence exactly in the same position.
E.g.:
Cut for length: sides (inter), brace and back (4 pieces).
Cut for width: top, bottom and back.
Glue up the 6 pieces above, it should be somewhat easy.
Cut the front baffle board 45degrees, should be a bit “wide” 1/16” on each side, this can be trimmed with a flush router bit. Add vent strips.
Cut the outside panels, 45degrees, (oversized) glue these on, line up the back perfectly; going in the saw next!
Use a good blade, “back up” the little corner with scrap hardwood for a good clean cut at the end. I did this a few times: the sneak-up-on it method.
Last step, go back and trim up the length: front and sides, they were left 1/8” long.
One other little trick to make life easier, enlarge the plans full scale on a copier; this fit nicely on an 11 x 17 sheet.
Please remember, this is slightly different then the classic build, I do like that the damping material can be added via the front.
Attachments
Unless you have a big-a$$ table saw, there will be a limit to how deep a chamfer you can cut in a single pass on a fully assembled enclosure, particularly on boxes like the Fonkens in Doug's photo. These use layers of 15 & 18mm plus up to 9.5mm for port spacers - that can mean a bevel over 45mm deep and 60mm across the diagonal.
Doug's assembly approach is different from mine - I assemble the three layers of side panels as a sandwich, attach the full width front baffle, top and bottom and cut bevels on 14" sliding saw. Not all DIYers or even small cabinet shops have one of those, and his technique is as valid as any.
oh yes, BTW Doug, how'd the latest project turn out?")
Doug's assembly approach is different from mine - I assemble the three layers of side panels as a sandwich, attach the full width front baffle, top and bottom and cut bevels on 14" sliding saw. Not all DIYers or even small cabinet shops have one of those, and his technique is as valid as any.
oh yes, BTW Doug, how'd the latest project turn out?
Last edited:
If you are really steady, a belt sander with 60 grit can be used, but you gotta be really steady (or use a hand-held electric plane). BUT, you must know exactly where any metal fasteners are, else not a good thing! (protect your eyes:" You'll miss them when they're gone.")Unless you have a big-a$$ table saw, there will be a limit to how deep a chamfer you can cut in a single pass on a fully assembled enclosure, particularly on boxes like the Fonkens in Doug's photo. These use layers of 15 & 18mm plus up to 9.5mm for port spacers - that can mean a bevel over 45mm deep and 60mm across the diagonal.
If you are really steady, a belt sander with 60 grit can be used, but you gotta be really steady (or use a hand-held electric plane). BUT, you must know exactly where any metal fasteners are, else not a good thing! (protect your eyes:" You'll miss them when they're gone.")
hell, with enough time & skill you could carve a 80ft totem pole with a pen knife
Odougbo is pretty good with his belt sander, he thinks the 4" x 24" works the best. If he was to do that, he would add scrap wood/runners so not to overcut/sand.
Pre cutting the bevels is not a big thing, the whole project took two days (double 16 hour days).
ODougbo refers to himself in the 3rd person - a definite sign of DIY addiction? - i.e. pre-authorized plausible denial for those projects that don't quite work out?
chrisb is a member of that club - welcome aboard
All you need is a razor sharp bench plane, you could do the chamfers in about 5 mins each or less, you would need skill of course, but what's wrong with that?
I'd like to see that.
jeff
All you need is a razor sharp bench plane, you could do the chamfers in about 5 mins each or less, you would need skill of course, but what's wrong with that?
I'd like to see that.
jeff
me too - bevels 45mm deep on BB plywood in 5mins? what about tear-out on end-grain of port spacer blocks?
.. so the precut bevels make sense. Just cut each piece slightly longer (on the back side) and then sand the "non-bevelled end" .
there's gotta be a few more possible fabrication techniques / sequences than discussed so far - any of which would work
Also it's only the base of the chamfer that's 45mm deep, I have worked with carpenters who have either forgotten how to use hand tools or never learned, you might be suprised how quick and effective they are, though I'm no Luddite, I've got every power tool there is but sometimes it's good to go back to basics. Check out Japanese carpentry, all done with hand tools.
You avoid tear out by scribing with a (razor sharp) chisel, and when I say razor sharp, I mean razor sharp as in finished on a leather strop, I assure you it can be done.
I'm sure you're right, but we might be talking at cross purposes - I was referring to my own method of fabricating the chamfers on fully assembled enclosures like the Fonkens in pictures post by Doug. I've probably built more pairs of this style enclosure than anyone, and have certainly got lazy about it. With any of our shop's big table stationary or sliding table saws, I can cut and block sand (by hand) all 4 chamfers on a pair of 300-400mm tall enclosures in less than 15 minutes.
I somehow got the impression that machinery was in short supply, I must admit I'd build them square and then cut the chamfers afterwards myself, but I maintain (for what it's worth) that the job could be done without power tools, sorry for harping on, nice speakers by the way.
I somehow got the impression that machinery was in short supply,
easy enough to do with the various number of posters involved - no lack of machinery/tooling in my own case - skill & patience, another story
thanxI must admit I'd build them square and then cut the chamfers afterwards myself, but I maintain (for what it's worth) that the job could be done without power tools, sorry for harping on, nice speakers by the way.
BTW, from my as built drawings for the FE127E version* - when using 18mm for fronts, 15mm for side wall panels and 9.5mm MDF for spacers, the total width across the bevel is 60mm - requiring a height of cut of at least 65 to clear. Not every DIYer will have that capacity, so it might be necessary to cut from both sides, in which case fine tuning with block plane or sanding block will be required.
* note that thickness of port spacer blocks may vary with individual driver's TSP, and these dimensions might change marginally - I haven't gotten around to building a pair from Dave's latest drawings for the FF125WK.
Attachments
What if you didn't cut the chamfers at all? If you're using the speaker as a center on its side with a shelf below and a tv above there's gonna be reflections anyway. I guess the port lengths would be slightly longer but what other problems would this cause?
I think I will eventually make one of the miniOnkens, and somewhat similarly to you I thought about a classic Onken look, but using the average port length, measured in the middle.
- Status
- This old topic is closed. If you want to reopen this topic, contact a moderator using the "Report Post" button.
- Home
- Loudspeakers
- Full Range
- Cutting the big bevels on a miniOnken