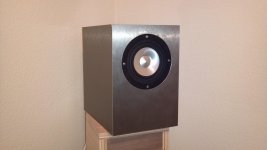
Hey guys, just thought I'd show y'all a build I did for a friend of mine. He had a pair of CHR-70's laying around and requested an all black cabinet. Instead I gave him a real treat by using my 13 ply void free birch core plywood and wrapped it in 1/32" stainless steel; internal volume is 5 liters sealed. They sound phenomenal for being entry level drivers. It took 4 hours from start to finish, which included programming the CNC router, building, veneering, and mounting everything. Enjoy!
-StevenZ
-StevenZ
Attachments
Thanks Boris! They sound amazing with pinpoint imaging and razor sharp detail. The plywood is a true 3/4" (.750 with my Mitutoyo caliper). Realistically though, anyone can do it. A hand router, a circle jig, and a table saw is all you need. I find building speakers to be greatly rewarding and a true passion of mine in sharing hifi audio with family and friends. The best part is watching a huge smile appear on the face of the person who the speakers were built for as they look around the room at the huge sound stage cast against the back wall and floating into the room.
-Steven
-Steven

Those are beautiful StevenZ, glad they sound great too.
How did you attach the stainless to the wood substrate? I assume glue but what glue did you use. Also how did you cut the stainless? Though 1/32 is thin I can't imagine plunging a router into stainless.
Scott aka Naturallmystic
How did you attach the stainless to the wood substrate? I assume glue but what glue did you use. Also how did you cut the stainless? Though 1/32 is thin I can't imagine plunging a router into stainless.
Scott aka Naturallmystic
Scott, I used Wilsonart professional grade red contact adhesive (I have a 55 gallon drum and dedicated spray system attached). My technique is to cut pieces about 3/4" larger than the surface, then use a hand router with flush cut with a laminate bit like this (C1455 Solid Carbide Flush Trim Laminate Bit, 1/4" Shank). Be careful though because the stainless steel wears down the bit pretty quickly so you must move fast or else it'll suck up against the adjacent surface and dent it. So a perfectly smooth cut isn't going to happen unless on each pass you raise the height of your base to always have a sharp edge. You'll need to keep the protective film on during the entire laminating process, all the way until you get every side laid and you're ready to clean off the glue. Peel the plastic off, wipe with lacquer thinner until clean, then file the edges with a laminate file. Filing takes work and experience so practice on a test piece before you muck up your finished work. When you're satisfied that you won't cut yourself on the edges, go ahead and clean it up with some stainless steel wipes or solution, and voila. You've got yourself a spiffy little speaker.
Keep in mind a sheet of stainless steel like this can cost up to $350 for a 4' x 8' sheet and can only come shipped on a flat pallet (depending on quantity ordered). It may not be the most cost effective covering for an enclosure, but done right it sure comes out pretty.
-Steven
Keep in mind a sheet of stainless steel like this can cost up to $350 for a 4' x 8' sheet and can only come shipped on a flat pallet (depending on quantity ordered). It may not be the most cost effective covering for an enclosure, but done right it sure comes out pretty.
-Steven
- Status
- This old topic is closed. If you want to reopen this topic, contact a moderator using the "Report Post" button.
- Home
- Loudspeakers
- Full Range
- Stainless Steel CHR-70