Time to start this thread!
I have it in mind to build a modern version of a Clairtone Project G. This will be a big job and will go on for awhile. But I'm going to start here and add to it as I go along.
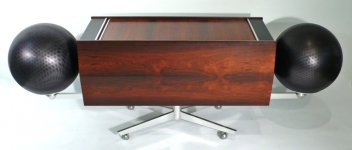
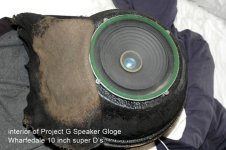
Step one is to make the speakers. The Project G's speakers are Wharfedale Super 10's mounted on a panel which presents the driver at the forward portion of a 18" spun aluminum globe. The front half of the globe is made of two layers of perforated aluminum with silver set inside of a black, and slightly offset creating a shimmering effect.
In an earlier thread on this topic I received some advice which lead me to choose to use Alpair 12s as the drivers. I will be setting them into some of Dave's octagonal Mar-Ken12 boxes and mount those boxes into my globe. My drivers are currently mounted in a pair of Pensil series Studio Reference Monitors and I am enjoying them very much. Already the best speakers I ever owned.
Last week I drew up the boxes full to better enable me to build them without error.
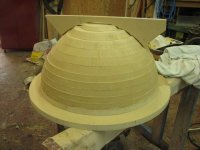
I also drew up the globes. This will be the first challenge to fabricate. I made a solid male mold from which I will make another female mold. for the time being I will be making my globes of fiberglass, possibly with carbon fiber outer layers. I may one day have access to equipment capable of spinning aluminum, but for now I will use composites.
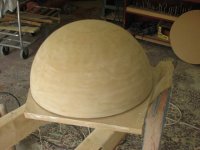
The photos show an original Project G, the interior of the original speaker, my mold discs of MDF, my mold rough shaped.
As time goes by I will post update.
Thanks for looking! I am excited to be working on this project.
I have it in mind to build a modern version of a Clairtone Project G. This will be a big job and will go on for awhile. But I'm going to start here and add to it as I go along.
Step one is to make the speakers. The Project G's speakers are Wharfedale Super 10's mounted on a panel which presents the driver at the forward portion of a 18" spun aluminum globe. The front half of the globe is made of two layers of perforated aluminum with silver set inside of a black, and slightly offset creating a shimmering effect.
In an earlier thread on this topic I received some advice which lead me to choose to use Alpair 12s as the drivers. I will be setting them into some of Dave's octagonal Mar-Ken12 boxes and mount those boxes into my globe. My drivers are currently mounted in a pair of Pensil series Studio Reference Monitors and I am enjoying them very much. Already the best speakers I ever owned.
Last week I drew up the boxes full to better enable me to build them without error.
I also drew up the globes. This will be the first challenge to fabricate. I made a solid male mold from which I will make another female mold. for the time being I will be making my globes of fiberglass, possibly with carbon fiber outer layers. I may one day have access to equipment capable of spinning aluminum, but for now I will use composites.
The photos show an original Project G, the interior of the original speaker, my mold discs of MDF, my mold rough shaped.
As time goes by I will post update.
Thanks for looking! I am excited to be working on this project.
Attachments
super!Could you give some tips & tricks of making this bowl?
Yes I will, in the fullness of time. I'm still working on it, yesterday I got some epoxy/microballoon mix on as a base for fairing the surface. Last night I refined my ideas for final shaping that does not require giant tooling.
I need to get my photos done in a way as to tell the story, and then get the time to post them!
Last edited:
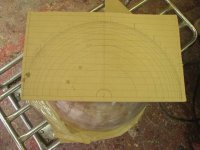
The first step in making this hemispherical mold was to draw it up in profile. It seems that a lot of people feel obliged to draw in CAD or Sketch Up, but good or pencil and paper, or in this case pencil and MDF, works just fine.
I start with the base line and the perpindicular center. Then I draw parallel lines to the base line set at the material thickness of my mold making materials. In this case it is MDF and I think that it measured out to 20mm. I had to do this twice as the first time I just made the assumption that it was 3/4". Easy to do and it makes a difference later.
Over these lines the maximum circumference is drawn. This determines the circumference (and diameter) and edge bevel, of each layer.
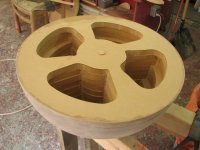
I cut out some of the interior of each disc to minimize the weight for handling purposes, while still leaving it solid enough to be, well, solid.
I drilled a hole at the center of each disc to keep them all aligned while gluing up the stack.
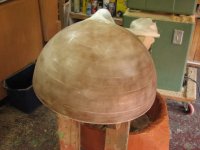
Having a lot of the excess already consistently removed by cutting the bevel greatly facilitated the next step of rounding it all over, both in terms of speed and consistent shaping.
Once the shape was as round as I could get it, I applied epoxy to saturate the MDF and then faired in the seams with an epoxy/microballoon mix. The next step will be to fair the mold into a perfect hemispherical shape as it still has small imperfections.
I start with the base line and the perpindicular center. Then I draw parallel lines to the base line set at the material thickness of my mold making materials. In this case it is MDF and I think that it measured out to 20mm. I had to do this twice as the first time I just made the assumption that it was 3/4". Easy to do and it makes a difference later.
Over these lines the maximum circumference is drawn. This determines the circumference (and diameter) and edge bevel, of each layer.
I cut out some of the interior of each disc to minimize the weight for handling purposes, while still leaving it solid enough to be, well, solid.
I drilled a hole at the center of each disc to keep them all aligned while gluing up the stack.
Having a lot of the excess already consistently removed by cutting the bevel greatly facilitated the next step of rounding it all over, both in terms of speed and consistent shaping.
Once the shape was as round as I could get it, I applied epoxy to saturate the MDF and then faired in the seams with an epoxy/microballoon mix. The next step will be to fair the mold into a perfect hemispherical shape as it still has small imperfections.
Attachments
Douglas, are your plans to rely completely on the A12's as FR, or do you plan to use the large box area (if you want to really make it look like a Clairtone) as a sub? Dave can correct me if I'm wrong, but it seems that one of the primary design goals of the Mar-Ken boxes is low frequency response. Given that you can make the large box area (for sub) handle this, it seems like that major design goal might not apply to your project... Further by not trying to take the Alpairs that deep by letting a sub take over, you relieve them from that extra effort.
How will the relatively wide front of the Mar-Ken mate to the globe and what will you use to round off the front? Could a simple ported or sealed enclosure better fit the fact that you need to get them into the globes with minimal impact on the front side, if you would have bass duty handled by another driver? Would it be reasonable to make a spherical sealed enclosure, with enough asymmetry on the interior to reduce standing waves of the same wavelength? It might not be too hard to make something using the Mar-Ken concept using a CNC machine that would end up being a sphere on the outside, even. Then you could simply cover them with the fiberglass or carbon fiber, which would eliminate the challenge of supporting the weight of the "box" in the globe and be great for reducing baffle diffraction.
I'm quite sure that your design concept will sound great as it is. Given the work you'll put in, I thought it might be interesting to throw out a few ideas that crossed my mind.
The Clairtone is really beautiful and iconic, I'll definitely follow your build with curiosity!
Dave can correct me if I'm wrong, but it seems that one of the primary design goals of the Mar-Ken boxes is low frequency response.
Actually the goal with all the miniOnken is bass finese. These are designed to a specific kind of rersponse curve in my modeler. This curve is not the actual response as the box Q is lowered by the high resistance of the slot vents. So in the end the bass goes down as far as it goes, i don't try to push it. A10 & EL70 are capable of the lowest response, and it is not a sin to add helper woofers.
Doug's Mar-Ken12 is a special variation that is a regular octagon from the front. It may still need some bevels on the back corners to make it fit into an 18" sphere...
One of the perks of buying a plan-set subscription is that i will do variations to meet special needs. Somewhere in the queue is a real scary one from a construction point of view -- a tapered 20 sided dMar-Ken7.
dave
Attachments
I don't plan on using a sub woofer, at least any time soon, for a few reasons.
-I am very satisfied with the bass performance of my A12's in their present cabs.
-I have ENOUGH to do with just getting this Project G built (G for globe...)
-There will be a turntable in the console and I don't want to add interference to it. I actually have a Garrard Lab 80 for this, same unit as original. How cool is that? I have no idea how much actual use I will put it to, but it will certainly add to the end result.
I'm setting my console up as a full media center which will store and play all my digital media-audio as well as video- and have internet connectivity for streaming audio not in my library and for Netflix, etc.
As much as I like the idea of tube amps, I'm going to have to choose something that will run cooler as it will be inside the console. Any suggestions as to what would work "best" with these speakers? I'm not worried about "THE BEST!", just the most appropriate given my circumstances and budget.
Dave's octagon version fits the globe well, at least on paper. I had thought of talking to him and making it a cylinder and bringing the face of the cab right up to the surface of the globe. That way the slots would follow the surface of the the sphere in a way that looks more proper than straight slots. This would be an issue if the front screens were off. I decided that that was more of a theoretical issue than a real one, so simpler execution won out.
Dave, when I drew out the cab full scale on paper and then drew out the circle, it appears that I have a lot more space left over than your drawing is showing. I am assuming that the units indicated are correct, but I'll double check. I still have a lot of final fairing of my globe mold before I start the cabinet.
The moire effect is very, very, cool. I'm not sure if I will be able to achieve that yet, but I will be working towards it. One thing that I DO have is some old Brazilian Rosewood veneer plywood for the cabinet. You just cannot buy that now!
Thanks, Chris. It looks promising, but it is a lot of money for me.
I notice the Virtue ONE.2 is more affordable.
Here's a question: How would these compare to something like the Dayton Audio DTA-100a? CSS sells the Virtue One.2 for $399, vs $99 for the Dayton at PE. Do I get $300 "more"? I would spend the money if it was worthwhile.
My son has one of those Dayton DTA-100a's and it sounds pretty darn good, and it is clearly better than the amp that I use presently.
Last edited:
Thanks, Chris. It looks promising.
Here's a question: How would it compare to something like the Dayton Audio DTA-100a? CSS sells the Virtue One.2 for $399, vs $99 for the Dayton at PE. Do I get $300 "more"? I would spend the money if it was worthwhile.
My son has one of those Dayton DTA-100a's and it sounds pretty darn good, and it is clearly better than the amp that I use presently.
AFAIC, yes the Virtue is worth every penny of the difference. My son has a One.2 driving a pair of CHR70 and the combination is much more musical than either the Trends or Kingrex T20 that I've heard with a range of different FR drivers and enclosure designs.
I haven't actually heard the Sensation, and had a brain-fart forgetting that Bob had the One.2s available.
Considering the investment you're making in labour and other materials on the Clairtone project, I think it deserves more than the Dayton.
I'll take your word for it! And you're right about not being cheap after all the other investments of time, labour, and money.
I'll put the Virtue ONE.2 at the top of my list...unless something else proves to be more worthy.
While work progresses slowly on the mold for the globes (Because they're a lot of work, that's why!) I decided to start on the cabinets that will house the Alpair12 drivers inside of the globes.
As mentioned earlier, theses cabs will be the octagonal version of Dave's Mar-Ken 12. Yes, I am the guinea pig beta tester on these, and yes, I hope they work well, and yes, I trust Dave.
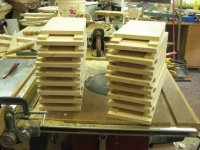
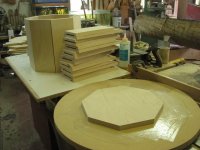
There are a lot of pieces to prepare: 16 outer sides, 16 inner sides, 32 slot spacers, 2 backs, 2 front baffles. So, cut, cut, cut, glue, glue glue, and you get all 16 of the side panels made.
As mentioned earlier, theses cabs will be the octagonal version of Dave's Mar-Ken 12. Yes, I am the guinea pig beta tester on these, and yes, I hope they work well, and yes, I trust Dave.
There are a lot of pieces to prepare: 16 outer sides, 16 inner sides, 32 slot spacers, 2 backs, 2 front baffles. So, cut, cut, cut, glue, glue glue, and you get all 16 of the side panels made.
Attachments
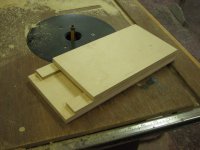
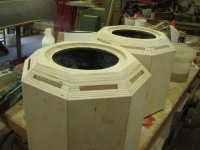
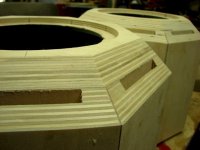
Once all of the side panels are made, I need to cut the side bevel along each side at 22.5 degrees.
My tooling isn't quite precise enough to get this done perfectly, any errors will be multiplied 8 times! But it isn't an issue as these pieces will be glued together with epoxy with added filler for gap filling, and they will be painted black and stuck inside of the the globes. The end result was close not enough for a seamless precise exposed joint. If that were going to be the case I would have spent more time getting it just right.
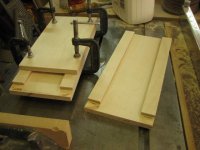
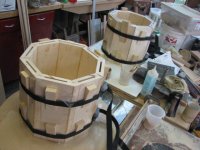
I used straps for clamping and wedges to increase the clamping pressure.
Once the epoxy had set I cleaned up the glue squeeze out and trimmed the whole thing to length.
Next up is to fit the internal brace, cut the hole for the wiring cup, and cut the holes for the front baffle for driver mounting, fit the damping lining, glue the front baffle on, and fashion the front edge bevels.
Then I get to make the globes and mount the cabinets in them. Good old boxes are SO easy!
My tooling isn't quite precise enough to get this done perfectly, any errors will be multiplied 8 times! But it isn't an issue as these pieces will be glued together with epoxy with added filler for gap filling, and they will be painted black and stuck inside of the the globes. The end result was close not enough for a seamless precise exposed joint. If that were going to be the case I would have spent more time getting it just right.
I used straps for clamping and wedges to increase the clamping pressure.
Once the epoxy had set I cleaned up the glue squeeze out and trimmed the whole thing to length.
Next up is to fit the internal brace, cut the hole for the wiring cup, and cut the holes for the front baffle for driver mounting, fit the damping lining, glue the front baffle on, and fashion the front edge bevels.
Then I get to make the globes and mount the cabinets in them. Good old boxes are SO easy!
Attachments
Thanks Tade. This work does have some of its own gratification and I'm really looking forward to making some progress on this particular project.
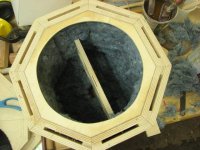
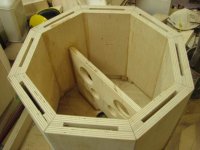
Here's an update.
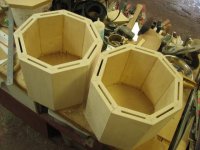
I have the holey brace cut and installed, as well as the Ultratouch denim wool lining. The hole for the wiring cup is cut. The front baffle is made and glued one. I cut the bevels last night and will be refining the surface today, so I'll get some photos of that for everyone.
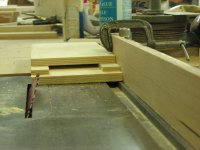
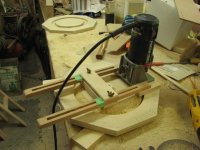
One small change to the plans that I made is a plywood plate that fits inside of the cabinet and behind the front baffle. It is small, only big enough to fill the corner where the front baffle joints the sides. Its purpose is to provide more rigidity at this joint. I am thinking that the front baffle is 18mm thick for stiffness, but joins the sides for only the wide of the panel, and half of the front baffle is removed by the front bevel. You can see it in the photos.
You can also see the circle cutter rig for my router for cutting the rebate and hole for the front baffle
Here's an update.
I have the holey brace cut and installed, as well as the Ultratouch denim wool lining. The hole for the wiring cup is cut. The front baffle is made and glued one. I cut the bevels last night and will be refining the surface today, so I'll get some photos of that for everyone.
One small change to the plans that I made is a plywood plate that fits inside of the cabinet and behind the front baffle. It is small, only big enough to fill the corner where the front baffle joints the sides. Its purpose is to provide more rigidity at this joint. I am thinking that the front baffle is 18mm thick for stiffness, but joins the sides for only the wide of the panel, and half of the front baffle is removed by the front bevel. You can see it in the photos.
You can also see the circle cutter rig for my router for cutting the rebate and hole for the front baffle
Attachments
- Status
- This old topic is closed. If you want to reopen this topic, contact a moderator using the "Report Post" button.
- Home
- Loudspeakers
- Full Range
- The begginings of my Clairtone globes