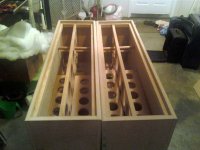
Alright I added more bracing. I bought a broom handle and cut down 2 pieces per cabinet for side/side bracing. They were VERY tight and basically just pressure fit themselves into place. Of course I glued them and now they're sitting in the garage drying. Resonance is GREATLY reduced at the top of the cabinet. I would highly recommend anyone building these cabinets to do this. It cost 6 bucks for the rod, took about 2 minutes to cut the pieces to size then another 5 minutes to get them glued into place. Cheap, easy and works; doesn't get better than that!
The pictures make the dowels look crooked but its just the picture, they're perfectly straight")
Scott
The pictures make the dowels look crooked but its just the picture, they're perfectly straight
Scott
Attachments
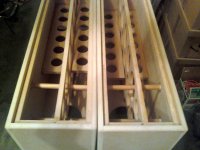
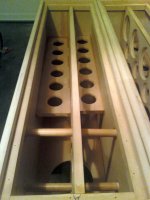
FINALLY finished with construction!! LOL! I'm now onto sanding/priming/painting. Planning on sealing the "endgrain" of the MDF with drywall spackle then sanding smooth. Any other better ideas? I've heard glue/water in a 50/50 mix but is that better/easier/worse than spackle?
Scott
Scott
FINALLY finished with construction!! LOL! I'm now onto sanding/priming/painting. Planning on sealing the "endgrain" of the MDF with drywall spackle then sanding smooth. Any other better ideas? I've heard glue/water in a 50/50 mix but is that better/easier/worse than spackle?
Scott
I personally avoid MDF whenever possible, and even then would finish with either veneer or plastic laminate - but believe this subject has been discussed frequently.
I guess the products to use would depend on the quality of finish/texture you'd like to attain, but likely the advice would be to not use any water based / high content sealers or pore fillers on the first coat- you'll have enough sanding as it is during the painting process. It's no fun trying to flatten out that mushrooming that will happen around screw holes and exposed edge"grain" on MDF when exposed to even heavy atmospheric humidity, much less direct application of water based products. .
There are special primers and sealers for working with MDF, and IINM, a lot of builders here tend towards auto finishing products - but no matter which, a lot of sanding between several coats of primer / sealer / color / top coats is likely to be involved.
Yeah yeah yeah I know, MDF = BAD with a lot of people but being my very first build AND my very first foray in FR Drivers I didn't want to spend too much money into wood if I wasn't going to like the outcome to begin with. I'd never heard a FR driver before buying these speakers and building the cabinets. Maybe the next build I'll try and do BB ... But again, that's been hashed out before
Ok so no water based fillers, got it. I'm going to roll on the finish with a foam roller. With such large cabinets I didn't want to spray the whole things with rattle can paint (I don't have a sprayer or booth) and thought a nice texture with an eggshell finish would look nice. I'm expecting lots of sanding so that's not an issue (just bought LOTS of sandpaper!!). Ok well I guess I'll just get it all to 220 and start up with the priming. Fun fun!
Thank you!
Scott
I get better results using oil based finishes, but Latex can work OK, too. Use one coat of primer and let it dry well! Don't "lay it on"!
Practice on scrap to get your technique worked out. Multiple thin coats will usually be more successful than fewer thick coats.
Sand and continue your finish.
Proper prep, application, and dust control, is essential.
Practice on scrap to get your technique worked out. Multiple thin coats will usually be more successful than fewer thick coats.
Sand and continue your finish.
Proper prep, application, and dust control, is essential.
I get better results using oil based finishes, but Latex can work OK, too. Use one coat of primer and let it dry well! Don't "lay it on"!
Practice on scrap to get your technique worked out. Multiple thin coats will usually be more successful than fewer thick coats.
Sand and continue your finish.
Proper prep, application, and dust control, is essential.
Ok so an oil based paint with the MDF? Oil based primer too? I've usually only used latex paint so not really used to oil based.
Thank you very much for the tips, I really appreciate it! This has really been a journey but I've learned a lot so far!!
Latex will work well, but oil based gives a deeper quality to the finish, and it feels harder too. Latex always has a kind of softer, plastic, feel, in comparison.
Dust control is a bigger issue with oil based finishes as the paint has a longer open time.
Ahh got ya. Well I want a harder finish. Maybe latex for the coats then finish with an oil based spray or do they even make them or is that a dumb idea? A hard finish is ideal for sure.
Have you considered a "flay alkyd" wall paint? It's an oil-based wall paint that has a very fine rough texture after it dries (it's a wall paint after all). That fine roughness provides a bit of porous nature to the finish and allows varnish to get some "traction" and penetration into the coating. Furthermore, there is some compatibility between the oil-based wall paint and oil-based varnish (or urethane / polyurethane) You can put a couple of coats of oil-based paints on the cabinets (I think at least two coats) then start to build on coats of varnish sanding VERY LIGHTLY between the first couple of coats of varnish. After about 3 coats of varnish, a good gloss should appear.
If you want a good glossy finish, apply 4 - 6 coats high gloss polyurethane, sand lightly with very fine sandpaper (even 320 is OK) between coats. After the last coat go over the surface with 0000 steel wool, then rub with pumice and buff with "rotten stone" or automotive finish compound. Always remove the dust with a tack cloth (cheesecloth dampened with varnish). The result will be a hard glossy finish that can be enhanced and protected with wax or fine furniture polish.
If you want a good glossy finish, apply 4 - 6 coats high gloss polyurethane, sand lightly with very fine sandpaper (even 320 is OK) between coats. After the last coat go over the surface with 0000 steel wool, then rub with pumice and buff with "rotten stone" or automotive finish compound. Always remove the dust with a tack cloth (cheesecloth dampened with varnish). The result will be a hard glossy finish that can be enhanced and protected with wax or fine furniture polish.
I've never heard of that wall paint. Seems like quite the process and maybe more than I'd want to do for a first try attempt on such large cabinets. Maybe if I build surrounds though?? I think it would look good from what you describe and a hard finish would be nice ... Thanks for the RECO!!
Its not that hard to do.
Any enamel will work under varnish, you can even use floor urethanes, as long as you don't put water based over oil based. The other way round is OK, though.
Try this, though. Prime to seal and build a base. Sand thoroughly to 220. Build your colour coats, sand to 220, apply a clear coat, sand to 360, rub out with 0000 steel wool, then apply a couple coats of Tung oil, one per day. You'll get the colour, and the Tung oil will give a deep luster...and no dust problems.!
Its not that hard to do.
Any enamel will work under varnish, you can even use floor urethanes, as long as you don't put water based over oil based. The other way round is OK, though.
Try this, though. Prime to seal and build a base. Sand thoroughly to 220. Build your colour coats, sand to 220, apply a clear coat, sand to 360, rub out with 0000 steel wool, then apply a couple coats of Tung oil, one per day. You'll get the colour, and the Tung oil will give a deep luster...and no dust problems.!
Hmm, the wife likes that idea. So do you rub out with 0000 steel whoole in between each coat of the Tung oil? It sounds like it'd really bring out that blue/gray I'm going for and make it hard and long lasting too. Is Teak Oil the same as Tung oil?
No, its not the same, but should work well enough and the technique would be the same. I've tried Watco's Teak Oil and it is much thicker than tung oil. Try some experiments on scrap.
Tung oil is widely available in most paint stores. Yes, apply it with 0000 steel wool, it burnishes as it applies. Makes sure that you buff the fresh oil application with a clean cloth (like cotton). Too much oil left sitting will just dry and get gummy. You can rub it out with fresh oil, but that is harder than buffing. You don't need to go crazy buffing, just rub it as much as you would rub your dishes dry after washing them.
Keep your hands clean by wearing gloves while you work. Latex gloves are great for this. Even if you're working clean, its amazing how much will still get on your fingers. Tung oil is non toxic as it is made from Tung nuts, but still...
hi,
OK for the wood finishing but, how does it sound?
what kind of music is it good for : rock, classical, piano, voices???
let us know , please
if it's really good, i'll want to buy a pair ;-)
dondiba
Dondiba,
Yeah the thread has gone all over the place but in the first couple pages I do give my impressions of the speakers. To sum up, I replaced a very nice set of Strata Mini's (2k beautiful multi-way speakers) with these. Do the Supers do EVERYTHING PERFECTLY, no of course not. For me the biggest trade offs are pure SPL for movies and hard hitting authoritative bass. Do these dig pretty deep? They sure do but are they going to hit you in the gut with drum kicks? Probably not. For me, I've always loved hard hitting bass so its taken some getting used to but the bass is there and its clean. I really feel these shine from probably 100-150hz on up. Its not that they lack anything down low, its just not the bass I'm used to. But once I get past that, its smooth sailing. They are clear clear clear and image VERY well. For me, if a speaker can't image properly I can't listen to them and these speakers definitely present a very realistic image. They aren't overly bright but rather revealing and true to the recording. The 12's may not be as revealing as the 7's but for me they are just right. Vocals are not just clear but they have weight and texture ie they don't appear thin and veiled. Chesty tracks have weight to the sound without ever sounding boomy.
Apologies, I'm not all that great about describing what I hear plus I've had them disconnected for almost a month as I finish them ever so slowly! LOL! Also, I didn't have the bracing finished when I first had them hooked up and the cabinets were pretty resonant (I would HIGHLY recommend doing the bracing for this large cabinet, it really is necessary). Now the cabinets are much more solid and panel resonance has been cut down dramatically. I still feel there is more that needs to be done to make the cabinets dead but that can be added later.
I would definitely recommend these speakers and this cabinet design specifically. Coming from only listening to multi-way designs and having some very nice ones as well, I feel that the compromises that these present are worth it for the overall sound these portray. Just my 2cents though
Scott
Nice project, congrats.
Norman
Thanks Norman!
- Status
- This old topic is closed. If you want to reopen this topic, contact a moderator using the "Report Post" button.
- Home
- Loudspeakers
- Full Range
- Skeeter's SuperPensil12 Build