After a Pm exchange with BudP concerning the project, I took by his advice, and am posting it here for anyone interested to contribute (even a link to certain post in a thread) and hopefully as some kind of an information thread where people planning on EnABL'ing their drivers would find the information they're seeking.
Please bear through this long post, as I try to make things as clear as possible.
I have a pair of Audio Nirvana Super 12 stamped frame speakers that have been in my system for a bit more than a year now.
I feel that these speakers have reached their improvement limits concerning break-in, yet they still retain some shrillness and edginess in the upper frequencies (i'm guessing starting at 2.5 Khz and up, with bumps along the way), and the sound tends to "stick" to the drivers.
This issue has led me to seek other drivers for my setup, or even a different approach altogether (horns, O/B drivers with relatively high x-max and Qts, even planars...)
So, unless i can find a way to make the AN drivers sound better, they're going out anyway.
Since the EnABL treatment is by all means a cheap one, I decided to give these drivers one last chance, and hopefully along the way learn a thing or two about the process.....
I know there are lots of threads concerning Fostex drivers, and the specificity of their banana pulp paper cones (damar, conforming coat, etc..)
But many of these steps seems to be non-mandatory ones (and sometimes detrimental) for other types of drivers, while some other treatment steps are needed only on drivers with bigger diameters than available from Fostex (tacky acrylic glue to the cone's backside, etc...)
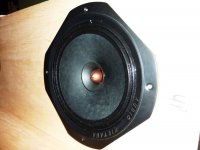
The AN Super 12 is phase-plugged, whizzer coned driver with a relatively large voice coil (1.5 inch, approx 3.8cm), so it's a different beast altogether compared to the majority of the drivers being EnABL'ed.
First off, the tentative list of materials to be used, so far i've compiled the following:
As you can see, the problem with the above list is that most of these materials are referred to by brand name, as for those living outside North America (as is my case), most of these are rather hard to come by.
I am aware of the EnABL Kit being sold, but alternative options are always a good thing to have")
I guess this is the first part of the process, getting the right materials.
Next is tools
Followed by Process, Techniques and tweaks.
This is going to be a long process, and I hope an interesting one for the forum members.
Dave and Bud, your input will be most valuable.
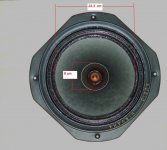
For those of you that have survived the long post, here are some pics of the driver with some measurements.
Please bear through this long post, as I try to make things as clear as possible.
I have a pair of Audio Nirvana Super 12 stamped frame speakers that have been in my system for a bit more than a year now.
I feel that these speakers have reached their improvement limits concerning break-in, yet they still retain some shrillness and edginess in the upper frequencies (i'm guessing starting at 2.5 Khz and up, with bumps along the way), and the sound tends to "stick" to the drivers.
This issue has led me to seek other drivers for my setup, or even a different approach altogether (horns, O/B drivers with relatively high x-max and Qts, even planars...)
So, unless i can find a way to make the AN drivers sound better, they're going out anyway.
Since the EnABL treatment is by all means a cheap one, I decided to give these drivers one last chance, and hopefully along the way learn a thing or two about the process.....
I know there are lots of threads concerning Fostex drivers, and the specificity of their banana pulp paper cones (damar, conforming coat, etc..)
But many of these steps seems to be non-mandatory ones (and sometimes detrimental) for other types of drivers, while some other treatment steps are needed only on drivers with bigger diameters than available from Fostex (tacky acrylic glue to the cone's backside, etc...)
The AN Super 12 is phase-plugged, whizzer coned driver with a relatively large voice coil (1.5 inch, approx 3.8cm), so it's a different beast altogether compared to the majority of the drivers being EnABL'ed.
First off, the tentative list of materials to be used, so far i've compiled the following:
- Damar
- ModgePodge (Puzzlecoat)
- Poly Scale
- Ever tacky acrylic glue
- MicroGloss
As you can see, the problem with the above list is that most of these materials are referred to by brand name, as for those living outside North America (as is my case), most of these are rather hard to come by.
I am aware of the EnABL Kit being sold, but alternative options are always a good thing to have
- For example, i've read somewhere that the Tamiya acrylic paints used for model cars is a good substitute to Polyscale as long as it's flat and not glossy, because flat paint has a higher solids content and is thus denser. If anyone can confirm this, that would be great.
- As for Damar used to draw the "trifoil pattern", it seems that the only real testing was carried by Dave of planet10 on the Fostex Fe207/Fe206 drivers and I can't figure if this will yield any result on my specific drivers which have a relatively high density/very tough paper cone.
- The puzzlecoat is also a tricky step, as some advocate laying it first, then the EnABL pattern on top, while in other cases, EnABL pattern applied directly on the cone seems to be enough. Would regular PVA wood glue be an option?
- Microgloss, are there any alternatives?
I guess this is the first part of the process, getting the right materials.
Next is tools
Followed by Process, Techniques and tweaks.
This is going to be a long process, and I hope an interesting one for the forum members.
Dave and Bud, your input will be most valuable.
For those of you that have survived the long post, here are some pics of the driver with some measurements.
Attachments
The damar was/is used on the FE12xe drivers specifically to deal with a resonance in those cones. Not applicable, without a lot of research, to any other cones.
The mod podge (PVA) acts as a stabilizing surface to put the EnABL on. I use it on almost all non-coated paper cones. I will be using it on the AN Super 8 that have been patiently waiting for treatment.
dave
The mod podge (PVA) acts as a stabilizing surface to put the EnABL on. I use it on almost all non-coated paper cones. I will be using it on the AN Super 8 that have been patiently waiting for treatment.
dave
The mod podge (PVA) acts as a stabilizing surface to put the EnABL on.
dave
Dave, I use Mod podge by the gallon for crafts and don't find it's behavior identical to "pure" PVA especially with respect to clouding after multicoats or water contact post drying. PLAID actually makes a version that never clouds even after total water immersion. I'm not a chemist so I don't know what the differences are.
hajj,
I cannot tell how happy I was to discover this new thread you started.
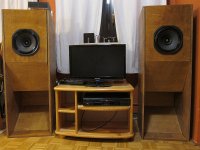
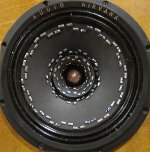
I have recently finished my back-loaded horns with AN 10" cast frame drivers (see attached photo) and am sure I need to try the EnABL process. I have previously used Planet10's enabled Fostex FE127eN and the quality of the sound with EnABL is addictive.
I have found the following links somewhat relevant to the topic you started:
Picasa Web Albums - Bud - Audio Nirvana...
http://www.diyaudio.com/forums/mult...ng-impressions-techniques-44.html#post2011241
Anything you post on your progress in EnABLing AN12" or any further relevant information/instructions will be much appreciated.
Peter
I cannot tell how happy I was to discover this new thread you started.
I have recently finished my back-loaded horns with AN 10" cast frame drivers (see attached photo) and am sure I need to try the EnABL process. I have previously used Planet10's enabled Fostex FE127eN and the quality of the sound with EnABL is addictive.
I have found the following links somewhat relevant to the topic you started:
Picasa Web Albums - Bud - Audio Nirvana...
http://www.diyaudio.com/forums/mult...ng-impressions-techniques-44.html#post2011241
Anything you post on your progress in EnABLing AN12" or any further relevant information/instructions will be much appreciated.
Peter
Attachments
Dave, I use Mod podge by the gallon for crafts and don't find it's behavior identical to "pure" PVA especially with respect to clouding after multicoats or water contact post drying
Or remains as flexible. I tried lots of things before settling on ModPodge (and a number of variations of that were tried too).
dave
Ok, so Damar seems to be off the list. Great, one less thing to worry about
What about the acrylic paint used for the pattern? and the microgloss on top?
btw, just for fun, i went and applied an EnABL pattern on the outer metal rim of one driver using transparent tape.
I'll report with results (if any) as soon as i have it mounted back.
Thanks all for your input, keep'em coming guys.
Any bit of help is needed here
Regards
Nick
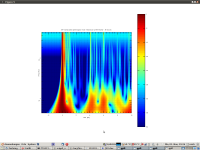
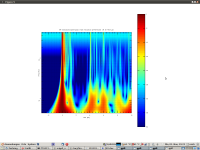
I have been discussing another problematical driver with Gary Pimm. The Emminenece Beta 8. He sent some test impulses of the driver, already EnABL'd, to midge0 for wavelet analysis. What they were looking at was what impact occurred from placing a very dense industrial felt on the inside of the metal basket legs, with appropriate cuts to clear surround and spider. I have attached pics. Take a look in the upper mid frequency areas. Gary says that this reduction in ghosting,or "hall of mirrors" reflection, is quite noticeable. The CSD plot of both of these treated driver tests looks like that of a good ribbon tweeter.
So, I have added another material, to take the place of the removed Damar varnish. I will see if I can obtain a brand name for this mylar backed felt, so that Ed can offer it with the rest of the kit. And really, Ed's kit is the way to go, just get all of the stuff from him. Besides, you need the pen holding wand to use on the tap test you are going to learn to do, to analyze where exactly these patterns need to be applied. Which brings up a whole bunch of questions about other tools you are going to need, to do these drivers properly, something they do deserve.
Bud
Attachments
Last edited:
I have sent Ed a PM concerning the Kit
As for the felt application; if i understood it correctly, it's a way or deadening the reflections occuring from the basket legs, right?
If so, my guess is it would yield interesting results for the Stamped steel basket AN super12 i have on two fronts.
First, any reduction in ringing of these legs is a major plus
Second, the basket legs are relatively quite large, rendering a reduction in reflections potentially very noticeable.
Temporary reversible EnABL using Dynamat equivalent
Curious about EnABL on my pair of Audio Nirvana 10" drivers but not yet ready to take the plunge with full EnABL (I don't have the Kit yet), I thought I would give a try to a reversible temporary EnABL treatment. I cut up strips of damping material of Dynamat type and arranged them into blocks according using Bud Purvine's patent as a guideline. Naturally, I first checked if the material can be taken off of the paper cone without any damage. I also applied the enable pattern on the driver casket itself to help reduce resonances.
While a temporary solution and not fully in line with the recommendations (I have not used 36 pairs of blocks in one strip), the results showed the modification has been worthwhile. The noise floor dropped a bit so instruments playing at low volume in the background can now be better differentiated.
Plus my daughter commented the speakers now looked cool...
Peter
Attachments
Well, It's been a week I've been trying to contact Ed concerning the kit, but he's not answering, I tried posting in the Enabl Kit thread, tried to PM him, to no avail, it's as if he's just ignoring my posts and PMs. It's his right, but it's also rude.
I guess I'm going to have to source everything on my own.
Won't be easy (I spend a lot of my time on an offshore oil rig), but I'll look at it as part of the fun.
I'm also looking into the mamboni process, but the lack of pictures and clear literature is making it harder than originally thought.
Well, It's gonna take longer than originally thought, but it's all part of a big system upgrade along with a pair of Hawthorne audio Augies, an active crossover and a stereo amp for the augies (thinking of a high power tripath DIY amp)...
I tried my AN Super12 in an OB and it seems I'm not going back to a closed enclosure....I'm going OB all the way.
Regards
Nick
When i look at a normal driver now, they just look so naked, incomplete
Have you shown your daughter the kermit thread? Be interesting to know which ones she likes the best
dave
Have you shown your daughter the kermit thread? Be interesting to know which ones she likes the best
dave
Dave, at five years of age, there is a natural limit to how much she cares for the looks of a speaker (or its sound for that matter )
Still, the kermit thread is inspirational for further EnABLing...
How important, in your opinion, would conformal coating be for a 10-inch fullrange driver to achieve sonic benefits?
Peter
)Still, the kermit thread is inspirational for further EnABLing...
How important, in your opinion, would conformal coating be for a 10-inch fullrange driver to achieve sonic benefits?
Peter
inclinedplane, from this site, has a couple of pairs of AN 8's that have been EnAB'd. One pair to the original layout, or version 1.0 and one pair to version 2.0. He doesn't think either pair completely cure the "shriek" value of the whizzer and my solution would be to add even more damping acrylic glue to the back side of the whizzer, just to kill the circulating waves on that device.
His comments on the differences between version 1 & 2 indicated that you REALLY want to learn how to perform the tap test analysis on your drivers and apply a version 2.0 plan to these drivers. This could become interesting, with a high energy female with 5 years of experience in household terrorizing.
Bud
There are two resonances in the 'shriek' region for my AN8 - one at 3kHz and one at 4.5 kHz.
You can significantly lower the 3 kHz resonance by stuffing some polyfiber between the whizzer
and the main cone. The 4.5 kHz resonance appears to be coming from the surround and I just
use a notch filter for it.
Then there is the 12 kHz bump in response which accentuates the 'ssss' sounds. This can be
completely cured using a foam on the dustcap.. ala geddes and his waveguides. Use open-cell
foam - it works like magic. I'm guessing this is not needed for the super drivers with phase plugs.
None of the above 'mods' do anything to the driver. They are completely reversible.
Just some solutions to improve your AN drivers along with EnAB'd.
Last edited:
- Status
- This old topic is closed. If you want to reopen this topic, contact a moderator using the "Report Post" button.
- Home
- Loudspeakers
- Full Range
- EnABL project, Audio Nirvana Super 12