If you tilt the center slightly, it should be better.
I'd suggest to toe in the left and right speakers as well.
If you have a sketchup of your whole room, post it and we may give some ideas about the surround positioning.
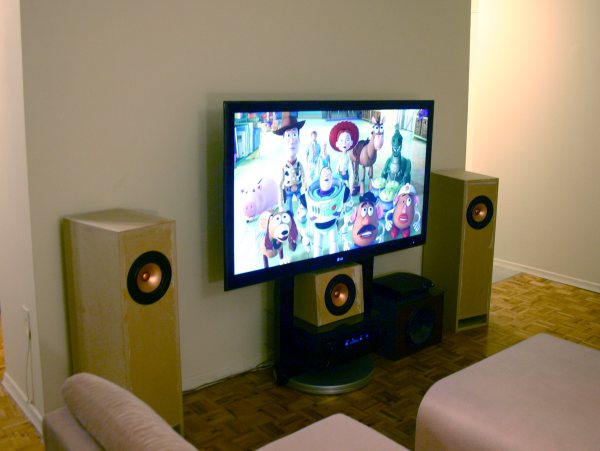
Currently, left and right are toed in 2.5° in the sketch, but I'll be adjusting them to taste. The center is also tilted upwards ~7° as per the A12 center design here. It's kind of hard to see from the picture I posted.
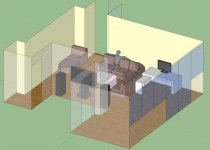
Here's the complete room, at least the important parts.
Wow, that's inspiring. Feeling the envy here!
Thanks!
")
Attachments

I guess you can wall-mount the left surround on the wall behind the sofa, to the left (somewhere above the desktop maybe), and the right one in the small "corner" to the right of the person seating. They must point toward you.
That's a rather typical positioning when the seating position is next to a wall. I think the distance will be similar to the fronts/center.
That's a rather typical positioning when the seating position is next to a wall. I think the distance will be similar to the fronts/center.
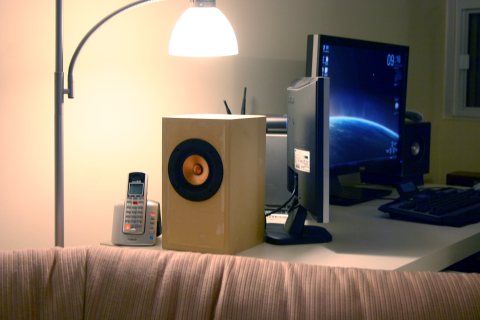
Well thanks guys. All your help has paid off. I'm still running in the drivers, tweaking, and testing, but I figured I would post some pre-finished pictures and my impressions thus far.
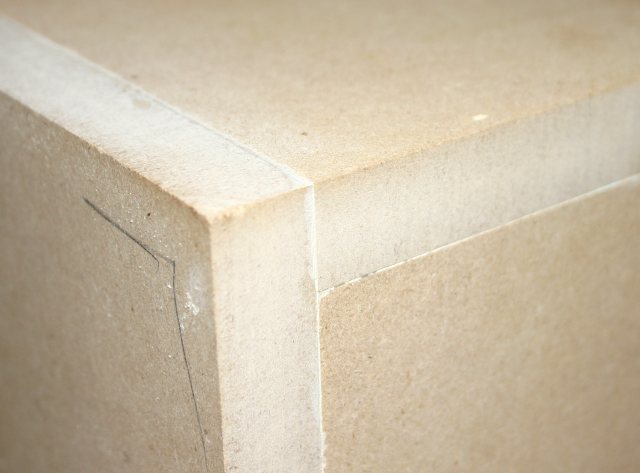
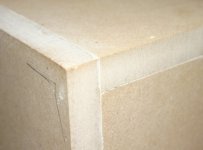
I realize the boxes themselves look horribly crude, so I posted that last picture to assure you all that my laziness is only detrimental to cleanup, not the actual construction.
On to the impressions...
To be blunt, my first listen had me looking up the Creative Sound return policy. Fortunately, the sub par performance was entirely down to my own inexperience.
For starters, I began critically listening at about the 18 hour mark of running in. This meant I had to keep the volume very low and almost all detail was lost.
Secondly, I didn't have any stuffing in the house so I was running hollow cabinets. I figured it couldn't be that bad. The sound was boomy, and plagued with unwanted echos. It was downright nasty. The following day I properly stuffed the boxes and the tone improved greatly, but it still wasn't at an acceptable level.
It's looking more and more, as time goes by, that I just didn't have enough hours on the drivers. Mids were muffled and nasally, and mid-highs were like they'd been notched out. Running in to about the 25 hour mark did a lot for restoring detail across the entire frequency range, but the sound stage was still nothing to write home about. Every noise was completely localized to the speaker cone. And there was this strange sort of invisible ceiling on the sounds. It sounded like every sound was coming from the virtual floor. I watched a plane fly across the screen and it sounds like it was coming from the on-screen ground. As I crossed the 35 hour mark, the sound stage filled out in a big way. The L/R channels merged beautifully, finally recreating a phantom center (I'm using a real center, but this was stereo testing) and the sound stage reached its full vertical extension. When I close my eyes I no longer pinpoint sounds to the speaker cones, I pinpoint them to about a 12'x14' plane in front of me. Not sure if that's good, or right, but it's what I like to hear, and that's all that matters for me.
I'm up to about the 40 hour mark now and the sound is consistently improving. I'm actually shocked how detailed they're becoming, and thankfully the center channel is softening up, shedding a slightly 'tinny' characteristic it had in the beginning.
I'm sure many of you know exactly what to expect when running in a new set of drivers, but I figured I would post for the other newcomers that may be discouraged by initially poor results. Though I've followed the run-in guide religiously, I didn't put much stock in it's effect on sound quality. Luckily I was wrong and I'm enjoying my new creations more and more each hour.
I'll probably post final impressions and finished cabinets when I can locally source some black gloss laminate.
Attachments


No insult or second guessing your skill set intended, but do you have experience working with high gloss plastic laminate?
Glosses are tricky at best, black is pretty much the most unforgiving sold "colour" of laminate to work with, and not the easiest to keep looking good - everything shows.
Having said that, it sure beats piano grade black lacquer finish on MDF
there's a reason I take the lazy route and generally finish with veneer, maybe stain, and clear lacquer
enough of that sh!t, congrats on actually getting the project completed, and forget what we say, just enjoy it
I usually don't even bother listening until the driver has at least 100 hours on it... From my 12s i'm guessing 300-500 Hrs before they are at their best.
dave
No insult or second guessing your skill set intended, but do you have experience working with high gloss plastic laminate?
Glosses are tricky at best, black is pretty much the most unforgiving sold "colour" of laminate to work with, and not the easiest to keep looking good - everything shows.
Having said that, it sure beats piano grade black lacquer finish on MDF
there's a reason I take the lazy route and generally finish with veneer, maybe stain, and clear lacquer
enough of that sh!t, congrats on actually getting the project completed, and forget what we say, just enjoy it
Thanks for the heads-up guys.
Unfortunately I don't have the time or equipment to do a piano grade lacquer finish. In terms of tricky, are you referring to handling, application, and "not scratching it" factor, or is there some inherent quality that makes it difficult to work worth (ie. something similar to hard woods woods being difficult due to fluctuations in moisture). I considered that the surfaces should be nearly perfectly flat to avoid funhouse style reflections, but other than that, I can't see it being too much trouble.
With regards to keeping it clean, that's a price I'm willing to pay. I have other furniture topped with black glass, and although I have to give it a wipe down every couple days, it's totally worth the look for me.
I can vouch for Chris's comment. Gloss black is really a bear. I did a small center channel in gloss black one time. I must have sanded and repainted it about 4 times before I got it where I wanted it. The laminate scratches easily too. If you go for it more power to you, just know that it takes work! The results are stunning if you get them right though.
Thanks for the heads-up guys.
Unfortunately I don't have the time or equipment to do a piano grade lacquer finish. In terms of tricky, are you referring to handling, application, and "not scratching it" factor, or is there some inherent quality that makes it difficult to work worth (ie. something similar to hard woods woods being difficult due to fluctuations in moisture). I considered that the surfaces should be nearly perfectly flat to avoid funhouse style reflections, but other than that, I can't see it being too much trouble.
With regards to keeping it clean, that's a price I'm willing to pay. I have other furniture topped with black glass, and although I have to give it a wipe down every couple days, it's totally worth the look for me.
keeping it clean is actually the easy part - getting a flawless application is the trick
I'm not trying to discourage you, but if you've never worked with it previously, be aware that:
Gloss black laminate will telegraph (if not amplify) any imperfection in either the substrate / carcase ( i.e. your MDF box), or in uneven pattern of the applied adhesive . This will generally be a contact cement, but of course cold press or vacuum bagging with white glue works also, however is a lot more work and requires even more time/special equipment, and doesn't eliminate the following risks.
You'll likely be rough trimming with flush bit on laminate trim router ( the bearings of which can easily score the gloss finish) While you can reduce the chances of that by applying masking tape to the bearing contact path, that will result in an even larger overhang margin that is generally taken care of by hand with a fine single-cut file while softening the edge for safe handling (exposed edges of plastic laminate can be as sharp as your Olfa box cutter). This is where the real risk of scratching the gloss finish occurs.
Buy extra material and practice on test boxes 'til you think you've got it aced, 'cause otherwise you'll need to strip the damaged laminate off and start all over.
BTDT
Personally, I'd rather spend a little extra time applying veneer - it needs to be sanded in prep for the finishing process, and I simply prefer the look of wood to plastic or paint.
Thanks for the excellent info. Exactly the kind of specific details I was looking for.
I've always used contact cement and a rubber roller for my veneer projects. The one time I tried to be adventurous with wood glue, my veneer started peeling/bubbling after a year or two. Never again.
With regards to the edges, my original plan - for a more forgiving application and now it seems for safety - was to put something like a 1/16" chamfer on all the edges. My hope is that will reduce or eliminate the non-bearing trimming scratches. Some relatives have a very similar design on their entertainment center, and the results are visually pleasing as well as functional. I realize the edges will be bare, so it would take some scrap experimentation with sealing/painting the open edges to see if the result is acceptable.
In the absolute worst case I can settle for gloss on the fronts with a dark stain/veneer on the sides and back.
Nonetheless, I thank you for the input. I'd only consider your comments discouraging if I wasn't outright asking for the pitfalls and perils associated with gloss finishing... and even then, though discouraging, they'd surely save me some time and money.
- Status
- This old topic is closed. If you want to reopen this topic, contact a moderator using the "Report Post" button.
- Home
- Loudspeakers
- Full Range
- Need Complete Home Theater EL70/CHR-70/Alpair 7