On request i can supply -- and have done -- DWG or DXF of any specific page. Do note that unless you have a 5-axis CNC, a CNC is only useful for doing the sides and the baffle rebates.
dave
Hi, I just joined this thread and the CNC part of this piqued my interest. Can you explain the above statement? I have found a way to cut virtually any miter angle on the plywood edge on my 3-axis machine if that is what you are talking about and would be happy to share.
For example, I plan on cutting all the pieces on my machine for the DecWare Corner horn:
http://www.diyaudio.com/forums/full-range/169641-decware-corner-horns-3.html
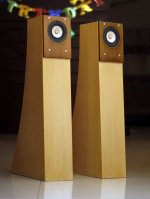
I made some stands to match the University Dean speakers I previously made on the CNC machine. They used the same 62.5 degree miter on the outer edges as the Deans themselves but this time I cut the miters on my Shopbot CNC.
Here is the link to the Dean construction but that was prior to me knowing how to cut miters on the plywood edges. University Speaker "Dean" similar to "Classic" 3D Model and Build - AudioKarma.org Home Audio Stereo Discussion Forums
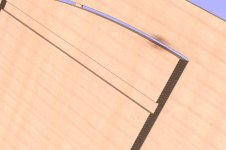
The Shopbot comes with versatile software called PartWorks. In it is a command "Create Fluting Toolpath". Flutes are cuts that start at a given height in the material and end at a lower level (think drainage grooves on a cutting board). In this case the flutes are not very long and they plunge quickly (rate determines angle). They are also spaced really close together.
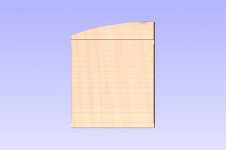
The pics show one of the sides of the speaker stand, a piece about 18 inches high.
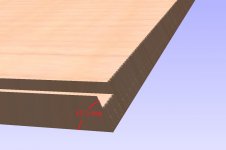
I used the same 1/4" flat endmill bit as I usually cut the parts out with. What you do is start the flutes (I made mine .15" apart) at the top of the material and have the tool go down an "incline" ---which of course is specified by the user -- till it reaches the bottom. You have to be careful with your layout to make sure you start and stop the bit at the correct place, taking into account bit diameter. At .15 spacing the "cut" has noticeable teeth but if you shift the adjacent part's fluting vectors by half that distance it fits together really nice. If you want virtually no teeth, go with .075 but of course that takes twice as long to machine. These teeth are not stair steps but lengthwise from the top of the material to the bottom. For example, one of these vectors (flutes) cutting a 45 degree angle on 1 inch thick material would be 1.414 inches long. To machine the 18 inch long miter with .15 spacing took 10 minutes.
If anyone wants the PartWorks file I will supply it or attach it here if interest.
Any miter can be cut this way; some Trig calcs are usually necessary to input the Fluting commmand.
The stands are completed and unfortunately I cleaned up too good as I can't find any scraps I tested the miters on.
Here is the link to the Dean construction but that was prior to me knowing how to cut miters on the plywood edges. University Speaker "Dean" similar to "Classic" 3D Model and Build - AudioKarma.org Home Audio Stereo Discussion Forums
The Shopbot comes with versatile software called PartWorks. In it is a command "Create Fluting Toolpath". Flutes are cuts that start at a given height in the material and end at a lower level (think drainage grooves on a cutting board). In this case the flutes are not very long and they plunge quickly (rate determines angle). They are also spaced really close together.
The pics show one of the sides of the speaker stand, a piece about 18 inches high.
I used the same 1/4" flat endmill bit as I usually cut the parts out with. What you do is start the flutes (I made mine .15" apart) at the top of the material and have the tool go down an "incline" ---which of course is specified by the user -- till it reaches the bottom. You have to be careful with your layout to make sure you start and stop the bit at the correct place, taking into account bit diameter. At .15 spacing the "cut" has noticeable teeth but if you shift the adjacent part's fluting vectors by half that distance it fits together really nice. If you want virtually no teeth, go with .075 but of course that takes twice as long to machine. These teeth are not stair steps but lengthwise from the top of the material to the bottom. For example, one of these vectors (flutes) cutting a 45 degree angle on 1 inch thick material would be 1.414 inches long. To machine the 18 inch long miter with .15 spacing took 10 minutes.
If anyone wants the PartWorks file I will supply it or attach it here if interest.
Any miter can be cut this way; some Trig calcs are usually necessary to input the Fluting commmand.
The stands are completed and unfortunately I cleaned up too good as I can't find any scraps I tested the miters on.
Attachments
Last edited:
The Shopbot comes with versatile software called PartWorks. In it is a command "Create Fluting Toolpath". Flutes are cuts that start at a given height in the material and end at a lower level (think drainage grooves on a cutting board). In this case the flutes are not very long and they plunge quickly (rate determines angle). They are also spaced really close together.
This type of machining was once very common in shops that didn't have anything more than the typical 3-axis mill. With a ball end mill, you could do some quite complex shapes.
jeff
No need to sand out the teeth, especially if you index the adjacent teeth to fit into each other. Also, if you machine these at .07 apart you can barely even see, let alone feel, any teeth.
As far as programming, you just program one flute and then repeat it for the length of the cut, takes seconds really. Well worth it in my opinion, when you can simply lift the finished piece off the machine with no extra attention to it required.
As far as programming, you just program one flute and then repeat it for the length of the cut, takes seconds really. Well worth it in my opinion, when you can simply lift the finished piece off the machine with no extra attention to it required.
I am feeling like a pain in the *** after all the hook up wire post's but after wading thru all the posts in this thread my kids want me to give them some attn, so...
What is the definitive "polyfill" ratio for MH 7.3 drivers? Specifically what are u all using
In the "v"?
Behind the driver?
Underneath the driver behind the front baffle?
I wish i had read the post and used a removable top but that was 20 minutes ago! Murphy's law i guess
I have read the latest plans but its a bit opaque to me. I would just like a bit of clarification
This is my build on the IKEA work bench/dinner table.No wife, wonder why
Now i know why the leaves come out the middle
Attachments
This might help:
Frugal or Frugel Horn Mk3 Do It Yourself high end horn loaded loudspeaker DIY FH Mk 3
I suggest you fix some netting roughly 60% the way down from top, so that as gravity brings the polyfill down it doesn't fall to the bottom.
The density level is suggested in the plans - but probably you will need a bit of experimenting with the stuffing depending on room, amp, listening position.
Also you need to line the areas around the drivers to absorb early reflections from the cone. Jim (the builder's thread referred above) has done it with jute carpet underlay.
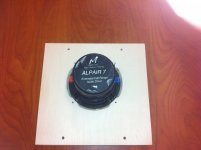
OK, read the thread and most of the original FH mkIII thread. Ordered the drivers – Alpair 7.3 seems to be flavor of the month.
Originally I was thinking BIB with 4” Fostex driver. I needed a smaller speaker for new lounge/TV room, FE168EZ BIBs a little large (have a dedicated room for my FE208EZ/T90 BIBs). So reading I came across the FH mkIII and liked the looks, build and design so…..
Looking at 15mm ply build and thinking about a 300mm round supra baffle (as I have done with the BIBs). But strangely I have seen no builds with such a supra baffle and wonder why, even the plans mention it as an option. Is there any likely benefit or is it simply unnecessary? With my meager collection of power tools I have trouble rebating the driver so was thinking the supra baffle would b a simple way of rebating - made out of 2 @ 300mm disks one speaker cutout cut to outer speaker diameter, other to inner diameter and glue together. May also have a larger cutout behind the baffle to allow for better access – bolt supra baffle to cab with foam seal strips.
Appreciate thoughts as I am deciding on my build approach.
ChrisMmm,
The supra baffle for FH Mk3 plans was added to facilitate changing drivers, as the FH Mk3 supports mutiple driver types with a slight change of stuffing amount and room placement. Builders ready to experiement can switch supra baffles and install a driver of their choice if built with this option.
The Alp 7.3 is a good choice. My build is with my own version of supra baffle. I have an unfinished pair of SB for Alp 7.3 also, but use CHP-70 or EL-70 in my frugs. Pics attached for your reference.
If you have no plans of swapping out the drivers, just go ahead and build the original design without SB.
Attachments
Perhaps the answer has presented itself.
The suprabaffle is more likely necessary when the desired driver is bigger than 4 inches.
If you do some more research/reading, you may find that flush mounting the woofer is primarily to avoid tweeter diffraction issues. With a full range driver it is more of a cosmetic choice.
With 15mm material, you're not going to be rebating the Alpair 7. It's flange is 8.8mm thick.
. . . . .
But strangely I have seen no builds with such a supra baffle and wonder why, even the plans mention it as an option. Is there any likely benefit or is it simply unnecessary? . . . .
Appreciate thoughts as I am deciding on my build approach.
With 15mm material, you're not going to be rebating the Alpair 7. It's flange is 8.8mm thick.
Good catch! IIRC Mark recommends flush mounting of drivers (and definitely chamfering on the inside)
So either a supra baffle or an extra layer of 6mm ply on the front can be an option to support the flush mount.
Last edited:
ChrisMmm:
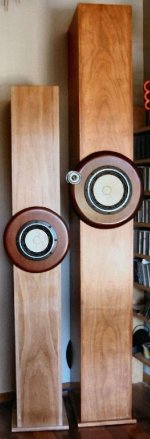
We've actually built a bespoke pair for FE126EN with a rectangular solid cherry SB & side returns:
SXSW: Barry Knittel Lounge DMX Music BlogDMX Music Blog
and at least a few folks have experimented with other small SB shapes as well.
However, I think the aesthetics of the enclosure are so elegant without that I understand why except for the need to shoehorn a larger driver, such as the TangBand W5 1611, most don't.
I will differ with fastbike1 on the lack of requirement to rebate/flush mount any of the Alpairs, and all that's required is to increase the thickness of front baffle to 18mm (what we do with the P10 flat packs) - either by laminating 3mm of ply or MDF to the face, or using thicker material if on hand. The 7.3 is not a particularly massive driver, and with scalloping of the relief of rear cut-out to leave solid "pads" at the mounting screw locations, still leaves plenty of material for mechanical fasteners.
BTW, in case I've not mentioned it before, the hex head screws that Mark ships are just great - but be very careful to guard the driver cone with a piece of wood or cardboard while installing them - one light glancing slip is all it takes to ruin your day.
Attachments
Thanks for the responses guys.
I can go for a 18mm ply build so really supra-baffle or not is down to aesthetics tho I do like the idea of having better access to adjust stuffing.
My recollection with BIBs is that being against the wall or corner that baffle step is not such an issue, am I right and will that be the case with the FH as its bit further from the wall due to curved cab?
I think, aesthetically, supra-baffles look good on a BIB but that may be because of the height whereas, and I do agree, the FH is a very simple and elegant design, maybe best kept “clean”.
I can picture my 168 BIB with the top part cut off to get a feel for the looks. Mmm, I think a supra-baffle may make the FH look top heavy.
Attachments
Last edited:
ChrisMmm,
Post # 712 from Yai:
http://www.diyaudio.com/forums/full-range/172605-frugel-horn-mk3-72.html
A removable top - perhaps the most convenient solution to adjust stuffing?
Post # 712 from Yai:
http://www.diyaudio.com/forums/full-range/172605-frugel-horn-mk3-72.html
A removable top - perhaps the most convenient solution to adjust stuffing?
ChrisMmm,
Post # 712 from Yai:
http://www.diyaudio.com/forums/full-range/172605-frugel-horn-mk3-72.html
A removable top - perhaps the most convenient solution to adjust stuffing?
indeed it is
I have finally got about 80 hours broken in with my Alpair 7 Frugal Horns. I placed them out into room more than I would the older Kef units and...I Am Really Very Impressed!!!
Driven by an old leak 20 the are loud enough for me, the have great bottom end, you can tell the bass from the organ from the kick drum! Admittedly, i really want to like them, but with all taken into account, I Am Really Very Impressed!!! Better than I expected and I expected a fair bit! I am hesitant to adjust the stuffing, love it!
Good Job!
- Home
- Loudspeakers
- Full Range
- Frugel-Horn Mk3 Builds & Build Questions