I don't know about a thread, but it was a favourite method of the late Terry Cain's for simple cabinets. Over to Terry...
[The] simplest construction method I know of. All of the edges are mitred on a huge sliding table saw... Cut to within + - 1/64" along the length, the panels are easily masking taped together and folded with glue in the corners. The entire structure is assembled this way in about 5 minutes.
...This method of folding miters comes from the bank and office industry where I first apprenticed. With about a full 1-3/8" of diagonal glueline available, when panels are mitered this way they become the strongest element of a structure. The 15 psi required for carpenter glue to set firm is easily achieved by the masking tape folding method where you lay out the pieces flat and tape the joints "flat" and then flip this assembly and run glue down the "v's" and fold the box up. This is nearly impossible to do without a saw that can miter with the "good side up". Any left tilt saw such as the newer Delta's and of course the Powermatic 66 can do this cut. A right tilt saw can do it but you have to have the fence to the left of the blade so that the mitered edge of the panels touch the upper part of the fence without slipping under.
I once saw a thread on how to tape together a speaker cabinet then fold it together without clamps? I've been searching all afternoon, wondering if anyone has seen it?
thanks
Mitre folding - this is a trick commonly found in the commercial millwork trade as well - depends on precision cutting of dimensions and machining of bevels on adjoining panels. This process will work for any number of panels such as for pentagon, hexagon, etc - its the accuracy of cutting that counts.
It's particularly handy if you're using pre-veneered sheet goods and want clean finished corners all 'round the box.
You'll generally get much better bevels with a table saw with left tilting blade or left-handed mitre fence.
It also helps to have a large work bench or cut-off table at the saw, since best results will come from taping and folding all the panels at the same time - and depending on finished size of cabinets, a spare set of hands can help too.
Once all the bevels are cut and marked for grain matching, etc., dry fit them face side up in sequence and run several bands of masking tape the length of the joints, and then perpendicularly over the group. ( I find masking tape is less damaging of delicate face veneers than plastic packing tape) Then carefully turn them over to expose the v-grooves and apply a thin bead of glue to both faces of each joint, and smooth with brush - the less squeeze the better. Then carefully fold them up to close the joints, and apply some more tape to the final corner. If your bevels were accurate, once the joints are tight, it'll be exactly square (or hexagonal, etc.)
Once the assembly is fully taped, you could apply "proper" band clamps, but don't underestimate the masking tape - today's better cabinetmaking glues have amazing strength and quick tack time - and overzealous / uneven pressure on multiple bands could destroy the integrity of the tacking glue lines - but I'd leave the glue-up overnight if no mechanical fasteners are involved.
edit: well I see that Scott beat me to the post button and while Terry's citation about assembly time is correct, unless you have a saw dedicated to this one procedure, it would take slightly longer than 5 minutes to test the bevel and fence settings to ensure the box comes out square
Last edited:
Just to add my observations, I often supplement taped joints be putting extra tape around and stretching it until it's nearly breaking. This adds some pressure without the use of clamps.
The HIFI site
The HIFI site
Just to add my observations, I often supplement taped joints be putting extra tape around and stretching it until it's nearly breaking. This adds some pressure without the use of clamps.
The HIFI site
that certainly works well with plastic packing tape - but I've found masking tape has rather a low threshold of breaking; and as well I've had the highly adhesive backing on plastic tape pull out more fibers from face veneers than can be easily sanded be remedied by sanding - but whatever works for ya
Member
Joined 2009
Paid Member
wow, this sounds great stuff, if only I understood it!
But poor sods like me, we get to look at the artwork you guys can produce whilst we trying to do something with a hand drill and circular saw. Oh, and some glue and sandpaper
Well I'm kind of in the same boat as you, trying to build as much with hand tools as possible. Thinking that there were mitres before table saws I did some research on traditional woodworking techniques and found plans for a shooting board (basically a guide for planing mitres) Shooting Boards @ Cornish Workshop, I'm in process of building the following one: http://www.whipplesargent.com/jig.pdf I hope I get away with triangular wooden rods* as upper and lower guides, I can't cut anything more precise so I hope these are close enough to 45degrees. I already got most of the wood, but can't build it yet since I'm still not sure about the dimensions of the plane I will be using. In your case you cut all your panels a little bigger with your circular saw and then plane them down to the right size/angle. Sure it will take longer but I really hope for more precision this way. *I'm sure that's not the right term, here you can buy pieces of wood that have a triangular profile and are for example 19x19x100mm - would really appreciate if someone could tell me some English expression for these. Daniel
Oh and I forgot here is a page with some pictures of the process this thread is about, unfortunately the text is in German, but there isn't much more than in this thread, except the tip that you can check if your box is rectangular by measuring the diagonals, if the angles are right they should be the same length (It's obvious but I wouldn't have thought of it).
Wolfgangs Bastelkeller, Lautsprecherboxen selber bauen - Lautsprecherboxen-Selbstbau leicht gemacht, Heimwerken mit We-Ha (scroll down a little)
Wolfgangs Bastelkeller, Lautsprecherboxen selber bauen - Lautsprecherboxen-Selbstbau leicht gemacht, Heimwerken mit We-Ha (scroll down a little)
Well I'm kind of in the same boat as you, trying to build as much with hand tools as possible. Thinking that there were mitres before table saws I did some research on traditional woodworking techniques and found plans for a shooting board (basically a guide for planing mitres)
Having the luxury of a few power tools, but the curse of a lack of skill in using them, I'd say I get more utility from my miter saw than from my table saw. Anything I could do with the table saw, I can do with a hand held circular saw and a guide. It usually turns out to be a better cut, too. For most of what I build for small BLH (100mm to 150mm type stuff) the ten inch power miter saw really can't be beat for making fast, accurate, square cuts.
I can't speak for Berlin, but in the United States I can find a working used saw on Craigslist for about fifty US dollars.
I built my 6 ft. BIBs with plain masking tape as described by Terry Cain. And given my limited skills they came out quite decently without any rattling.
I would never try to cut 6 ft. long 3/4" miters on my table saw. Of course I do not have an industrial table saw with a +100lbs cast iron top. And Terry is quite specific on the type of saw he used/recommends. Instead I used a Festool handheld circular saw with edge guide. Keep the pressure constant and steady with no stopping. It was not easy and I tripped my circuit breaker numerous times in the process. I did however get clean razor sharp, burn-free edges. Wear gloves while cutting.
Also, I would never attempt to clamp the taped edges. Try it and you will find out why.
If you are uneasy about cutting the miters, have them cut professionally. The assembly is straight forward. Do a dry run without glue to see how the edges line up and ascertain that the miter joint is solid. If I recall, I used a Kreg pocked joint with glue to fasten one side of the inner board before folding the panels around it. Use lots of glue. And make sure you have an assistant who can help you flip the panels over once they are taped.
Thinking that there were mitres before table saws I did some research on traditional woodworking techniques and found plans for a shooting board (basically a guide for planing mitres)
Daniel
I've used shooting boards for some time with great success. There are other ways but the precision is hard to beat.
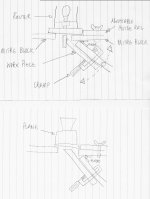
here are some shots of the ones I use. The adjustable version is for the router as it can cut some pretty cunning angles, but the fixed version is just a variation on the trad shooting block.
www.vitalstates.org/diy/misc/mitre-blocks.jpg
www.vitalstates.org/diy/misc/fixed-mitre.jpg
www.vitalstates.org/diy/misc/fixed-mitre1.jpg
www.vitalstates.org/diy/misc/swing-mitre.jpg
www.vitalstates.org/diy/misc/swing-mitre1.jpg
www.vitalstates.org/diy/misc/swing-mitre2.jpg
www.vitalstates.org/diy/misc/swing-mitre3.jpg
I had a cutaway drawing of the swing version which I havn't been able to lay my hands on. If anybody is interested just email and I'll make a concerted effort to find it.
Ed
I've done a couple of "boxes" with taped mitred joints and with a semi reasonable table saw it's quite feasible.
Details - FE 167e Fostex BR and another
Rythmik Sub
Cheers - Phil
An externally hosted image should be here but it was not working when we last tested it.
Details - FE 167e Fostex BR and another
Rythmik Sub
Cheers - Phil
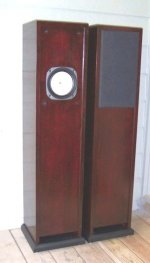
1. When I started building speakers, I had nothing but a saber saw, a corded drill and a plane. With these tools, I built the attached. The techniques used are HERE.
A circular saw will allow dead straight cuts. The simplest guide is the manufactured edge of a piece of MDF/plywood. When making identical panels, cut one to final dimensions, then cut the other(s) slightly large and plane it to match the first one. A table saw allows exact replicas in width. With panels longer than ~24", you will need an outrun table/support.
Cutting to length is a major problem. With panels >12", a miter/chop saw is the best bet. Next best is a circular saw and an accurate guide. A table saw can be used, but requires a crosscut slide that runs in both miter guage slots.
In short, anything that can be done with power tools can be done with hand tools. It just takes more time. A lot more time.
Bob
Attachments
@vitalstates Do I see this right? In your design you tilt the board to be mitred while in the design I linked to earlier you tilt the plane? Do you think keeping the plane straight makes things easier?
It's more about me being stubborn than anything else.
I can't speak for Berlin, but in the United States I can find a working used saw on Craigslist for about fifty US dollars.
It's more about me being stubborn than anything else.
I just realized what the heck is going on here. How does the wood not split when you fold those suckers over???
FWIW, with the cut parts finished side out, I tape the length of the mitre cut first, then across the joints before carefully folding over. It certainly helps if you have a big work surface, and perhaps a helping pair of hands for larger enclosures.
but to be honest, I don't use this method all that much, as I generally post veneering the boxes, it's just as easy to use butt joints
- Status
- This old topic is closed. If you want to reopen this topic, contact a moderator using the "Report Post" button.
- Home
- Loudspeakers
- Full Range
- cabinet build tips