Hi There
I'm relatively stupid and I'm getting really confused about the Fonken Floorstander MK2.
I'm using Dave's excellent plans and I'm going to pick the timber up and get it cut at good ol' B&Q on Friday. Plan is to build them over the weekend while my girlfriend is at silverstone.
I'm writing out the panel sizes but I've noticed the plans are drawn using 15mm material but I can only get my hands on 18mm. I'm BOUND to make a mistake (being relatively stupid)
Which parts do I need to increase in size? Will the back wall (the pipe like piece) being 3mm larger affect the sound?
Does anyone have a cutting list for 18mm or have it drawn using 18mm material?
I'm not being lazy (I've drawn this out a dozen times already) I just have terrible spatial awareness and want to get it right
Cheers
Chris
I've built enough of Dave's designs to note the following:
- try to maintain the net internal CSA and port lengths, etc. that means the width and depth will increase by a total of 6mm each -( i.e. to 195mm and 161mm respectively);
- many of the MLTL or resistively ported enclosures have proven in real world use to be quite tolerant of minor variations of dimensions (I've made more than a few cutting/assembly errors over the years, and only a few have resulted in unmitigated failures to launch);
- this particular enclosure has a lower void chamber intended for ballast that can be reduced to retain overall enclosure and driver height, even when filled this box can be tippy, so an enlarged base plate (not shown in sketch or photo) wouldn't hurt;
- the final cutting plan will depend on how you want to overlay the sides / front/ back - personally on the designs with slot ports, I find it makes for quicker assembly and easier finishing to overlay the sides, but that does mean the sides will be a different width than the internal driver brace, so careful cutting and dry fitting will be necessary to ensure tight fit;
- simple butt joints are more than adequate for this one (use biscuits if you like, but I tend to just use air nailer) - dadoes, splines, glue mitre joinery will only complicate the assembly and would of course completely change parts dimensions;
- I'd highly recommend running the driver brace longer than shown on Dave's drawing, and interlocking it with the lateral panel that forms the slot port;
- plan ahead as to type and location of input terminals/wiring/damping materials, this is a tall skinny box parts of which are virtually impossible to access after assembly;
- see my hasty dimensioned sketch attached (as noted above, some part dimensions would change depending on how you overlay panels, so a detailed cut plan could be pointless)
Attachments

Plan is to build them over the weekend while my girlfriend is at silverstone.
You are staying at home and the GF is going to Silverstone? Were you a bad boy?
dave
- see my hasty dimensioned sketch attached (as noted above, some part dimensions would change depending on how you overlay panels, so a detailed cut plan could be pointless)
Chris has pretty much covered it. When rounding the dimensions, round up.
The only change necessary is that due to a 3mm increase in the depth of the back panel, the length of the length of the piece that defines the port slot needs to be shortened by 3mm to 252mm.
It also is possible to arrange the vent as show in the attachment for a bit more floor loading.
dave
Attachments
Great! I think I might prefer the port at the front actually... Hmm options!
Look forward to silverstone all year; as much as I love F1 I like the house to myself even more. I can sneak all kinds of stuff into the house when she's not here. Doubt she'll even notice these little floorstanders")
cheers for the help!
Look forward to silverstone all year; as much as I love F1 I like the house to myself even more. I can sneak all kinds of stuff into the house when she's not here. Doubt she'll even notice these little floorstanders
cheers for the help!
which driver are you planning on using? I built a pair of these with the CSS EL-70's and they sound GREAT - lots of bass.
I have not had the gumption to yank them out of duty and finish the cabinets...
Just beware of the depth of the driver cutout on the brace as the plans are geared towards the FE127E wich is NLA...
I have not had the gumption to yank them out of duty and finish the cabinets...
Just beware of the depth of the driver cutout on the brace as the plans are geared towards the FE127E wich is NLA...
which driver are you planning on using? I built a pair of these with the CSS EL-70's and they sound GREAT - lots of bass.
I have not had the gumption to yank them out of duty and finish the cabinets...
Just beware of the depth of the driver cutout on the brace as the plans are geared towards the FE127E wich is NLA...
yes, you definitely want to dry fit the brace to magnet (with driver screwed in place, including whatever gasket came with or you're subbing) before buttoning up the box
the FE127E wich is NLA...
I still have them... althou in tarted up guise. (tarted EL70s too)
dave
Going to use a stock fe127e, fit everything and then modify the driver later. So general concensus is to build them from the baffle backwards I guess?
Going to get the timber cut after work tonight. Plan is to use 18mm birch ply (difficult to get 15mm over here) and to finish in some kind of veneer. I like cocobolo but it's rather expensive so don't know yet!
Going to get the timber cut after work tonight. Plan is to use 18mm birch ply (difficult to get 15mm over here) and to finish in some kind of veneer. I like cocobolo but it's rather expensive so don't know yet!
Going to use a stock fe127e, fit everything and then modify the driver later. So general concensus is to build them from the baffle backwards I guess?
Pretty much - I'd suggest the following:
1) first decide the following, as they will affect the cut dimensions and ease of fitting the driver brace, which is the fiddliest part of this particular design:
- whether the port slot to be on front or back (I've done both and personally I prefer the aesthetics of rear slot on this design)
- decide whether you'll overlay or inset the front baffle and rear panel to the side panels
If both front and back are overlaid, the sides and driver brace can be cut the same width, but you'll need some small blocks to fill the gap at the slot port (easy enough to hide with post assembly veneering, less so with natural finish or paint on raw material)
2) After deciding above, cutting parts to rough size and cutting driver opening, install driver including either the gasket supplied or of your own choosing. The degree of compression of gasket can affect the contact with the driver brace.
Don't use manufacturer's drawing to determine rear mounting depth behind baffle - I use a sliding T-square to gauge the distance.
Laying the baffle with installed driver face down on protected work surface, set the body of the square on the magnet, and slide the rule 'til it rests on the baffle. Then transfer that measure to the brace panel and cut inside the pencil mark - I use a band saw which can give a very clean and straight line, but some "correction" may be required. Use a sanding block to adjust to the line and test dry fit. If anything, err on a slightly loose fit, and add some duct seal, blu-tak or closed cell foam weather strip tape to the brace. If the fit is too tight, there's the risk of bending the rather thin stamped flange on the FE drivers on the final install, and at the very least losing the integrity of the front mounting gasket.
This is actually much easier than it sounds - just take your time and make small adjustments. If you do a full length holey driver/cabinet brace interlocking with the port slot panel, this can be the most time consuming part of the cabinet assembly. Post veneering and finishing will take more time.
should look gorgeous - post some pictures when you're doneGoing to get the timber cut after work tonight. Plan is to use 18mm birch ply (difficult to get 15mm over here) and to finish in some kind of veneer. I like cocobolo but it's rather expensive so don't know yet!
PS 1 final note - we saw a minor variation in production dimensions of FE127E during the past few years, (increase of net mounting depth), so be sure that you're fitting to the actual pair that you'll be installing. Adding a minor amount of fill to a brace that's too deep is easy, cutting down a brace once it's in the box is another story (and yes, we've been there too!)
cheers
Last edited:
If the fit is too tight, there's the risk of bending the rather thin stamped flange on the FE drivers on the final install
Even without bending the frame, excessive stress on the basket can affect sound. Screws/bolts should be just tight enuff to hold a washer (real or imaginary) from spinning. We haven't gone as far yet as getting a torque scredriver, but some people do. They should be tightened in the same manner as you would the lug-nuts on a wheel.
dave
Well I went to my local b&q and got the timber and have cut it to size. The front and back panels will overlay the sides.
I've had the drivers burning in for some time now and my grotty valve amp should arrive Friday.
I've done the cuts so the brace interlocks with the central port? piece.
I'll post pictures of my build when I start.
Thanks for all your help so far (and the awesome design of course)
I've had the drivers burning in for some time now and my grotty valve amp should arrive Friday.
I've done the cuts so the brace interlocks with the central port? piece.
I'll post pictures of my build when I start.
Thanks for all your help so far (and the awesome design of course)
They don't even have to be circles. They do not have to be identical, but they should be very close in terms of ratio of holes to solid.
They also act to make the side to side standing wave structure more chaotic and that is dependent on hole placement, so approximately the same is good. Do maintain a solid bit from directly behind the driver to the back of the box.
dave
They also act to make the side to side standing wave structure more chaotic and that is dependent on hole placement, so approximately the same is good. Do maintain a solid bit from directly behind the driver to the back of the box.
dave
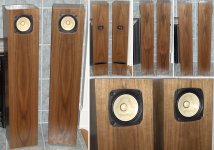
Finally finished the speakers. Been quite hard work as I don't have a workshop. They are easy enough to build with a jigsaw, router and a garden table.
I haven't veneered them yet but will be ordering the cocobolo at the end of the month.
They sound pretty good. I've got them hooked up to my yaqin mc-100b which is brand new with the cheapo chinese tubes. Everything needs burning in. The source is a asus xonar essence st in a rather noisy pc.
I also run this system into a set of 2 way standmounts with scanspeak drivers. The cabinets are rather badly designed for these 2 ways. So here's a comparison:
+points of the fonkens - sound stage is far far superior. Far superior. This is good because this is the part I most value in a hi-fi. Mid range is perfect. Yes perfect.
- points of the fonkens compared to my 2-ways - treble is less detailed and there is zero bass. Why would there be any bass though? It's a small enclosure with a small driver. I will probably build a helper woofer but I hate faffing with crossovers so maybe not.
I listened to "bonny James Campbell" the June tabor version. Her voice sounds excellent but the piano in her version is a little overpowered and distorted.
I listen to a lot of English/Irish folk and I think these are well suited. I tried some Bellowhead an the speakers didn't seem to keep up.
I reckon once everything is burnt in I'll reevaluate and then enable them to see the difference.
Dave/chrisb - thanks for your help!
Chris
- Status
- This old topic is closed. If you want to reopen this topic, contact a moderator using the "Report Post" button.
- Home
- Loudspeakers
- Full Range
- Fonken Floorstander Dimension Problem