Here is my over-simplified newbie take on how to design a horn, specifically, a BVR (big vent reflex), which is basically a bass reflex with a large horn-shaped vent.
To design a horn, you have to juggle lots of variables, and balance many trade-offs. For a beginner like myself, it's very handy to have a tool that lets you rapidly prototype any number of (bad) designs in search of a good one. For me, AJ-Horn fills that need really well. It doesn't model as many factors as MJK or HornResp, and thus it's very quick.
AJ-Horn works with "ideal geometry," e.g. the mathematical abstraction of an exponential contour, as opposed to the real exact physical contour that you input into MJK (section by section). Likewise, AJ-Horn lets you choose "corner placement" whereas MJK lets you specify exact distance to the walls (more accurate results, takes longer to compute though).
AJ-Horn fills a definite niche (rapid prototyping), and my plan is to design in AJ-Horn, then to check the design in MJK and HornResp, then build and keep iterating until I have a great-sounding speaker.
Before showing you AJ-Horn, there's one quick question to get out of the way, which is always confounding to my fellow newbs: what is a horn?
Gurus, please jump in!
What is a horn?
What is a horn? Over-simplified: a horn is a throat, mouth, length, contour (e.g. exponential) and cutoff frequency. If you know four, you can derive the fifth.
But there are no starting points for any of these values -- each has an infinite set of possible values. A 100hz horn could be 5 feet long, or 5 miles long. The mouth (or throat) could be 5 square feet, or 25 square feet.
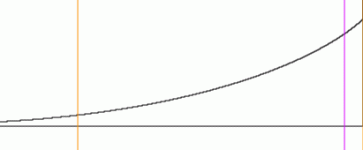
The picture below should show why. For a given contour/cutoff, you have a continuum of choices for the throat, mouth and length. The designer has to choose the values, staying within certain practical minimum / maximum values. A horn 5 miles long would have too much delay (obviously), but a horn 5 millimeters long won't have enough gain. So you keep iterating until you get something that meets your goals, and you pay whatever sonic penalties for any compromises made, and if you're successful, you can live with the result for a while
There are classic formulas and rules of thumb for sizing the throat, mouth, length etc. But in this thread, we're starting from the opposite end -- we'll input the values and then note the results. Ultimately, it's good (and very satisfying) to crunch the numbers and see why it all adds up to a working design.
There's no shortcut to horn bliss. You're "tuning" the design like you'd tune a guitar. If you don't use the correct inputs, you'll get bad outputs and bad sound. The best way, obviously, is to take advantage of simulation as much as possible. As you'll see, it's not too hard.
Attachments
AJ-Horn Overview
Here are the steps:
1. Input the driver's parameters (Driver tab).
2. Input the horn's initial parameters (Horn tab).
3. Click "Start" button (lower right)
4. Iterate again and again!
5. Design your box
6. Build your box
7. Enjoy
Step 1: Driver Parameters
In the Data Input dialog, click on Driver tab and enter the driver's params. (No pic here -- see the pictures in the subsequent posts below.)
Last edited:
Steps 2 and 3: Horn Inputs
Step 2: Now click on the Horn tab. See the attached picture.
There are five sections to this tab. Going from left to right, top to bottom:
(a) horn type, contour, placement (top left):
Choose Rearloaded, Hyperbolic, Floor + wall (or if you like, Corner). Leave Distance at 1 meter (distance of the listener or imaginary microphone).
(b) Rear chamber (middle top):
Ignore and leave everything at zero (it only applies to front-loaded horns).
(c) Absorber chamber (upper right):
Ignore and leave everything at zero (it only applies to front-loaded horns).
(d) Horn parameters (bottom)
* Leave "dl" at zero. (When the mouth is not in the same vertical plane as the cone, this value contains the offset in meters. This would be used for a rear-firing design, but we're doing front-firing).
* Set "h" to the height of the mouth. (AJ-Horn assumes you've stuffed your horn into a rectangular box, so your mouth has height and width). Try 100 to start.
* Set "b" to the width of the mouth, as viewed from the front of the box (or the depth of the box, when viewed from the side). Try 20 to start.
* Set "l" to the horn's length (axial length measured through the centerline of the folded horn). Try 1 meter to start.
* Set "Drv.pos." to zero. (It's for front-horns.)
* "At" is area of the throat. Set it initially to half the area of the cone (Sd, which you entered on the Drivers tab). Try 40 cm to start.
* "Vfc" is volume of the front chamber (a.k.a. the back chamber, paradoxically). Try 40 cm to start. (This chamber is in
"front" of the horn throat; things are a bit reversed in a "backwards-loaded horn".) In a BLH proper, the chamber is small and the horn length is long, but in a BVR, the chamber is huge and the horn length is short. We'll be doing a BVR but you could do BLH.
* Leave B1 and B2 at zero. (B1 is for stuffing the first half of the horn, and B2 is for stuffing the second half, but we're not doing that yet, if ever.)
Step 3: Click Start
Click the "Start" button in the lower right of the Data Input dialog. You will now see lots of pretty graphs, including an
SPL (frequency response) and Zel (impedance plot). Other graphs are minimized at the bottom of the window.
Yay, you're halfway there.
Attachments
Last edited:
Step 4: Iterate
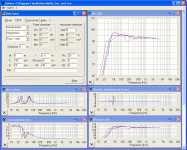
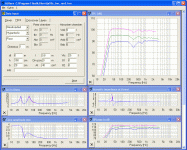
Now comes the interesting part. Try iterating various parameters and note the results in the response. At this point, all you care about is the SPL (frequency response) and the Zel in Ohms (impedance plot). You want the impedance plot to get the characteristic "double hump" of a bass reflex (see the picture). In terms of frequency response, obviously you want bass extension and a flat response. (Don't worry about other things for the time being.)
(a) Throat
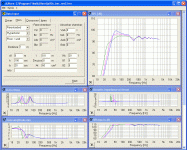
The picture on the previous post shows changes in the throat: 20cm (green), 40cm (pink), 60cm (blue). Let's keep 40cm (one-half of cone area, Sd, that is entered into the Driver tab).
(b) Chamber
The first picture below (chamber.gif) shows changes in Vfc, the chamber: 20 liters (black), 25 liters (green), 30 liters (pink). Let's keep 25 liters.
(c) Mouth
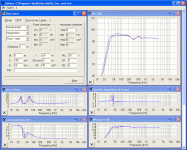
The second picture below (mouth.gif) shows changes in the mouth area. I varied it by changing "b", the mouth width but could have changed "h" the mouth height, or both. It doesn't matter because AJ-Horn simply multiplies h*b and works with the area, it seems to me.
Values for b are: 5cm (blue), 20cm (green), 60cm (pink). Let's keep 20cm.
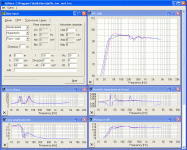
(d) Length
The third picture below (length.gif) shows changes in "l", the horn length. Values are 0.6m (black), 0.8m (blue), 1.4m (red). Let's keep 0.8m.
(e) Room placement
You get substantially more bass (boundary re-inforcement) when you push your speakers against a wall, and even more if you put them in a corner. The last picture below (placement.gif) shows the speaker away from walls (blue), near a wall (green), and in a corner (pink).
In other words, the speaker is radiating into 2pi, 4pi and 8pi respectively. Note how the 300Hz dip starts to flatten out in the corner.
Attachments
Step 5: Design your box
Now you will sketch your box on paper. You need to draw a rectangular box, into which you'll fit the horn contour, and decide where the driver will go, etc.
To get the numbers for the horn contour, click Extras > List contour. What pops out is 51 lines, four columns per line, tab-separated.
The first column is the length from the throat. Second column is the area of the horn at that length. Third column is the width of the horn at that point, as viewed from the side (we're assuming it's rectangular-shaped). Fourth column is the effective radius of the horn at that point (area = pi*r^2) which you don't really need.
On the paper, draw a curve shaped like a backwards "J". At right angles coming out from the J, draw a line which is equal to the value in the third column (the width). You end up with something that looks like fish bones. Check out Steffen's example at Hornlautsprecher.de (scroll down):
www.hornlautsprecher.de - solutions in sound
6. Build your box
Self-explanatory! I will approximate the curve by using many small pieces of wood. Bending plywood is an option (easier if you "kerf" it by partially cutting through the ply -- but not all the way through -- at spaced intervals).
Try to get the driver's center as close to the mouth as possible.
Last edited:
7. Enjoy
It's not guaranteed to be a complete success. But if you use good data, and simulate (especially if you pass the numbers through MJK for the extra precision), your results will correlate well to in-room response.
If you look at the AJ-Horn sims on the Hornlautsprecher.de site, you'll see that the designers have a big bump in the bass.
This is to help with baffle step compensation (the tendency of low frequencies to "sneak around" the narrow baffle). On the other hand, if your room has lots of "room gain" (tendency to lift the bass), you might want to design the very low end with a gentle drop, as Bob Brines has described elsewhere.
So really, you don't necessarily want a ruler-flat response, but that's where the art and craft come in.
A very, very big thank you to GM (the original horn guru), MJK (self-explanatory), Scottmoose (for the Harvey), Dave (for drawing the Harvey), Phil Townsend (for building the Harvey), and Serenechaos (for getting me hooked on horns).
Also many thanks to Bob Brines (for explaining MJK), dhenryp (for his excellent HornResp BLH tutorial here: http://www.diyaudio.com/forums/full-range/145972-blh-example-hornresp-pictures.html ) and David McBean, HornResp creator.
And last but certainly not least, thank you to Armin Jost, creator of AJ-Horn (http://www.aj-systems.de/indexe.htm), and all the wunderbar Menschen (great guys) at http://www.hornlautsprecher.de/
Machen sie Spass (have fun)!
Last edited:
- Home
- Loudspeakers
- Full Range
- Horn How-To with AJ Horn (BLH / BVR)
