Started 12/21/09 , just got done last Sunday. Worked on average 5-6 hours /day
for the last 2 weeks. Lessons learned:
1. Dont let lumber yard (in this case Lowes) rip your wood to precise dimension
Since the cutting plan had tight margin, and since I had good luck with Home
Depot in the past making straight cut, I thought Lowes could do the same
thing. Wrong, their saw blade was so dull that it keeps getting bound up
while ripping the boards causing it to stop and restart and the cut ended up
not being straight, plus their blade was not at 90 degree so the edges of the
boards are not squared !😡
I decided to go to Lowes because I noticed that their 3/4 inch Birch ply is 1/32 inch
thicker than Home Depot's Birch ply and seem to have less void. And since
the width of the board are cut at precise dimension there were no room for
squaring the edges once I got home.🙁
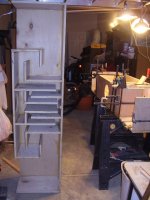
2. Should started with laying out the partition beginning with the throat and
moving out toward the mouth measuring and laying out the board as I go.
I did the opposite and found out that 1/4 in of error in an area that is 1 inch
wide is a lot more significant than 1/4 inch of error in an area that is 7 inch
wide
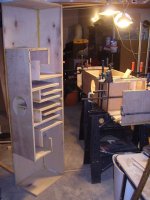
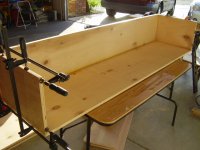
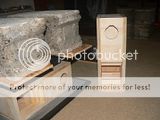
Here are the picture of the build, speakers are finished with 4 coats of polyurethane varnish with light sanding between coats.
for the last 2 weeks. Lessons learned:
1. Dont let lumber yard (in this case Lowes) rip your wood to precise dimension
Since the cutting plan had tight margin, and since I had good luck with Home
Depot in the past making straight cut, I thought Lowes could do the same
thing. Wrong, their saw blade was so dull that it keeps getting bound up
while ripping the boards causing it to stop and restart and the cut ended up
not being straight, plus their blade was not at 90 degree so the edges of the
boards are not squared !😡
I decided to go to Lowes because I noticed that their 3/4 inch Birch ply is 1/32 inch
thicker than Home Depot's Birch ply and seem to have less void. And since
the width of the board are cut at precise dimension there were no room for
squaring the edges once I got home.🙁
2. Should started with laying out the partition beginning with the throat and
moving out toward the mouth measuring and laying out the board as I go.
I did the opposite and found out that 1/4 in of error in an area that is 1 inch
wide is a lot more significant than 1/4 inch of error in an area that is 7 inch
wide
Here are the picture of the build, speakers are finished with 4 coats of polyurethane varnish with light sanding between coats.
Attachments


more lessons learned
Should try to straight out warped back and front boards with clamps. On the first speaker, the back panel is warped in by 1/8 in and I did not realize that with clever use of clamps, I could straight it out. causing the air passages near the throat to be narrower than spec. I did use clamp on the 2nd speaker to straight out the warped back and front panel.
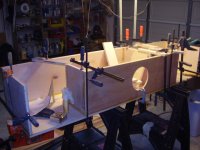
When the edges are not perfectly squared, clamping down hard on the internal
dividers causing them to move out of places, this is the most time consuming part. would have gone faster if the edges were squared !
Should try to straight out warped back and front boards with clamps. On the first speaker, the back panel is warped in by 1/8 in and I did not realize that with clever use of clamps, I could straight it out. causing the air passages near the throat to be narrower than spec. I did use clamp on the 2nd speaker to straight out the warped back and front panel.
When the edges are not perfectly squared, clamping down hard on the internal
dividers causing them to move out of places, this is the most time consuming part. would have gone faster if the edges were squared !
On my mikasa build, I was not quite square but the sound to me is just terrific. These cabinets are very forgiving, I continue to be amazed for over one year.
some info here: http://www.diyaudio.com/forums/full-range/104879-mikasa-next-2.html
gychang
Very nice turn out!
Yeah, the clamping for the middle pieces can be tough since the clamps wont reach in that far. It helps to put a longer piece of wood on top and clamp it down at both ends to apply even pressure.
If it were me I'd have probably clamped the front face and ever board that attaches to it in preparation before putting it into the main cabinet. That way they are all tight and secure before going in and they the only pressure you need to worry about is straight down.
Yeah, the clamping for the middle pieces can be tough since the clamps wont reach in that far. It helps to put a longer piece of wood on top and clamp it down at both ends to apply even pressure.
I haven't yet tackled one of the larger projects, but someday I hope to build a set of Sachiko myself. In the meantime, I built a much smaller set of Makizou M8-BH clones for practice. It's not exactly the same problem, since these little guys aren't even 18 inches tall. Regardless, I chose to "clamp" the inner sections by just piling concrete block on top of the glued assembly. It seemed to work for me, and gaps appear to be non-existent.
http://i69.photobucket.com/albums/i43/Ty_Bower/Makizou/P1120676.jpg
Did you do anything to compensate for the mistake near the throat?
dave
no, I found out about the 1/4" error too late after the glue
started to dry, and after I have repositioned and reclampped that particular divider 3,4 times so I was getting fed up with it and decided to leave it alone. Because of this, one of the path near the throat goes from 1.75 to 1.75 with no flare instead of the required
1.5 to 1.75 inch flare. In hindsight, I should have cut another 1/4 inch thick panel and glue it to the problematic panel to
get the required 1.5 to 1.75 inch flare. Because of this I think
I can hear some difference between the 2 speakers if I stick my head into the mouth and listen while it is playing. I have to run more warble tone test later to see what kind of difference it makes.
Another lesson learned, I had 14 clamps and it was not enough.
It takes average 3 clamps to clamp one divider down so on a few ocassions, I had to stop because I ran out of clamps. By the way
Harbor freight tools has cheaps clamps. They dont have the built
quality of HomeDepot or Sears clamps but they work well enough and are much cheaper.
Previously I was using the FE206Es in a pair of BIB (built with dimension for FE207E). I was searching the forum for someone who
had built both to get comparision feedback but could not find any. Well here
is my impression of the differences. The Sachiko seem to have more gain in the midbass
section ie 80-100hz but drop off rapidly after 40hz, while the BIB bass has less gain in he 80-100hz but it extends down to 25hz in my room 13ft X 30 X 9. Imaging on the sachiko is better,
more precise. Both gave the impression that some have given as a wall of sound coming at you, but more so in the sachiko. I think
I like the sachikos , now if I can find suitable drivers to turn those BIB cabinets into some sort of tapered horn sub, I will have the best of both worlds..🙂
The only flares are those from one straight section to the next. If your mistake ended up as a too large 1st section i know how to band-aid that and you could do thefix thru the driver hole.
Getting this 1st section right is critical.
Are you also saying that the 2 speakers are different?
dave
Getting this 1st section right is critical.
Are you also saying that the 2 speakers are different?
dave
Yes I meant the 1.5 inch section next to the throat and that goes into a 1.75 inch section. I think that 1.5 inch section ended up being 1.75 inch section. That mistake only happen on one speaker and only on one of the path of that speaker. How can I fix it through the driver hole? I had a suspicion that it is critical area but I was too eager to keep moving with the project to pause and fix it at that time. More lesson learnedThe only flares are those from one straight section to the next. If your mistake ended up as a too large 1st section i know how to band-aid that and you could do thefix thru the driver hole.
Getting this 1st section right is critical.
Are you also saying that the 2 speakers are different?
dave
Screw and glue, then fill and paint after. You can get away with just a few clamps then....
Fran
Fran
If I'm painting and not staining I prefer brad nails over screws. It's about 10x quicker. No predrilling and it's a smaller hole to fill.
I thought about that, but then I would have to screw from underneath the speaker as it lay flat on the saw horse, kind of awkward situation . plus the putty filed areas would be on the sideScrew and glue, then fill and paint after. You can get away with just a few clamps then....
Fran
where it is visible instead of just the back of the speaker. Since I wanted to finished it with high gloss urethane, I dont want them to ruin the look
Yes I meant the 1.5 inch section next to the throat and that goes into a 1.75 inch section. I think that 1.5 inch section ended up being 1.75 inch section. That mistake only happen on one speaker and only on one of the path of that speaker. How can I fix it through the driver hole? I had a suspicion that it is critical area but I was too eager to keep moving with the project to pause and fix it at that time. More lesson learned
Looking at the plan i see that it is not the area i was hoping. To get at that passage you would have to cut out part of the back panel. Once you can get at the passage insert a block 1.75" high x 1 5/8" wide into the middle of the fat slot. That will give the equivalent of cross-sectional area as if it was 1.5" high.
It may be easier to just build a 3rd one and burn the bad one 🙁
dave
I was affraid of that. The other thing is the width of the fat slot may not be consistantly 1.75 inch wide... but that is a idea to comtemplate. I also forgot to mark which path in that speaker has the fat slot... 😕 Burning it and building a 3rd is not an option at this time🙁Looking at the plan i see that it is not the area i was hoping. To get at that passage you would have to cut out part of the back panel. Once you can get at the passage insert a block 1.75" high x 1 5/8" wide into the middle of the fat slot. That will give the equivalent of cross-sectional area as if it was 1.5" high.
It may be easier to just build a 3rd one and burn the bad one 🙁
dave
- Status
- Not open for further replies.
- Home
- Loudspeakers
- Full Range
- my Sachiko build