I finally got the Ziggies put together with inlay and other work.
I went ahead and put in the EnABLD Merrill drivers (his last two)
before the lacquer has completely out gassed and will re sand, polish
and buff them out in a couple of months.
I further modified the drivers by using felt on the inside and outside of the driver frames and the back also. Internal wiring is four nines soft silver with cotton sleeving and small Bybee quantum purifiers on the
+ driver connectors.
I put the drivers in a pair of prototype boxes for several hundred hours of break in time before putting in the Ziggies.
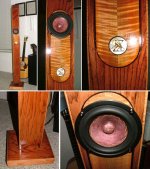
The boxes are 1/2" Red Oak ply with fiddleback Maple accents and the
the ZigmzHornet logo I designed which have a white MOP background,
the hornet is bronze and gold MOP with Paua abalone Z's.
These speakers sound fantastic, sub woofer is optional but truly not necessary.
I'll try to post pictures. wish me luck.
If the pictures work and anyone wants duplicates of the hornet inlays for their Ziggies, Igave the design to Andy Depaule at
http://www.luthiersupply.com look for the custom logo page about 1/3rd down. the hornets face each other.
Sorry the picture files are too large. If you wish to see them email me.
I'll also send them to Dave to see if he can attach them.
Thank you all.
Tim
I went ahead and put in the EnABLD Merrill drivers (his last two)
before the lacquer has completely out gassed and will re sand, polish
and buff them out in a couple of months.
I further modified the drivers by using felt on the inside and outside of the driver frames and the back also. Internal wiring is four nines soft silver with cotton sleeving and small Bybee quantum purifiers on the
+ driver connectors.
I put the drivers in a pair of prototype boxes for several hundred hours of break in time before putting in the Ziggies.
The boxes are 1/2" Red Oak ply with fiddleback Maple accents and the
the ZigmzHornet logo I designed which have a white MOP background,
the hornet is bronze and gold MOP with Paua abalone Z's.
These speakers sound fantastic, sub woofer is optional but truly not necessary.
I'll try to post pictures. wish me luck.
If the pictures work and anyone wants duplicates of the hornet inlays for their Ziggies, Igave the design to Andy Depaule at
http://www.luthiersupply.com look for the custom logo page about 1/3rd down. the hornets face each other.
Sorry the picture files are too large. If you wish to see them email me.
I'll also send them to Dave to see if he can attach them.
Thank you all.
Tim
Wha' DIYa know? said:I've got the Merrill dca 4 drivers. Not enabled. Guess that makes them ... Disabled?
No, just Acoustically Challenged.

Jeff
Well, if I had the woodworking skills shown here, I could compensate for my acoustically challenged drivers but I'm pretty fracken humbled by the craftsmanship!
My wood bits don't line up with precision -- not sure if my mitre saw won't saw square, or if it's the mitrer who can't mitre straight. :-/
Looks like my acoustically challenged drivers have an constructionally challenged builder in the ... driver's seat.
My wood bits don't line up with precision -- not sure if my mitre saw won't saw square, or if it's the mitrer who can't mitre straight. :-/
Looks like my acoustically challenged drivers have an constructionally challenged builder in the ... driver's seat.
Ziggies
Thank you sincerely for your hospitality and you comments.
I don't remember the exact cutout for the DCA4's , I measured them
at the inside of the flange (don't quote me, please check first but I believe it was 3 9/16") and cut the holes about 1/64" larger than
that and then on the back side of the front panel after slipping the drivers in, marked where the openings of the basket were and used my Dremel with a sanding roll and relieved the area so that the sound emanating from the openings on the back of the basket would not be restricted.
Re: Ziggies
Prof',
Thanks for the tips. I've been fretting a good bit about this part of the operation.
I'll see about acquiring a circle cutter after work, and do some measuring.
Hah! I just knew that dremmel of mine would come in handy one day! That's a great idea.
-Brenton
profkirby said:... I measured them
at the inside of the flange (don't quote me, please check first but I believe it was 3 9/16") and cut the holes about 1/64" larger than
that and then on the back side of the front panel after slipping the drivers in, marked where the openings of the basket were and used my Dremel with a sanding roll and relieved the area so that the sound emanating from the openings on the back of the basket would not be restricted.
Prof',
Thanks for the tips. I've been fretting a good bit about this part of the operation.
I'll see about acquiring a circle cutter after work, and do some measuring.
Hah! I just knew that dremmel of mine would come in handy one day! That's a great idea.
-Brenton
- Status
- This old topic is closed. If you want to reopen this topic, contact a moderator using the "Report Post" button.
- Home
- Loudspeakers
- Full Range
- ZigmaHornets...finally!!