After setting up the dado blade for width and depth, I got started on making the necessary cuts for inserting my ribbing while attaching all the pieces together. For my first carcus I had painstakenly made each and every cut individually and by line of sight. I had marked each place for the cuts with all six facings, and allowed for any mismeasurement by allowing the dado cut to be slightly wider than the thickness of the plywood.
This time I decided to do things differently. Instead of eyeballing all the cuts, and praying for the powers that be to make everything right on the money, I decided to automate this process.
Because the carcus needed to be 40 inches long, and I had 45 inches to work with, I allowed for one inch on one end of the pieces. By making the cuts at 1", 11", and 21", I could make three cuts, only having to move the rip fence each time I finished making my six cuts at each distance. This worked out quite well.
then I changed the direction of the six sides, and measured out to make the final two dado cuts. I figured I would need to make a 3 3/4", and 13 3/4" pass for each of the six pieces. Man, I was really on a roll here. So I quickly made my passes and made sure that all the dado cuts lined up neatly.
Then I decided to make the necessary cuts to trim off the excess length of each of the six boards. And here is where I made my second, and biggest mistake of the day. How I did this I have no idea, but they say Hubris is the mother of failure, and I can readily believe it. Somehow I got three of the panels turned around 180% from the others, and since I was on a roll, I made all my passes in short order, with no further delays.
Or so I thought. After making my last pass, I took the six panels and placed them on my work table, and started attempting to line up all the dado cuts.
What the "you fill in the blank" here. Three of the pieces worked fine, but the other three? All the dados were off line, and the ends were not neatly made into a rabbet as they were supposed to be. This was terrible! $%##!!!##. I couldn't believe that I had made such a foolish mistake as this. And after doing things so well from the start.
What to do? Rather than recut the three panels, as I could have done were I a true perfectionist, I decided to go ahead and use them as before. This meant that I would have to recut the three to match the other three, which I did. And I did this with heavy heart. SIGH.
Now, once I finished the cuts, laid them out, and confirmed that the dado cuts all matched, I took a measurement of the length of the sides. I was 1/8" off with each piece. The original carcus is 40" long exactly, and this second one is 39 7/8" long. Not perfect, but still not worth starting over.
The process of putting the pieces together were exactly the same as with the first one, and while I was listening to the Discovery Channel tell me all about how Global Warming was in danger of destroying the Great Barrier Reef, I attached all six sides together, and used some choice four letter words, directed at the brain dead announcer for his Herd Mentality. Irritation at something can always get you moving when complacity cannot.")
After putting the carcus together, wiping off all the excess glue, and finally finishing things up by using my heavy duty Duo-Fast stapler, driving 1 1/2" quarter inch staples into each internal ribbing, I was almost through. Next I cut 3/8-1/2" thick strips of 7 1/4" long cuts to use to fill in the dado cutaways that were mistakes. Then I liberally applied glue within each dado cut, inserted the filler, and stappled them into place. Once the glue dried, the brace should be every bit as strong as the original plywood. The only thing to suffer would be my pride.
I don't have a picture of this 'gaff', but if you wish to see it, I will sheepishly take a shot or three for you, so you can get a good laugh at me and my hubris.
And lastly, last night, I filled in all the staple and brad holes, and also the bad parts of the exteriour plywood. This plywood was 'Seconds' and it had some facing issues, so I also filled in their mistakes. Here is the carcus with all the filler.
And here is a shot of the first cabinet, with base, along side the second one.
I originally had plans of finishing up the sanding of the second carcus and then applying the veneer, one at a time to one side of each cabinet together. But it is raining here and I can not take the second cabinet out and give it a good sanding. In fact, it is a mess outside, and that is wonderful, because we are in the middle of a severe drought, so all the rain we can get is more than nice.
Consequently I will go down stairs and begin setting up the veneer for going on to the first cabinet. When it stops raining, I will sand it and then try to play 'catch up' with the first one. The reason why I intended to do one side of each, all together, is because I want to make certain that all sides are exactly matching, all around the cabinets. I'll just have to be more careful now, and make certain that Mr. Hubris is upstairs and out of the way.
I'll keep everyone posted as to how the veneering is coming along.
This time I decided to do things differently. Instead of eyeballing all the cuts, and praying for the powers that be to make everything right on the money, I decided to automate this process.
Because the carcus needed to be 40 inches long, and I had 45 inches to work with, I allowed for one inch on one end of the pieces. By making the cuts at 1", 11", and 21", I could make three cuts, only having to move the rip fence each time I finished making my six cuts at each distance. This worked out quite well.
then I changed the direction of the six sides, and measured out to make the final two dado cuts. I figured I would need to make a 3 3/4", and 13 3/4" pass for each of the six pieces. Man, I was really on a roll here. So I quickly made my passes and made sure that all the dado cuts lined up neatly.
Then I decided to make the necessary cuts to trim off the excess length of each of the six boards. And here is where I made my second, and biggest mistake of the day. How I did this I have no idea, but they say Hubris is the mother of failure, and I can readily believe it. Somehow I got three of the panels turned around 180% from the others, and since I was on a roll, I made all my passes in short order, with no further delays.
Or so I thought. After making my last pass, I took the six panels and placed them on my work table, and started attempting to line up all the dado cuts.
What the "you fill in the blank" here.
Three of the pieces worked fine, but the other three? All the dados were off line, and the ends were not neatly made into a rabbet as they were supposed to be. This was terrible! $%##!!!##. I couldn't believe that I had made such a foolish mistake as this. And after doing things so well from the start. What to do? Rather than recut the three panels, as I could have done were I a true perfectionist, I decided to go ahead and use them as before. This meant that I would have to recut the three to match the other three, which I did. And I did this with heavy heart. SIGH.
Now, once I finished the cuts, laid them out, and confirmed that the dado cuts all matched, I took a measurement of the length of the sides. I was 1/8" off with each piece. The original carcus is 40" long exactly, and this second one is 39 7/8" long. Not perfect, but still not worth starting over.
The process of putting the pieces together were exactly the same as with the first one, and while I was listening to the Discovery Channel tell me all about how Global Warming was in danger of destroying the Great Barrier Reef, I attached all six sides together, and used some choice four letter words, directed at the brain dead announcer for his Herd Mentality. Irritation at something can always get you moving when complacity cannot.
After putting the carcus together, wiping off all the excess glue, and finally finishing things up by using my heavy duty Duo-Fast stapler, driving 1 1/2" quarter inch staples into each internal ribbing, I was almost through. Next I cut 3/8-1/2" thick strips of 7 1/4" long cuts to use to fill in the dado cutaways that were mistakes. Then I liberally applied glue within each dado cut, inserted the filler, and stappled them into place. Once the glue dried, the brace should be every bit as strong as the original plywood. The only thing to suffer would be my pride.
I don't have a picture of this 'gaff', but if you wish to see it, I will sheepishly take a shot or three for you, so you can get a good laugh at me and my hubris.
And lastly, last night, I filled in all the staple and brad holes, and also the bad parts of the exteriour plywood. This plywood was 'Seconds' and it had some facing issues, so I also filled in their mistakes. Here is the carcus with all the filler.
An externally hosted image should be here but it was not working when we last tested it.
And here is a shot of the first cabinet, with base, along side the second one.
An externally hosted image should be here but it was not working when we last tested it.
I originally had plans of finishing up the sanding of the second carcus and then applying the veneer, one at a time to one side of each cabinet together. But it is raining here and I can not take the second cabinet out and give it a good sanding. In fact, it is a mess outside, and that is wonderful, because we are in the middle of a severe drought, so all the rain we can get is more than nice.
Consequently I will go down stairs and begin setting up the veneer for going on to the first cabinet. When it stops raining, I will sand it and then try to play 'catch up' with the first one. The reason why I intended to do one side of each, all together, is because I want to make certain that all sides are exactly matching, all around the cabinets. I'll just have to be more careful now, and make certain that Mr. Hubris is upstairs and out of the way.
I'll keep everyone posted as to how the veneering is coming along.
And I can't even make boxes worth a darn, let alone well braced hex tubes with stands and reflectors. You may be having some issues and working hard, but you're making alot of the rest of us envious. Beautiful work so far. I'm also envious that I'm not likely to get a chance to hear them when they're done.
Kensai
Kensai
Kensai said:And I can't even make boxes worth a darn, let alone well braced hex tubes with stands and reflectors. You may be having some issues and working hard, but you're making alot of the rest of us envious. Beautiful work so far. I'm also envious that I'm not likely to get a chance to hear them when they're done.
Kensai
If you have a decent table saw you can do this as well, without too much trouble. and not only do you need the proper tools, but the right steps and technique are important to make it easier.
that is why I am trying to make the explanations as detailed, but concise, as possible. It's really not all that bad. It's just daunting the first time around.
My greatest challenge now is to find someone who will be able to turn the upper diffraction piece for the top. Anyone, who uses a lathe, I could use some recommendations, or help here.
I managed to get somewhat distracted over getting supper made, so I did not get around to the veneer until later. However, I did go down stairs and start setting up the pieces to be adhered to the panels of each cabinets.
I started off by deciding just how big I wanted each piece of veneer to be before I applied the glue to the underside of the veneer and the target wall of each cabinet. Since each side was exactly 8 inches wide, I figured I could overlat each side by 1/8 inch and with a nice cut, I would have little to trim off each side. As for the length, I decided on 1 inch overlap, because I would be taping the ends with masking tape to prevent any tearing of the veneer while working with it. And too, when all was finished, I could easily trim everything off with a trim bit on my router. so the overall size of each piece of veneer would be 42 inches long, by 8 1/4 inch wide.
Next I needed some form of ability to actually see what I wanted to to be included in the veneer, and how I wished for it to run. what I needed was some king of plastic sheet where I could easily see through it and mark the boundries. I did not have any scrap piece sitting around. But I did have several pieces that I use in my business, which is making beautiful things for the interior design business. I took down one of my plastic templates for swag patterns, and use it as a template for the veneer sheets. When I finish, I will take some solvent and remove the lines.
If you look below, you can see at the top of the swag template a 42 inch line by 8 1/4 inch width. It is not easy to see, but it is there. Also, at the corners of the inner part of the template, I drilled a small hole where I could use a black velt pen as a corner marker. Sometimes you just have to use a field expedient when you can't come up with the real thing.
After that I gathered my tools, and a scrap piece of plastic laminate that was laying around. I used the back side of it as a cutting base for cutting the veneer. I have three types of veneer saws, but the one I like the best is the French Veneer Saw. If you closely examine the teeth of the blade, they are pointing one way on one side, and the other way on the other side.
Traditional veneer saws are set up for right handed people and they either come with a set of teeth that are pointed downward, or some now come with the teeth pointing back toward the person pulling the blade.
The French veneer saw is set up for both left handed and right handed people. Naturally, being left handed, I like that up front. But the blade comes already sharpened and it allows you to make the initial starter cut with the teeth going one way, and then making the real cuts on the teeth going the other way. And regardless which hand you use, it is the same arangement. Neat huh?
Here are the pieces of veneer laid out on the work table. It consists of two groupings of six pieces of walnut veneer, including the sap wood. The veneer came to me in lengths of over 90 inches long, so I cut them in half. That gives me a pretty frugel use of the veneer, and leaves me more than enough todo another hexagon enclosure if I wished. and then some of this magnificant pattern left over.
I'm not real big on walnut because it is dark and about as "Blaah" as it gets. I never really understood the industry getting into walnut, with so much wonderful material out there. Cherry is far better in character IMO. But there is a world of material there that beats walnut, hands down. The only reason why I went with this walnut was because it had a wonderful pattern, and the sapwood just brought out the pattern in the wood to a degree that most other woods, short Santos Rosewood, which is really my favorite material. But for the money and the pattern, it would be hard to beat this veneer. And there was so much of it for less than $30 plus S/H.
I started off by deciding just how big I wanted each piece of veneer to be before I applied the glue to the underside of the veneer and the target wall of each cabinet. Since each side was exactly 8 inches wide, I figured I could overlat each side by 1/8 inch and with a nice cut, I would have little to trim off each side. As for the length, I decided on 1 inch overlap, because I would be taping the ends with masking tape to prevent any tearing of the veneer while working with it. And too, when all was finished, I could easily trim everything off with a trim bit on my router. so the overall size of each piece of veneer would be 42 inches long, by 8 1/4 inch wide.
Next I needed some form of ability to actually see what I wanted to to be included in the veneer, and how I wished for it to run. what I needed was some king of plastic sheet where I could easily see through it and mark the boundries. I did not have any scrap piece sitting around. But I did have several pieces that I use in my business, which is making beautiful things for the interior design business. I took down one of my plastic templates for swag patterns, and use it as a template for the veneer sheets. When I finish, I will take some solvent and remove the lines.
If you look below, you can see at the top of the swag template a 42 inch line by 8 1/4 inch width. It is not easy to see, but it is there. Also, at the corners of the inner part of the template, I drilled a small hole where I could use a black velt pen as a corner marker. Sometimes you just have to use a field expedient when you can't come up with the real thing.
An externally hosted image should be here but it was not working when we last tested it.
After that I gathered my tools, and a scrap piece of plastic laminate that was laying around. I used the back side of it as a cutting base for cutting the veneer. I have three types of veneer saws, but the one I like the best is the French Veneer Saw. If you closely examine the teeth of the blade, they are pointing one way on one side, and the other way on the other side.
An externally hosted image should be here but it was not working when we last tested it.
Traditional veneer saws are set up for right handed people and they either come with a set of teeth that are pointed downward, or some now come with the teeth pointing back toward the person pulling the blade.
The French veneer saw is set up for both left handed and right handed people. Naturally, being left handed, I like that up front. But the blade comes already sharpened and it allows you to make the initial starter cut with the teeth going one way, and then making the real cuts on the teeth going the other way. And regardless which hand you use, it is the same arangement. Neat huh?
Here are the pieces of veneer laid out on the work table. It consists of two groupings of six pieces of walnut veneer, including the sap wood. The veneer came to me in lengths of over 90 inches long, so I cut them in half. That gives me a pretty frugel use of the veneer, and leaves me more than enough todo another hexagon enclosure if I wished. and then some of this magnificant pattern left over.
An externally hosted image should be here but it was not working when we last tested it.
I'm not real big on walnut because it is dark and about as "Blaah" as it gets. I never really understood the industry getting into walnut, with so much wonderful material out there. Cherry is far better in character IMO. But there is a world of material there that beats walnut, hands down. The only reason why I went with this walnut was because it had a wonderful pattern, and the sapwood just brought out the pattern in the wood to a degree that most other woods, short Santos Rosewood, which is really my favorite material. But for the money and the pattern, it would be hard to beat this veneer. And there was so much of it for less than $30 plus S/H.
Sorry for breaking this up, but the "Submit" and " Review" buttons are backwards from other forums I use, and I accidentially hit the wrong button. Opps.
Normally I would not mark out the boundaries of each piece, especially if I was going to bookmatch the veneer. But in this case, it does not matter, since I am going to trim off the 1/8 inch overlap anyway. After marking the bounderies, I began sawing the veneer, by making the cross cut of the ends first.
Here is what I did.
I used a 36" straight edge level and began by pulling the veneer saw carefully and using light pressure to establish a straight groove into the veneer. Then I made continuing slow passes with the saw until the excess veneer came off. Then I turned the veneer around and did the other side, the same way.
Next, I laid out a 72 inch straight aluminum measure, and secured one end, and repeated the process. However ripping is a different proposition from cross cutting. It is really important to make the initial groove precise and then begin applying pressure to the saw. And usually it only takes about three or perhaps four passes when ripping length wise. That French Veneer Saw is really nice for this Leftie.
Here is what the first piece looks like after I have trimmed it down to size.
And here are more cuttings being made to the veneer. Note the clamp at the bottom of the picture. I used it to keep the measure rock steady at that end, and only had to rely on one hand to keep the other end of the measure still, while I cut with my left hand.
Here are two sequential cuts of one half of the long pieces of veneer.
And here are two sequential pieces from the other end of the veneer. If you compare the pieces you can note that even being sequential, there are still differences in the pattern. Unfortunately, it is not possible to get the pieces exactly alike, but it is vitally important to make them as close as possible. That is why one piece of veneer will go on one wall of one cabinet, and the other piece will go on the same wall of the other cabinet. And then it will be repeated for each of the six walls of each cabinet. This is why it is important to switch back and forth, so as not to get things mixed up.
Also, if you will notice on the last picture, I have already taken masking tape and taped the ends, on each side of the veneer, to keep any of the dry and brittle veneer from tearing or ripping. Nothing is more frustrating than having this happen, and then have to use veneer tape, when it wasn't needed in the first place.
This is as far as I have gotten tonight. tomorrow I will take the second carcus outside, and sand it down nicely. then I will start veneering one wall of each cabinet. I'm not certain how I am going to trim off the edge of the veneer, because doing it this way is different from trimming from a 90% corner. I guess the best way to do this is very carefully.
Normally I would not mark out the boundaries of each piece, especially if I was going to bookmatch the veneer. But in this case, it does not matter, since I am going to trim off the 1/8 inch overlap anyway. After marking the bounderies, I began sawing the veneer, by making the cross cut of the ends first.
Here is what I did.
An externally hosted image should be here but it was not working when we last tested it.
I used a 36" straight edge level and began by pulling the veneer saw carefully and using light pressure to establish a straight groove into the veneer. Then I made continuing slow passes with the saw until the excess veneer came off. Then I turned the veneer around and did the other side, the same way.
An externally hosted image should be here but it was not working when we last tested it.
Next, I laid out a 72 inch straight aluminum measure, and secured one end, and repeated the process. However ripping is a different proposition from cross cutting. It is really important to make the initial groove precise and then begin applying pressure to the saw. And usually it only takes about three or perhaps four passes when ripping length wise. That French Veneer Saw is really nice for this Leftie.
An externally hosted image should be here but it was not working when we last tested it.
Here is what the first piece looks like after I have trimmed it down to size.
An externally hosted image should be here but it was not working when we last tested it.
And here are more cuttings being made to the veneer. Note the clamp at the bottom of the picture. I used it to keep the measure rock steady at that end, and only had to rely on one hand to keep the other end of the measure still, while I cut with my left hand.
An externally hosted image should be here but it was not working when we last tested it.
Here are two sequential cuts of one half of the long pieces of veneer.
An externally hosted image should be here but it was not working when we last tested it.
And here are two sequential pieces from the other end of the veneer. If you compare the pieces you can note that even being sequential, there are still differences in the pattern. Unfortunately, it is not possible to get the pieces exactly alike, but it is vitally important to make them as close as possible. That is why one piece of veneer will go on one wall of one cabinet, and the other piece will go on the same wall of the other cabinet. And then it will be repeated for each of the six walls of each cabinet. This is why it is important to switch back and forth, so as not to get things mixed up.
An externally hosted image should be here but it was not working when we last tested it.
Also, if you will notice on the last picture, I have already taken masking tape and taped the ends, on each side of the veneer, to keep any of the dry and brittle veneer from tearing or ripping. Nothing is more frustrating than having this happen, and then have to use veneer tape, when it wasn't needed in the first place.
This is as far as I have gotten tonight. tomorrow I will take the second carcus outside, and sand it down nicely. then I will start veneering one wall of each cabinet. I'm not certain how I am going to trim off the edge of the veneer, because doing it this way is different from trimming from a 90% corner. I guess the best way to do this is very carefully.
Very nice looking design OP, and good progress. Can't wait to see the finished product.
Looks like we share tastes in veneer. I was also looking for Santos rosewood but ended up purchasing a similar looking walnut, got it from ebay merchant thinwoodandoldtools. That project has been shelved for now since i'm in the middle of a 7 speaker project using the aura NS3 and some 3/4" eastern red cedar. The aura's will run fullrange and the tweeters will be crossed with 2.0 or 2.2uf caps. They'll be for nearfield 7.1 multimedia, and will use an 8" Dayton SD215-88 DVC (or two) to fill the lows.
Looks like we share tastes in veneer
. I was also looking for Santos rosewood but ended up purchasing a similar looking walnut, got it from ebay merchant thinwoodandoldtools. That project has been shelved for now since i'm in the middle of a 7 speaker project using the aura NS3 and some 3/4" eastern red cedar. The aura's will run fullrange and the tweeters will be crossed with 2.0 or 2.2uf caps. They'll be for nearfield 7.1 multimedia, and will use an 8" Dayton SD215-88 DVC (or two) to fill the lows. An externally hosted image should be here but it was not working when we last tested it.
sjetski71 said:Very nice looking design OP, and good progress. Can't wait to see the finished product.
I'm not sure what I am going to do with the speakers once I have completed them. I will probably make some other hexagon cabinets and refine the process further. There is something about the hexagon shape that I really like. It appears to be difficult to the untrained eye, but it really isn't if you have the proper tools, and a little bit of experience.
the real challenge is in the veneering and finishing, to my way of thinking. getting the edges, on a six sided edge, finished neatly is going to be worrisome for me since it is the first time I have tried this approach.
I am of two minds here on applying the veneer, and aplying a water based glue. If you apply the glue to one side of the veneer, and don't spray the other side with water, it will curl up and ripple on you. So, anytime you work on a nice veneer, what you do to one side must also be done in like manner to the other, or you can end up with a mess.
I can either apply the glue, spray the other side with water, and wait for everything to dry before applying to the surface. OR, I can apply a shellac seal to both sides at the same time. The advantage to using the shellac up front is that the wood will already be sealed prior to my applying the glue. The distinct advantage here is that it will already be sealed, which will tend to keep any melted glue, once pressed with the hot iron, from bleeding through any cracks.
Another advantage with sealing, up front, is that should any of the glue melt and flow over to an already applied side, it will not soak up into the wood of the applied veneer. I can just wipe it off, or wait for it to dry, and scrape it away. The wood will already be sealed and the tone of the stain will be already imprinted into the finish.
I like the later way best, but will probably try it both ways and record it to see which works best for speaker building.
Looks like we share tastes in veneer
When I first got started in buying veneer from E-
bay, I bought quite a bit from him. I recently went up to the storage room and pulled out all my veneers that I have stored there, and I was surprised at the amount I fell in love with and bought from him. I have a wonderful cherry, with little cluster burls present, that I got from him about five years ago. I meant to use it on a project, but never got around to it.
He is a good vendor. But I have since discovered some other fine ones there, such as Lepkowski. he is the vendor from whom I purchased this young walnut. Normally he is a little bit more expensive than others, but his quality is second to none.
I also like Steven/GreatDane6, over at Veneer Artistry, Ron Fritz(he sells a lot of short orders, and loves to talk to customers on the phone. He's a real nice fellow), RoseBudVeneer(he sells some very exotic veneers, and in quantity). there are a few others I like to do business with, but those above are quality vendors, and you will not be cheated, or sandbagged, like happens in the audio department. They are long time sellers and like to please the buyer, like you and me.
Hi John,
Nice progress. These will be truly fine looking speakers when finished!
Did you find a source for the top horn section? Seems everything from the sixties and seventies had something with that shape on it - lamps, swivel chair bases, planters...
If your stuck for a source, consider making it yourself like this:
A series of disks, each smaller than the previous one, stacked up and glued together. These would have to be cut to the correct diameter.
You could use 1/4" MDF or hardboard for the clean stepped edge (like we see on some horns), or you could go the extra distance and fill these smooth.
Also the disks could be rings, to have the centre of the horn hollow. This has the side benefit of being able to use the centre cut outs as more disks. The hollow centre could be filled with dry sand to damp resonances.
Not especially hard to layout either. Use some 1/4" graph paper (grid), joining 2 or three together to get the right width. Draw the arcs and measure each piece.
Here's just a rough sketch of what I mean:
Attachments
Here is the latest thing. I finally got the second cabinet sanded, as today was nice and sunny.
Before I start working on the veneer, I thought I would perform an experiment by using water base glue, which will work well by being ironed on. Titebond II will do this, as well as what I am currently using, Better Bond Heat Lock veneer glue. It is nice to be able to just apply glue to the bottom of the veneer, and substrate, and then just iron it on permanently.
However, there are potential problems associated with this process. If using glue and then applying it to the substrate, all that is necessary is to apply pressure evenly until the glue dries. But this can be complicating and time wasting.
However the problem is that if you apply glue or sealer to one side of the veneer, without using a like substance on the other side, the veneer will curl and wrinkle when it dries. this will tend to cause more problems that it solves.
So I decided to test the use of glue and shellac sealer to see how it affects the veneer. First I cut up some spare pieces of walnut, which were of the same tree as what I am using to cover the cabinets. Here is the picture of them in raw form.
Highlight and activate the picture to see larger image.
As can be seen, the veneer is quite flat and with only a very slight curling length wise. In other words a great veneer to work with.
I took two of the pieces of plywood outside, and opened both jars of my different shellacs. One is Orange unwaxed shellac, approximately a two pound cut. The other one is Super Blond unwaxed shellac, approximately a one pound cut. With both of them lying flat, I applied two coats of the Suber Blond, and one coat of the Orange, to make them pretty much even in sealer. I coated both sides of the veneer and allowed them to dry. Denatured alcohol evaporates quickly, so make sure and do this outside. Below is a picture of what the two look like pretty much dry.
There is a slight curl against the grain, but the wood is very pliable and easy to straighten out. Plus it is also sealed, so glue will not get soaked into the veneer should there be spillover.
Also, note the difference in color and shade of the two types of shellac. The Super Blond is very close to what the wood looks like without any stain. The Orange has a decided redish brown tint. with more coats, it will get darker. Also, you can find shellac that is even darker than this, so it is not necessary to use a dedicated stain, if you use shellac, because it automatically does it for you.
Now, on to the water based glue. Here is a shot of two pieces, one glued on one side only, and the other with glue on one side, and water sprayed on the other side.
And here is the side I sprayed with just plain H2O.
It is incredible how the veneer rolls around itself with nothing done to the other side. But on the sample that is glued on one side and sprayed with water on the other, the veneer is even flatter than by using the shellac samples.
I have just gone back to the basement and inspected the samples. It has been about two hours since I laid out the samples, and the glue has completely dried. the sample that has water sprayed on the other side, is still the flatest sample, and the two samples sealed with shellac are still very pliable and soft. In fact, almost as soft as with nothing done to it.
while I really like the best sample, the one with the water glue, I will probably seal the veneer with shellac, allow it to dry and then apply glue to one of the sealed side. And then when it dries I will iron it on to the body of the cabinet.
Anyway, I thought I would pass this little information along to everyone.
Before I start working on the veneer, I thought I would perform an experiment by using water base glue, which will work well by being ironed on. Titebond II will do this, as well as what I am currently using, Better Bond Heat Lock veneer glue. It is nice to be able to just apply glue to the bottom of the veneer, and substrate, and then just iron it on permanently.
However, there are potential problems associated with this process. If using glue and then applying it to the substrate, all that is necessary is to apply pressure evenly until the glue dries. But this can be complicating and time wasting.
However the problem is that if you apply glue or sealer to one side of the veneer, without using a like substance on the other side, the veneer will curl and wrinkle when it dries. this will tend to cause more problems that it solves.
So I decided to test the use of glue and shellac sealer to see how it affects the veneer. First I cut up some spare pieces of walnut, which were of the same tree as what I am using to cover the cabinets. Here is the picture of them in raw form.
Highlight and activate the picture to see larger image.
An externally hosted image should be here but it was not working when we last tested it.
As can be seen, the veneer is quite flat and with only a very slight curling length wise. In other words a great veneer to work with.
I took two of the pieces of plywood outside, and opened both jars of my different shellacs. One is Orange unwaxed shellac, approximately a two pound cut. The other one is Super Blond unwaxed shellac, approximately a one pound cut. With both of them lying flat, I applied two coats of the Suber Blond, and one coat of the Orange, to make them pretty much even in sealer. I coated both sides of the veneer and allowed them to dry. Denatured alcohol evaporates quickly, so make sure and do this outside. Below is a picture of what the two look like pretty much dry.
An externally hosted image should be here but it was not working when we last tested it.
There is a slight curl against the grain, but the wood is very pliable and easy to straighten out. Plus it is also sealed, so glue will not get soaked into the veneer should there be spillover.
Also, note the difference in color and shade of the two types of shellac. The Super Blond is very close to what the wood looks like without any stain. The Orange has a decided redish brown tint. with more coats, it will get darker. Also, you can find shellac that is even darker than this, so it is not necessary to use a dedicated stain, if you use shellac, because it automatically does it for you.
Now, on to the water based glue. Here is a shot of two pieces, one glued on one side only, and the other with glue on one side, and water sprayed on the other side.
An externally hosted image should be here but it was not working when we last tested it.
And here is the side I sprayed with just plain H2O.
An externally hosted image should be here but it was not working when we last tested it.
It is incredible how the veneer rolls around itself with nothing done to the other side. But on the sample that is glued on one side and sprayed with water on the other, the veneer is even flatter than by using the shellac samples.
I have just gone back to the basement and inspected the samples. It has been about two hours since I laid out the samples, and the glue has completely dried. the sample that has water sprayed on the other side, is still the flatest sample, and the two samples sealed with shellac are still very pliable and soft. In fact, almost as soft as with nothing done to it.
while I really like the best sample, the one with the water glue, I will probably seal the veneer with shellac, allow it to dry and then apply glue to one of the sealed side. And then when it dries I will iron it on to the body of the cabinet.
Anyway, I thought I would pass this little information along to everyone.
MJL21193 said:Hi John,
Nice progress. These will be truly fine looking speakers when finished!
Did you find a source for the top horn section? Seems everything from the sixties and seventies had something with that shape on it - lamps, swivel chair bases, planters...
If your stuck for a source, consider making it yourself like this:
A series of disks, each smaller than the previous one, stacked up and glued together. These would have to be cut to the correct diameter.
You could use 1/4" MDF or hardboard for the clean stepped edge (like we see on some horns), or you could go the extra distance and fill these smooth.
Also the disks could be rings, to have the centre of the horn hollow. This has the side benefit of being able to use the centre cut outs as more disks. The hollow centre could be filled with dry sand to damp resonances.
Not especially hard to layout either. Use some 1/4" graph paper (grid), joining 2 or three together to get the right width. Draw the arcs and measure each piece.
Here's just a rough sketch of what I mean:
Hi John, No I haven't yet. I did have a member here contact me and offer his services. We corresponded, but I haven't gotten back to him yet. I was waiting until I got far enough along with the project to show how serious I was.
There is also another thing I can do. I can go to a couple of the specialty woodworkers stores here in Raleigh, and ask around for someone who has a wood lathe that will swing out for larger work. I need the disc to be at least 13" in diameter, so most lathes will not be able to to this job for me.
And too, I have pretty much figured out how to make this work best. Instead of trying to do the entire dispersal horn in one piece it may be best to to it in two pieces.
Here is how Duevel does it.
An externally hosted image should be here but it was not working when we last tested it.
An externally hosted image should be here but it was not working when we last tested it.
It's all in one piece like that. But it means that one end will be raw where the lathe plate is attached to the wood. I don't know how they finish the part where the plate was attached.
An externally hosted image should be here but it was not working when we last tested it.
Note that the outer edge of the disc is about 1" thick. If I was to make two layered blanks and each one was worked on the lathe, with the outer 3/4" lower layer barely cut, and rounded, I could take the two pieces and glue them together and get a single piece of wood that is 1" thick at the outer rim and curved both top and bottom.
I would think this to be far easier for a person to turn on a lathe. And if the two pieces don't exactly fit with the same diameter, I could use a belt sander and finish the outside by hand. Then I can fill in any blanks, if any, and paint the finished product.
What do you think of that idea?
John L said:
I would think this to be far easier for a person to turn on a lathe. And if the two pieces don't exactly fit with the same diameter, I could use a belt sander and finish the outside by hand. Then I can fill in any blanks, if any, and paint the finished product.
What do you think of that idea?
Yes, that works if you have access to a lathe (which I assumed you didn't).
Would you be using MDF or solid wood for the turning? Either is possible, with the MDF being easier to cut on the lathe and more dimensionally stable
I think I'd like it better if it were stepped, with just the widest ring rounded. It's your creation though.
Happy new year.
You know, if worse comes to worse, I could indeed step it all the way around. In the end, it would most likely deflect the sound waves well. It would not look as nice as a finely flowing and polished horn though.
I had thought I would go ahead with the same material throughout, which is cabinet grade plywood. I even used that for the base.
Oh, I forgot, I can even use the spare pieces of plywood that I get from making my circular cuts with the router. I forgot about that way to use scraps. What is wrong with me.
John L said:You know, if worse comes to worse, I could indeed step it all the way around.
Oh, I forgot, I can even use the spare pieces of plywood that I get from making my circular cuts with the router. I forgot about that way to use scraps. What is wrong with me.
Or, while turning, you cound cut in some "steps". Maybe just a few near the middle.
That plywood is poplar veneer core? Could be a finishing challenge as this core will soak up a lot of primer.
Ahh, but I don't have that problem because I use shellac for a sealer. Obviously you are not a user of shellac. Shellac is the ultimate sealer, or finisher that is available. You even eat shellac when you eat M&Ms.
The only real limitation with it is that water and alcohol tend to ruin it's finish if left there for an extended amount of time. Table tops would work best if finished in a poly finish, or shellac with a glass top.
I always seal my wood with shellac before doing anything to it. It stores very well in flakes, and is very inexpensive to mix and apply. I simply cannot sing it's praises loud enough. And anyone who knows finishing will tell you the same thing.
Once I have sealed the wood in shellac, it will take any finish and take it well.
John L said:Ahh, but I don't have that problem because I use shellac for a sealer. Obviously you are not a user of shellac. Shellac is the ultimate sealer, or finisher that is available.
And anyone who knows finishing will tell you the same thing.
I used to like shellac, in my youth. Shellac is a decent sealer, but it has limitations. You can't use it as a sealer for a polyurethane finish.
Speaking of polyurethane, that is the real ultimate sealer. It's solvent stable, meaning it will not separate when applied to a very absorbent substrate like the edge of MDF (or that poplar core ply). When it cures (it cures, it doesn't dry like shellac), it's completely inert, and there isn't anything that you can't overcoat it with.
MJL21193 said:I used to like shellac, in my youth. Shellac is a decent sealer, but it has limitations. You can't use it as a sealer for a polyurethane finish.
But that is only partially true. You are thinking about waxed shellac in it's natural form. Dewaxed shellac has none of those problems.
I have never used shellac with wax, so I don't know how it works, or doesn't work. I only use dewaxed shellac. The dewaxed variety will work on anything to the best of my knowledge. I have never had any problems with it.
Another thing, all finishes have their limitations and poly finishes are no exceptions. if the surface is damaged, you cannot spot repair it. You have to take the entire surface down and start all over.
If shellac is damaged, all you have to do is either sand away the damage, using wet sandpaper, or sandpaper and denatured alcohol. Then once the damage is gone, you can recover the damaged area with another coat of shellac, and it will blend in with the rest of the finish.
John L said:
But that is only partially true. You are thinking about waxed shellac in it's natural form. Dewaxed shellac has none of those problems.
If shellac is damaged, all you have to do is either sand away the damage, using wet sandpaper, or sandpaper and denatured alcohol. Then once the damage is gone, you can recover the damaged area with another coat of shellac, and it will blend in with the rest of the finish.
Hi John,
Yes, it's the wax content that affects adhesion. This is a natural part of the shellac though, and it's removal diminishes it's quality.
Shellac can make a beautiful finish on a piece that will not see much abuse. It should be protected with wax though. I've done the classic French polish on a few things, but to maintain the beauty, it needs constant maintenance.
A point well made about repair being easier with the shellac finish.
There are many ways of fixing damage to pieces done with modern finishes though, such as coloured wax sticks for filling dents that will buff to a near perfect match.
I only use solvent based polyurethane as a sealer, either over solvent based stains (I don't use waterbased stains), or for MDF before priming it for paint.
Using the solvent based poly over the stain brings up the colour and highlights the grain.
I then use waterbased polyurethane clear finish on my wood projects and waterbased urethane paint for the painted projects. This is the best, most durable 1 part coating available IMHO.
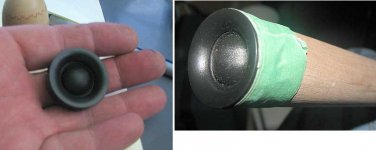
Kensai said:Having the tweeter sitting on something (like a length of dowel) that's sitting on the B20's pole piece (yes, with the dust caps removed)
Attachments
Make the top part out of plaster. cast it in sand.
scrub it with a nailbrush, then coat it with gloss black paint. that will secure any remaining sand and give it a pretty cool looking surface.
Use the first one as a pattern, then shove it into the sand to make 2 more so they will be identical.
scrub it with a nailbrush, then coat it with gloss black paint. that will secure any remaining sand and give it a pretty cool looking surface.
Use the first one as a pattern, then shove it into the sand to make 2 more so they will be identical.
OzMikeH said:Make the top part out of plaster. cast it in sand.
scrub it with a nailbrush, then coat it with gloss black paint. that will secure any remaining sand and give it a pretty cool looking surface.
Use the first one as a pattern, then shove it into the sand to make 2 more so they will be identical.
Oz, that's an excellent idea! I'm wondering why I didn't think of this earlier. But that is the purpose of a thread, such as this. Imput is great isn't it.
Thanks a lot Oz! You're a real Pal!
- Status
- This old topic is closed. If you want to reopen this topic, contact a moderator using the "Report Post" button.
- Home
- Loudspeakers
- Full Range
- Hexagon Pioneer B20FU20 Enclosure