OzMikeH said:Such a beautiful cabinet, and with a Pioneer driver, It deserves a Feastrex.
Which one, and could you provide a link showing the price range?
Here is the thing. I am purposefully making this pair of cabinets so as to have it be totally flexible for interchanges. it will be able to handle 8" drivers, even a 10" or up to a 12", with the right driver and compression horn. Of course you will have to have a different horn on top, like that in the photo of the Duevel Venus, so the compression horn can fit on top. It will not work on top of the main driver, unless a vented pole piece allowed the horn to be mounted in the rear of the driver and the sound come out of the center of the driver.
Even a set of six ports can be made for the bottom. I used WinISDPro to model the portings and came up with six ports, 1 " in diameter, 1.4" in length. There will be room at the bottom for all of them. If I go with less, I can still accomodate it. That way complete dispersion can also be acheived all around.
Further, I can interchange the bottom base plate and redrill ports for other drivers. This cabinet will be a Jack of all Trades, and a master of some nice drivers. I am starting out with the B20, and can move up to others should I desire. Perhaps the Fostex 207?
Also, once I make this pair, I will most likely make another pair, just for practice, and because I love the hexagon shape, because it is so rare that it is never going to be on of those "been there, done that" projects.
John L said:
Not at all. In fact, I encourage comments. This is a first for me in some ways. It's my first hexagon enclosure, which more than doubles the complexity of the cabinet construction and finish. But also, I am using the iron on veneer approach for the first time. I have used contact cement in the past, but over time, contact cement on raw veneer tends to work itself loose in some places. On paper backed veneer it is a joy to work with.
Ok, just thought I'd check. I can come across as a real know-it-all where this stuff is concerned, as many here would testify.
")
I have used the direct glue and clamp with raw veneer that I've cut myself. Never with paper backed veneer (the only kind worth using, again my opinion). I have never had a problem with veneer undoing itself but, like I said, I only use paper back veneer.
It goes back to how it's finished also. Blocking moisture penetration will preserve the veneer and keep the glue from breaking down. Also, the right finish will add a strong "skin" that holds everything in place.
As for contact cement, I have a bit of a system. I prime the cabinet first with solvent based clear urethane. This seals it, raises the grain so I can lightly sand it smooth before applying the glue. With the substrate primed, it only needs one light coat of contact cement. One coat on the veneer and 5 minutes later I'm rolling it on. I use a hard rubber J-roller to put pressure on the veneer to make it bond.
This makes for a smooth job, without waves and lumps and other baddies telegraphing through.
Anyhow, listen to me preach! I eventually run out of things to say, but if you find yourself getting tired of my noise, just give me a nod and I'll move along.
I think you have a fine project going here and it's great to see your enthusiasm for it. Lots of pics and updates are wonderful too.
Best regards.
MJL21193 said:
Ok, just thought I'd check. I can come across as a real know-it-all where this stuff is concerned, as many here would testify.
Not to worry. I have a thick skin, and am old enough to make my own decisions based on life experiences. Further, I am a bit of a smart-@ss myself. I have even been acused of being a pompous @ss as well, so you are not alone and by yourself here.
I have used the direct glue and clamp with raw veneer that I've cut myself. Never with paper backed veneer (the only kind worth using, again my opinion). I have never had a problem with veneer undoing itself but, like I said, I only use paper back veneer.
that may be why you have no problem. I don't use it because it is so thin that if you try to sand anything seriously, it will sand through. naturally it's very flexible, but not of substance, for me anyway.
But here's another thing. With paper backed or book stitched wide veneers, the patterns are not under your control. With raw veneers you can be totally creative. You can book match, quarter match, and do all sorts of things with it. And it is thick enough to be of substance. I guess I am a purist here.
Now, with this project, it is more than possible to find veneers that are slightly over 8 inches wide, but on wider projects, you are hard pressed to being out the pattern to your advantage if you are saddled with paper backed or book stitched veneers.
For instance, take this veneer that I just purchased on E-Bay. It is perfect for a book match, on a wider surface. But I could not begin to get something like that if I had to rely on a paper backed or book stitched veneer.

As for contact cement, I have a bit of a system. I prime the cabinet first with solvent based clear urethane. This seals it, raises the grain so I can lightly sand it smooth before applying the glue. With the substrate primed, it only needs one light coat of contact cement. One coat on the veneer and 5 minutes later I'm rolling it on. I use a hard rubber J-roller to put pressure on the veneer to make it bond.
This makes for a smooth job, without waves and lumps and other baddies telegraphing through.
Let me suggest something to you if you are going to use contact cement. Using it as it is can produce an uneven dry finish. Your use of a roller helps, but it will still dry less than flat.
What I do is get a gallon of acetone, and take the CC and cut it down with two parts CC and one part acetone. Stur it until it is evenly matched, and then apply three thin costs. This works best because each application dries much faster, and it gives you a smoother and thicker coating.
Anyhow, listen to me preach! I eventually run out of things to say, but if you find yourself getting tired of my noise, just give me a nod and I'll move along.
I think you have a fine project going here and it's great to see your enthusiasm for it. Lots of pics and updates are wonderful too.
Best regards.
Same here.
John L said:
Incidentially, would you be interested in contributing to my project by helping me out on the lathe end of things? I will give you the credit AND I will even pay you for your effort? How does that suit you?
Sure, I'm flattered that you asked let alone paying
. but it seems that you've already found someone or you found each other. It'll be an interesting project. Its like making a huge phase plug, well... kinda.I work for myself as well and I know it gets hectic at times. But no matter what, I manage to find time for the things I like to do. Just like you, prioritize. Anyway, best of luck with your project. Its looking better and better.
Hi take a look at Visaton Fontana at BMM
part no. 5091 looks quite handy. It may be the wrong diameter and not so much DIY but may help a person interested in a similar project but with lesser woodworking capabilities. Good price to boot.
I do have the perfect reflectors for you but don't want to part with them...I should have the negatives kicking around somewhere... maybe I'll cast a couple with flat tops for you and you can adapt them to your app. I'm pretty f'n lazy though It may be better if I send plaster negative to you and you can experiment with different materials, filler, CLD, whatever.
part no. 5091 looks quite handy. It may be the wrong diameter and not so much DIY but may help a person interested in a similar project but with lesser woodworking capabilities. Good price to boot.
I do have the perfect reflectors for you but don't want to part with them...I should have the negatives kicking around somewhere... maybe I'll cast a couple with flat tops for you and you can adapt them to your app. I'm pretty f'n lazy though
It may be better if I send plaster negative to you and you can experiment with different materials, filler, CLD, whatever.Attachments
Illusus said:Hi take a look at Visaton Fontana at BMM
part no. 5091 looks quite handy. It may be the wrong diameter and not so much DIY but may help a person interested in a similar project but with lesser woodworking capabilities. Good price to boot.
they are a bit small for the project. Also, the angle is not very diffraction friendly IMO. Most of the sound waves would be radiated upward, and not outward, I would think.
But there is one thing that I am very entrigued with. And that is the placement of the tweater in the top of the diffraction horn. I like that idea. I will have to think if this and see what my mind comes up with.
I do have the perfect reflectors for you but don't want to part with them...I should have the negatives kicking around somewhere... maybe I'll cast a couple with flat tops for you and you can adapt them to your app. I'm pretty f'n lazy though
That reflecter picture you have is about perfect. Only the hole at the point would have to be fixed for my use. The reflecter would have to be 13" in diameter to reach to the corners of the plane of the walls, but that's more than doable.
Coming up with something like that would work very well for inserting the tweater on top. You could carve out the hole, or include it in the cast.
BTY, is your negative a one piece affair, or two pieces? I am not familiar as to how pouring molds would work. And what material would you use?
I don't know if this was suggested before but could you use the a backside of a wave guide as a deflector? The Dayton example here http://www.partsexpress.com/pe/showdetl.cfm?&Partnumber=270-312 looks like it has a very smooth back. You might need to deal with the mounting threads at the end by cutting them off and putting a small cone there. Its a cheap and (possibly) very simple solution.
that's an interesting idea. And it is somewhere close to the diameter I want. It may make a great form for making a cast, but it will not work in and of itself.
I am going to try to pursue both the lathe work and also try out the possibilities of molding one which would be great for hollowing out the top and dropping in a tweater.
Your idea is a very good and sound one. Thanks for the input. keep 'em coming.
I am going to try to pursue both the lathe work and also try out the possibilities of molding one which would be great for hollowing out the top and dropping in a tweater.
Your idea is a very good and sound one. Thanks for the input. keep 'em coming.
John L said:I may decide to make a seven-sided enclosure
There certainly is something special about prime numbers.
dave
John L said:I used WinISDPro to model the portings
Do keep in mind that with the tall thin aspect of your enclosure WinISD is not capable of accuratly modeling it. With the driver at the top and the port at the bottom you have an ML-TL and not a bass reflex. You will need to use MJK to properly model this.
dave
John L said:Which one, and could you provide a link showing the price range?
The cheap 5" starts at 44k/pr.
dave
Illusus said:I do have the perfect reflectors for you but don't want to part with them...
I have a whole bunch of those too... none big enuff for this ap.
These shapes were used in a whole serious of designer electrohome boxes topologically identical to John's project. A lot of thot was put into the profile to achieve its job.
If someone wants one to use as a profile guide i can spare 1 i'm sure.
dave
Ahh dave, you have a damn good eye but a bit off this time. I have a couple pair of the electrohomes but this is not one of them... some weird brand I don't fully remember the name of, canadian... Stephenson-something? the outside diameter is 11" . the boxes were tall, round pipes with an eight inch driver; huge alnico magnet... similar to the Rolas that were in zenith alegro(?) speakers. The profile looks much like the EH, just scaled up. Anyway, the drivers and pipes the originals came with sounded very junky, I tried to beef up the boxes, sounded junky; I toyed with the drivers, junk sound, no HF, grr. I had some cheap WR drivers reserved for a home theater set up and decided to make them sealed 'omni' directional satelite deallies. I didn't have enough for 5.1 so i made a mold of one of the profiles and cast them out of short strand fiberglass body filler, good results. I really wanted them to work in a true HiFi app but couldn't get used to imaging, sounded weird.
P.S. that reads back funny, I had a few cocktails. Sorry.
P.P.S. no I'm not. Maybe tomorrow.
P.S. that reads back funny, I had a few cocktails. Sorry.
P.P.S. no I'm not. Maybe tomorrow.
BTY, is your negative a one piece affair, or two pieces? I am not familiar as to how pouring molds would work. And what material would you use?
It's a one piece affair. I used short strand fiberglass epoxy (body filler) and applied it in 1/4" layers. I used a frying pan as the top half of the mold, to get the top smooth. I really like the body filler, despite the stench, one could use a thin layer to start then stretch it with shredded rubber, lead shot and or sand for the subsequent layers providing damping at the same time. The bondo is easy to work with and finishes very well.
planet10 said:
Do keep in mind that with the tall thin aspect of your enclosure WinISD is not capable of accuratly modeling it. With the driver at the top and the port at the bottom you have an ML-TL and not a bass reflex. You will need to use MJK to properly model this.
dave
You will need to be a little more careful with this slow learner.

What's MJK stand for?
I read several reviews of the Duevel Jupitor, and one thing that was mentioned by the reviewers was that not only placement, but alignment/toe-in, was important. If the vents, which were multiples in their case, were not turned correctly, the speakers were not working their magic. That is why I am going to vent the cabinets, but also allow for the bottom plate to be replaceable with another, should I ever change drivers.
John L said:
Further, I am a bit of a smart-@ss myself. I have even been acused of being a pompous @ss as well, so you are not alone and by yourself here.
Yes, it might be a JOHN thing, we all share the same traits.
John L said:
that may be why you have no problem. I don't use it because it is so thin that if you try to sand anything seriously, it will sand through. naturally it's very flexible, but not of substance, for me anyway.
...You can book match, quarter match, and do all sorts of things with it. And it is thick enough to be of substance. I guess I am a purist here.
Let me suggest something to you if you are going to use contact cement. Using it as it is can produce an uneven dry finish. Your use of a roller helps, but it will still dry less than flat.
The first veneers I ever used were raw, then I was introduced to paper backed, and shown how to properly apply it.
It's like a great paint job, it's all about the prep. The substrate has to be perfect before applying the veneer. If you have done a good prep job, the veneer will not need sanding (just the final 220 grit before finishing).
As for book matching and such, I'm not a big fan, so I'd not do it to suit my own tastes. My supplier has book matched sheets, so that's no problem. The selection is not as vast as some would like, but the veneer is perfect, defect free. I buy veneer here. They are a commercial supplier and have as wide a selection as I need. They even have phenolic backed veneer, though I've never used this.
As for contact cement, I use a small foam roller that does a very smooth job. I don't thin the glue as it weakens it's adhesion power. On a few of my bigger (occupation related) jobs, i used spray grade, and if I had a lot of veneering to do, I wouldn't even consider anything else - it's SO smooth.
I will be tackling a veneer job of my own in the near future, where I'll be doing a couple of speakers that I'm not happy with.
One pair are made from Baltic birch plywood, stained and finished. The BB has a reasonable nice grain, but has minute cracks in the face veneer layer. Of course, no one else sees this, but it's the first thing I see when I look at them.
Oh Lord, I just screwed up, big time. I had an extensive post detailing what I did up to today, and I went back to look up another post, and tried to return to the page and it was timed out!
I'll have to start over, and I really need to cover this well, because I learned some valuable lessons here, that need to be passed on to other prospective cabinet builders.
RATS!!
I'll have to start over, and I really need to cover this well, because I learned some valuable lessons here, that need to be passed on to other prospective cabinet builders.
RATS!!
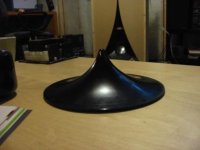
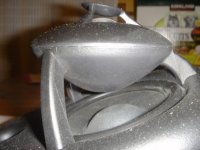
Concave or Convex
I was looking at some omni surround sound speakers, I got from Parts Express. They were on special, and have licensed technology from Mirage. I always thought that the "reflectors" on the omni should be concave, as in the pics earlier in this thread. As you can see, these have convex reflectors. They sound great, with wonderful coverage. What's your opinion?
I was looking at some omni surround sound speakers, I got from Parts Express. They were on special, and have licensed technology from Mirage. I always thought that the "reflectors" on the omni should be concave, as in the pics earlier in this thread. As you can see, these have convex reflectors. They sound great, with wonderful coverage. What's your opinion?
Attachments
Re: Concave or Convex
I wonder if you could affect the immedacy of the sound by dimpling those reflectors like a golf ball (okay, yes, I'm trying to be funny, but I've seen it done with flared ports, so... maybe a little bit of good theory there)
pblossom said:I was looking at some omni surround sound speakers, I got from Parts Express. They were on special, and have licensed technology from Mirage. I always thought that the "reflectors" on the omni should be concave, as in the pics earlier in this thread. As you can see, these have convex reflectors. They sound great, with wonderful coverage. What's your opinion?
I wonder if you could affect the immedacy of the sound by dimpling those reflectors like a golf ball (okay, yes, I'm trying to be funny, but I've seen it done with flared ports, so... maybe a little bit of good theory there)
- Status
- This old topic is closed. If you want to reopen this topic, contact a moderator using the "Report Post" button.
- Home
- Loudspeakers
- Full Range
- Hexagon Pioneer B20FU20 Enclosure