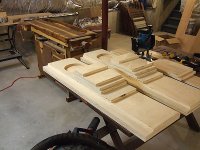
I've started my Half Changs. I'm using 18mm "maple/birch" ply that I found at my local Lowes. It turns out that the ply has a birch veneer side and a maple veneer side . The birch side is very erratically figured so I'm going with the maple side. The drivers will be FE206s - that pile of blankets in the background covers them as they are burning in.
As you can see, the cabinets are all cut and the driver hole has been routed. I'm waiting on the delivery of a 30º chamfer bit I ordered from MLSC to finish the holes before assembly.
That gives me time to start asking questions and soliciting advice. Specifically:
- Damping - right now I'm planning on damping the rear, top, bottom and one side of the chamber to start. I have some polyester batting but was intrigued by the use of cork in the recent PAWO thread. I'd appreciate any advice/opinions about my damping locations and choice of materials.
- Bracing - I'm planning three internal braces. One horizontal offset behind the speaker, another window brace a little more than half way down the chamber, and a vertical brace from the lip of the vent slot angled up to the front (like Marce used in his Curvy Chang). Should this last brace be offset or centered? Again, any comment or advice is welcome.
- FE206 prep - the drivers already have about 36 hours of burn in and should easily have 100 by the time I'm ready to mount them. Dave has told me that he's now working on a 2nd gen of 206 mods (EnAbl, etc) so I am holding of on any intense mods right now but will be adding duct seal to 3 of the 6 arms and a felt pad to the rear of the magnet. It would vastly improve the WAF if I could color the cones flat black or very dark brown, Dave has indicated that his new mods may allow black gloss acrylic in the final stage and though I'd prefer it not to be shiny, I might have to settle. Has anyone out there successfully dyed or stained Fostex cones and dark color? And, if so, how? Scottmoose has suggested ~4 ohm series resistance so I will try that, also.
Work, family and waiting for the router bit will mean I won't get back to these for a few days but I'll post again once they are partially assembled and ready for damping, etc.
Attachments

Attachments
The chamfer bit arrived today and I was able to chamfer the speaker opening and get one box almost completely glued up and the other about 1/2 done.
Tomorrow I'll mount the FE206e and do the final fit for the speaker brace (on the right below). I am unsure as to whether or not to use the additional brace at about 1/2 way down the full length of the cabinet as I'm not sure if it is really needed and don't want to eat into the chamber volume more than I have to.
I'm saving the final cuts on the piece that goes in the opening for when I'm fresh tomorrow as that Sears combination saw you see in the background is the single worst tool I have ever purchased - it is impossible to cut an accurate 45º angle as the arm has so much play that it twists almost 1/4" over the 9 1/2" crosscut. So I'll have to use my circular saw and just take a lot of time setting up and making test cuts ("measure twice, cut once") and will probably have to cut a tad over sized and file/sand for a nice fit.
Then it's on to duct seal and felt on the drivers; some cork and poly damping; and by Thursday I should be able to clamp on the other side and fire them up for a preliminary test run.
An externally hosted image should be here but it was not working when we last tested it.
Tomorrow I'll mount the FE206e and do the final fit for the speaker brace (on the right below). I am unsure as to whether or not to use the additional brace at about 1/2 way down the full length of the cabinet as I'm not sure if it is really needed and don't want to eat into the chamber volume more than I have to.
An externally hosted image should be here but it was not working when we last tested it.
I'm saving the final cuts on the piece that goes in the opening for when I'm fresh tomorrow as that Sears combination saw you see in the background is the single worst tool I have ever purchased - it is impossible to cut an accurate 45º angle as the arm has so much play that it twists almost 1/4" over the 9 1/2" crosscut. So I'll have to use my circular saw and just take a lot of time setting up and making test cuts ("measure twice, cut once") and will probably have to cut a tad over sized and file/sand for a nice fit.
Then it's on to duct seal and felt on the drivers; some cork and poly damping; and by Thursday I should be able to clamp on the other side and fire them up for a preliminary test run.
Scottmoose said:You'll get considerably more benefit from fitting the brace & loosing a touch of volume (I anticipated some loss through bracing etc) than if you didn't. You can't have too stiff a box.
Si...and you get some "virtuell" Volume through stuffing
Then again, if you told most people it was a BLH they'd say "Bacon, lettuce and ham ???"
Braces are in and glue is drying. Once they are set enough for me to remove the clamps I'll start on the angled pieces at the horn. I hope to get them glued in tonight so I can begin adding the the damping tomorrow.
I jerry-rigged three 10 ohm resistors from Radio Shack in parallel to give me 3.3 ohm series resistance until my Mills resistors from Parts Express arrive. By that time the 206s will have over 80 hours of burn-in and I'll have added the duct seal and felt. Once Dave's phase plugs arrive they'll go back into surgery.
I hope to fire them up tomorrow sometime, though it will be in the basement with concrete floors and walls. If all goes well I'll move them into the living room by Friday and fiddle with damping a bit before sealing them up for good.
Then I have to deal with finishing them...
bobtrancho said:Once Dave's phase plugs arrive they'll go back into surgery.
They started on their journey Tuesday (Monday was Thanksgiving)
dave
bobtrancho said:Once Dave's phase plugs arrive they'll go back into surgery.
Don't cut that bit of mesh in the dust cap, it spreads fibres everywhere. The mesh is just over twice the size of the hole in the dust cap. About 5/8
Play them loud while leaning forwards to shake any bits out.
OzMikeH said:Play them loud while leaning forwards to shake any bits out.
I usually play them face down (with one edge propped up) for a couple hours after a dustcapectomy.
dave
Thanks for the heads up Dave and for the dustcapectomy tips. I'll let you know how the patient fares after the transplant arrives.
I'll have more pics tomorrow but the 45º horn piece is cut and glued and (if I do say so myself) it came out fine. I'll need to do just a bit of caulking before painting but I nailed the angles. It's vital to keep everything square as you cut and then glue up. If you don't check square after each clamp it's easy to be off by a degree or two and when you're fitting a final piece that has to meet two 45º angles and two right angles just so in order to look good cumulative error can be a real bummer.
The initial damping is done and I'll wire up the drivers and resistors tomorrow, then clamp on the other side and give it a listen.
It actually started before this 1st link (buried in a thread on something else)
http://www.diyaudio.com/forums/showthread.php?s=&threadid=96937&highlight=
http://www.diyaudio.com/forums/showthread.php?s=&threadid=106799&highlight=
http://www.diyaudio.com/forums/showthread.php?s=&threadid=106911
http://www.diyaudio.com/forums/showthread.php?s=&threadid=109208&highlight=
plans
http://www.frugal-horn.com/spawn.html
http://p10hifi.net/tlinespeakers/FH/download/Chang-NBVR-map-140807.pdf
dave
Drivers temporarily wired and sides clamped on.

Down in my basement the LF if great - if it carries over to the living room I can retire the old sub I've been using with the Needles. Of course, with all that concrete the HF tends towards ear bleeding with some music so, again, the living room is the real test. I think I may need to adjust the damping, though. I used 1/8" cork on the top, rear, bottom and one side, with 1/2" of dacron poly batting over the braces. We'll see what the living room tells me.
I'll move them upstairs later later and hook them up to the Amp10 with proper speaker cable and give them a go.
Nice... ")
You know, seeing the first pair of these boxes, completed, really underlines what Jeff ('Zilla) was saying earlier about appearances. Attached is a shot of the LothX Polaris (AFAIK the company is now defunct) that sold for ~£4,700UK a couple of years back.
You know, seeing the first pair of these boxes, completed, really underlines what Jeff ('Zilla) was saying earlier about appearances. Attached is a shot of the LothX Polaris (AFAIK the company is now defunct) that sold for ~£4,700UK a couple of years back.
Attachments
Hi the Half Changs look very nice. Love the maple look, I am getting jealus looking at all the nice ply cabs, I think the extra money is well spent and saves time at the finishing stage, and when compared to the cost of veneer or even decent paint works out cheeper.
Just looked the LothX Polaris, first site I found said £5,990 wow!
http://www.eminentaudio.co.uk/Frontier/LthXReviews/Reviews/HIFI+Polaris.htm
Its quite frightening the cost of the comercial stuff, but nice to have somthing to compare our builds against, on the cost stakes, but 6 grand for a speaker.
I hope mine turn out looking that good. Right now I'm planning on applying edge banding to the exposed ply edges in the front and simply using rub-in polyurethane for the the finish for those edges and the side and back.
The horn opening and interior will be flat black and the baffle is up in the air.
I have two ideas about the baffle - (1) simply paint flat/semi black or (2) apply 1/8" thin stock (ebonized walnut?) from the top down about 2/3 (20" or so), between the edge banding, beveled at the periphery.
Option (2) serves another purpose in addition to the aesthetic - it effectively flush mounts the drivers. The only reason I'm holding off on (2) us that my local supplier of hardwoods doesn't have a good selection of thin stock right now. If I did this I'd want to use two vertical pieces per baffle, book matched if possible. So I'll most likely go with the plain black and then add the wood later when it's available (or maybe use 1/8" hardboard and veneer). But I'm way ahead of myself here. Gotta go haul them up the stairs for a more critical listening.
- Status
- This old topic is closed. If you want to reopen this topic, contact a moderator using the "Report Post" button.
- Home
- Loudspeakers
- Full Range
- Half Chang build