The toner-transfer method has been discussed in a number of
threads on the forum, so I thought it deserves a thread of its
own. This particular discussion started in this thread
http://www.diyaudio.com/forums/showthread.php?s=&threadid=28288&perpage=15&pagenumber=1
Briefly, I tried various papers with varying success until Kermit
recommended to use the photo paper from BilTema (people
living outside Scandinavia will have to follow other
recommendations on paper). I will describe the procedure I
used and add some pictures and notes. Some of the
notes are specific to the particular paper I have used.
I hope this will be helpful also for people not using the
BilTema paper, since most of the procedure and notes
should apply to most usable papers.
Toner transfer method for making PCBs (single-sided boards)
-----------------------------------------------------------
1. Create layout as if seen from component side, but with all
texts mirrored.
2. Round off edges on board. Especially remove warped cupper
after sawing/cutting.(See item 4 for board size).
3. Print layout on suitable paper (BilTema glossy photo paper,
or other suitable paper). The toner image on the paper will be
referred to as "the print".
4. Put board on paper with cupper side down so cupper is in
contact with printed side of paper.There should be a clearance of
at least 5mm from layout to board edge everywhere.
5. Secure board to paper with adhesive tape. This board-paper
combination will be referred to as "the package"
6. Put a piece of cloth on a table and heat up the iron to max.
(usually linen setting). Also shut off steam function if steam iron.
7. Preheat board somewhat by aiming a hairdryer at the board side of
the package, not the paper side.
8. Put package on cloth with board side down.
9. Iron the package by moving the iron slowly and carefully,
wiggling the iron sideways and applying pressure to it. Take
extra care to iron thoroughly near the edges.If successful, this
process will melt the toner of the print so it adheres to the cupper
of the board.
10. Put package in warm water with some detergent and let soak until
paper starts to peel off. Carefully start peeling off paper from edges.
Stop and let soak more whens no longer easy to peel off. Repeat until
the whole paper has been peeled off. The toner image now on the cupper
will be referred to as "the transfer".
11. There will still be some paper left on the board. Rub this off
gently. Be careful, some papers leave almost invisible "islands" of
paper, plastic or whatever and may require cleaning with a sharp tool
to be removed.
12. Inspect the transfer. If not successful, brush it off with steel
wool and water and repeat steps 3 to 12 until result is satisfactory.
13. Drill the holes.
14. Touch up the transfer with acrylic paint wherever the transfer
wasn't quite successful or the drilling damaged it.
15. Etch board as usual.
16. Rub off transfer using steel wool and water.
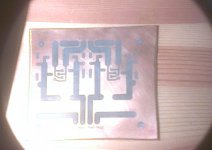
The BilTema paper was the one giving the sharpest transfers of
all, including Kodak and TDK photo papers. My laser printer has
started to give very narrow white stripes in the output (old
drum?), which is clearly visible in the print on all papers, but
it was only with the BilTema paper it was visible also on
the transfer. The toner seem to melt and smear more on all
other papers.
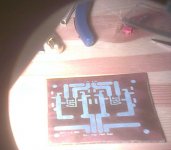
All papers seem to leave some traces after rubbing it off. It
may not seem so with BilTemas paper, but it can be difficult
to see. When the board is wet, the transfer is black and
no traces of paper can be seen. Let the board dry, using a
hair dryer if impatient. The transfer will now show up in
bluish grey colour and it may be possible to see paper traces.
For best result, use side lighting, that is, light almost along
the board. The transfer will now appear much brighter than
the cupper and any traces of the BilTema paper will show up
as white. Look especially at narrow clearances. These may
be difficult to rub off with the finger, but are easy to remove
with a tool. Probably not even a metal tool is necessary. Some
papers leave much more difficult traces. Kodak paper left almost
transparent patches of film which was very difficult to remove
except with sharp metal tools.
For touching up I recommend using acrylic paint. If you don't
have any, buy a tube of the cheapest study paint in an art
shop. Acrylic paint is almost not hazardous at all and can be
diluted with water, but after drying it is water resistant,
which is important. Don't forget to rinse the brush after use
and maybe now and when during the work.
That's all I can think of for now. I'll attach some images taken
during the process. They are not of good quality since my
digital camera can't take close-ups. I shot through a lamp
with magnifying glass, so the pictures don't show how sharp
things are.
all, including Kodak and TDK photo papers. My laser printer has
started to give very narrow white stripes in the output (old
drum?), which is clearly visible in the print on all papers, but
it was only with the BilTema paper it was visible also on
the transfer. The toner seem to melt and smear more on all
other papers.
All papers seem to leave some traces after rubbing it off. It
may not seem so with BilTemas paper, but it can be difficult
to see. When the board is wet, the transfer is black and
no traces of paper can be seen. Let the board dry, using a
hair dryer if impatient. The transfer will now show up in
bluish grey colour and it may be possible to see paper traces.
For best result, use side lighting, that is, light almost along
the board. The transfer will now appear much brighter than
the cupper and any traces of the BilTema paper will show up
as white. Look especially at narrow clearances. These may
be difficult to rub off with the finger, but are easy to remove
with a tool. Probably not even a metal tool is necessary. Some
papers leave much more difficult traces. Kodak paper left almost
transparent patches of film which was very difficult to remove
except with sharp metal tools.
For touching up I recommend using acrylic paint. If you don't
have any, buy a tube of the cheapest study paint in an art
shop. Acrylic paint is almost not hazardous at all and can be
diluted with water, but after drying it is water resistant,
which is important. Don't forget to rinse the brush after use
and maybe now and when during the work.
That's all I can think of for now. I'll attach some images taken
during the process. They are not of good quality since my
digital camera can't take close-ups. I shot through a lamp
with magnifying glass, so the pictures don't show how sharp
things are.
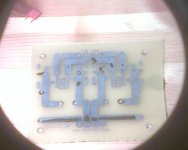
With light from the side, things change a bit, and any traces
of the BilTema paper show up as white under this condition.
Those remaining are to small to be seen in the photo, though.
Note the difference in brightness and colours compared to
previous image.
of the BilTema paper show up as white under this condition.
Those remaining are to small to be seen in the photo, though.
Note the difference in brightness and colours compared to
previous image.
Attachments
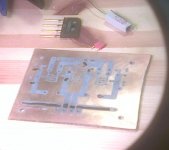
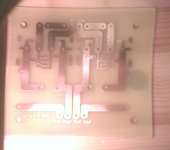
This is the board after etching, but before cleaning. Note how
the both the toner and the paint survived the etching. Be
somewhat careful with too hot water and acrylic paint, though.
It can start to peel off if the water is too hot, but then it is
probably too hot for etching too.
the both the toner and the paint survived the etching. Be
somewhat careful with too hot water and acrylic paint, though.
It can start to peel off if the water is too hot, but then it is
probably too hot for etching too.
Attachments
Not to late to edit, but too late to save changes after editing. 
Edit:
Hm, have to add one thing. Since I didn't check the catalogue
before driving to BilTema, I didn't realize they had two similar
types of paper. When in the shop I didn't know which one
Kermit had referred to so I bought both. The texts on the
packages are a bit cryptic, but I see now they are both
claimed as "photo quality" and "glossy" and the only difference
according to the package is that the one I have tried it heavier,
220g/sq.m. Maybe the other one works well too, but I haven't
tried it yet. When I came home I checked up which one Kermit
meant and used that.
Christer, do you think that you can check the article number?
I havent been able to find any paper with the weight (220 gr/m2) that you menition on biltemas webpage (www.biltema.se)
ps. tip before anyone takes of on a long journey, check first in the store that the intended gods are in stock. Biltema is notorious for keeping low stock in their warehouses, and long time between fillups.
I have been dissapointed sooo many times. Fortunately I live only 5 kms from a warehouse.
/rickard
Article number 23-771
It says "Glossy" on the package, the other one doesn't, but
maybe both papers work, I haven't tried the other one. I have
a suspicion, but it is only a speculation, that this paper is good
because it is cheap quality and perhaps not as good for its
intended use as better photo papers. While other photo papers
seem to contain a lot of plastic or similar stuff, this seems to be
real paper, except for the coating.
Happy ironing!
markp said:I've used clear transpearancy(sp?) sheets with good luck. Nice fine detail and you can see the image through the sheet too which is kind of helpfull. To fix any small defects I use a 'Sharpie' waterproof marker that does a great job. The acid is repelled by the ink.
how do you iron it on the copper board?
I tried this with some Canon paper (GP-401) i have, and it works great. The canon paper peels right off after the toner has melted, no need to soak it in water. Don't know if this works with more complicated patterns and traces, but it worked with a simple test pattern with component pads. Haven't tried the Biltema paper, but maybe it works the same way?
I removed the film residue with a moist "scotch brite" kind of spunge, the white type that is less abrasive. Very easy to do and the traces didn't take any harm.
Btw, i messed around some with painting patterns directly with a plotter before, but this method is much easier and the results are much more detailed. The limit is how good your printer is, with the plotter less than about 0.3 mm aren't possible because the pen tips break.
/Andreas
The toner comes right off the plastic sheet with an iron just like the commercial product. The sharpie is used AFTER the pattern has been ironed on the board to fix the holes in the traces if any.getafix said:
how do you iron it on the copper board?
I set the iron for cotton and iron directly on the transpearancy. The transpearancy is made for the high temps of a laser printer and a projector so there is no problem with melting it.getafix said:won't the transparency melt? do you put a layer of paper between the transparency and iron? is the iron set at a high temperature?
- Status
- This old topic is closed. If you want to reopen this topic, contact a moderator using the "Report Post" button.
- Home
- Design & Build
- Construction Tips
- PCB making: Toner transfer method