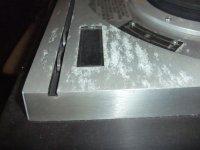
On the faceplates of a wide range of vintage audio devices (like Pioneer SX1980, Onkyo Integra A-9911 etc.) are occur reaction (by cat urine - so I think), because such vintage audio devices were some years unprotected resp. unboxed in the attic.
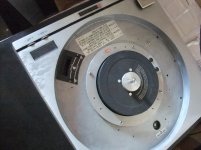
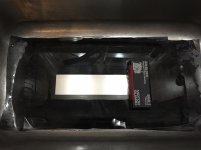
The attached images show an example of a direct drive turntable (record player) from National Panasonic.
What are the right steps for a perfect cosmetically restoration resp. for a perfect refurbishing ?
Thank you for your advices.
This URL's don't provide the wanted information:
Marantz 2500 - Repair And Restoration - Solid State Receiver
Cleaning a corroded faceplate | Telecaster Guitar Forum
How to clean up corroded Silverface frontplate? | Telecaster Guitar Forum
Excellent metal polish for vintage hi-fi fascia - aluminium, stainless steel (Mr Stee - General Hi-Fi Discussion - StereoNET
Tube amp faceplate restoration question..... | Steve Hoffman Music Forums
http://www.tdpri.com/threads/how-to-get-the-faceplate-of-a-silverface-clean.213142/
https://www.finishing.com/364/73.shtml
Marantz 2500 - Repair And Restoration - Solid State Receiver
removing/preventing corrosion on aluminum basket
https://www.finishing.com/574/26.shtml
https://www.quora.com/Under-what-conditions-does-aluminium-corrode
Attachments


I'd say you had 2 options.
1 - Paint. Gives you the choice of metallic silver/champagne or any colour you like.
2 - Brushed finish, there are threads describing the use of a belt sander with guides to achieve parallel "grain".
If you tried option 2 and didn't like it you could revert to option 1.
1 - Paint. Gives you the choice of metallic silver/champagne or any colour you like.
2 - Brushed finish, there are threads describing the use of a belt sander with guides to achieve parallel "grain".
If you tried option 2 and didn't like it you could revert to option 1.
Aluminum is a difficult case: because of its properties, there is no way you could get away using standard electrochemical restoration methods (unless perhaps if you have access to very specialized (and nasty) reagents and processes, and I am not even sure), but here base material has been lost, and if additive methods are ruled out, your only option seems to polish off up to the deepest pitted area, which is going to be time-consuming, and will seriously weaken the chassis, even if it was comfortably thick to begin with....
Some form of up-cycling might be more adapted here, if the gear is still functional...
Some form of up-cycling might be more adapted here, if the gear is still functional...
Some purple power might clean it up probably very diluted. Make sure you clean up every bit after or it will eat away the aluminum.
You could do a rougher finish if the pitting is bad cause i know a non-uniform surface drives me nuts. Shoot, you could go with russcs paint idea, fill all the pits to be smooth. They have an absurd amount of different paint finish textures so there is bound to be something spot on the same or very close if you're hoping to make it look the same.
Clean up the lettering and numbering then fill it in with black laquer to make that look new. Finally id put some sort of top coat on it to give it some added protection.
If citric acid is the cure, you can buy it in crystal form in many grocery stores and save the lemon juice. Maybe an old toothbrush to scrub it?
An old toothbrush would work to hasten the effect, but at the expense of wearing down the surface finish of the surrounding metal. Best to apply with a soft paintbrush, leave for awhile, then wipe off and reapply. Will take quite a long time to complete, and will not alleviate any prior pitting of the metal.
An alternative is to immerse the whole structure under water (or a bath of citric acid) and gently stroke the entire surface one way with a scotchbrite pad. This would change the entire finish but (somewhat) blend in the pitting.
There is no easy answer here. Once the metal has gone, its gone, thus refurbishment by refinishing will always be a compromise.
As has been said, the damage is done and you will have to decide what you want the finish to look like and how much work you are willing to do.
That being said, I don’t think the finish on the aluminum is any worse than the scrap aluminum I have sourced regularly from my local metal yard to fabricate my projects...actually, I know I have used pieces that had worse pitting, scratches and oxidation than your pictures depict.
The method I have come up with for creating a “brushed” look on all the panels that I use for my chassis’ is to completely submerge and wet sand them in the kitchen sink in about an inch or two of warm water (keeping your hands warm will make you more productive).
I have a scrap of rubber liner used for custom bathroom tile installs that I lay in the bottom of the sink that helps prevent the pieces of material from getting scratched up and sliding around too much.
I use 150-200 grit wet/dry paper wrapped around a hard rubber block. Sometimes I use a softer block if I need to work out some particularly bad pitting or scratches in one area and blend them in.
The material comes off quite fast with moderate pressure. I always sand along the longer axis of the work and make sure my strokes remain as parallel as possible. Keeping pressure uniform throughout your strokes is important. The piece can be rotated and worked on from both ends along the same axis to ensure more even removal of material.
I believe you could remove the oxidation on that turntable chassis fairly easily if you can get any raised logos and all other hardware out of the way. The recessed labeling should remain intact if you take your time and are careful about how you apply pressure while you sand.
I take a very minimalist approach to finishing my projects. They all receive a few coats of butchers wax (wood and aluminum) that I brush on with a utility brush and allow to dry for 10 or 15 minutes and then I buff the wax out with a shoe brush to bring it up to a nice satin shine. I have projects that I did years ago that still look as they did when I finished them with no issues of oxidation or otherwise.
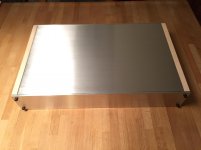
I attached a few pics of my sanding setup and a chassis for a preamp project that I built from scratch out of some scrap that was both oxidized and scratched.
That being said, I don’t think the finish on the aluminum is any worse than the scrap aluminum I have sourced regularly from my local metal yard to fabricate my projects...actually, I know I have used pieces that had worse pitting, scratches and oxidation than your pictures depict.
The method I have come up with for creating a “brushed” look on all the panels that I use for my chassis’ is to completely submerge and wet sand them in the kitchen sink in about an inch or two of warm water (keeping your hands warm will make you more productive).
I have a scrap of rubber liner used for custom bathroom tile installs that I lay in the bottom of the sink that helps prevent the pieces of material from getting scratched up and sliding around too much.
I use 150-200 grit wet/dry paper wrapped around a hard rubber block. Sometimes I use a softer block if I need to work out some particularly bad pitting or scratches in one area and blend them in.
The material comes off quite fast with moderate pressure. I always sand along the longer axis of the work and make sure my strokes remain as parallel as possible. Keeping pressure uniform throughout your strokes is important. The piece can be rotated and worked on from both ends along the same axis to ensure more even removal of material.
I believe you could remove the oxidation on that turntable chassis fairly easily if you can get any raised logos and all other hardware out of the way. The recessed labeling should remain intact if you take your time and are careful about how you apply pressure while you sand.
I take a very minimalist approach to finishing my projects. They all receive a few coats of butchers wax (wood and aluminum) that I brush on with a utility brush and allow to dry for 10 or 15 minutes and then I buff the wax out with a shoe brush to bring it up to a nice satin shine. I have projects that I did years ago that still look as they did when I finished them with no issues of oxidation or otherwise.
I attached a few pics of my sanding setup and a chassis for a preamp project that I built from scratch out of some scrap that was both oxidized and scratched.
Attachments
As has been said, the damage is done and you will have to decide what you want the finish to look like and how much work you are willing to do.
That being said, I don’t think the finish on the aluminum is any worse than the scrap aluminum I have sourced regularly from my local metal yard to fabricate my projects...actually, I know I have used pieces that had worse pitting, scratches and oxidation than your pictures depict.
The method I have come up with for creating a “brushed” look on all the panels that I use for my chassis’ is to completely submerge and wet sand them in the kitchen sink in about an inch or two of warm water (keeping your hands warm will make you more productive).
That is a brilliant description - you are a first class technical writer.
I have used a similar approach to finishing cheap and nasty guitar hardware, covered with burred edges and lumpy chrome, by using kitchen scouring pads under warm soapy water. Taking my time, I have gotten a lovely soft satin finish of dulled chrome, with a selective reveal of the underlying electroplated copper. To finish off the finishing, I use a crumpled brown paper bag as 10,000 grade sandpaper.
In my experience, the first scratch is always a tragedy. After a thousand scratches it starts to look interesting. After ten thousand scratches - wow - that's really beautiful.
a lot of good advices - thank you very much.
But maybe a professional company like
Technics SP-10MK2 turntable restoration work by RoyLCraft service only (10) | eBay
is a better choice. Any experiences ?
Roylcraft Custom Turntables - Home | Facebook
But maybe a professional company like
Technics SP-10MK2 turntable restoration work by RoyLCraft service only (10) | eBay
is a better choice. Any experiences ?
Roylcraft Custom Turntables - Home | Facebook
") !
!- Status
- This old topic is closed. If you want to reopen this topic, contact a moderator using the "Report Post" button.
- Home
- Design & Build
- Construction Tips
- Removing of very strong Corrosion on Vintage Solid State Amp Silver Face Plates