Just wondering what kind of neglected/abused pieces of audio equipment diyers have come across over the years.
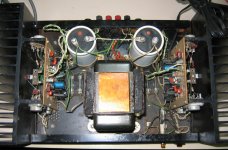
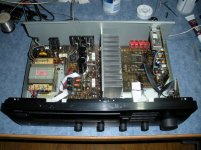
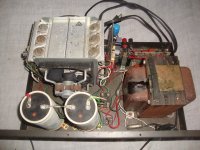
A few years ago I ended up with a Hafler DH200 amp that was downright nasty.
Heavily rusted, lousy solder joints, messy & poorly routed wiring, paint overspray (probably for the sale) and so on.
After a complete tear down, parts swapping / replacement / substitution / upgrades, this is where it is at so far.
As nasty as this one is, I am sure there are much worse out there.
It would be nice to see some before and after pics if you have them.
Attachments

Back in '84' I had acquired a "Bi-Amp" brand amp. It was dead, fortunately I was attending school & I brought it to the lab in school. It was well rusted as well, I got it up & running..
It seems when a piece of gear goes dead & 'we' don't have the time or inclination, it gets stored in an unsuitable location or environment.
Garages are the place of choice, but it seems some garages are better than others....moisture, rats & mice......dust & dirt.
Wrap up your devices in plastic....try to find those packets(Unused) of Silica Gel, to draw out moisture. Just throwing it atop other stuff in the garage.....and returning to it years(decades) later will get you a rusted & ruined machine.
___________________________________________________Rick...........
I have a neglected DH-200 on it's way that may look worse than yours and it's supposed to work. If I remember, I will post pictures of it. I would like to restore the chassis like you have but I would like to reapply the lettering as it was. I wounder if you can buy decal/stickers to add the information back. It was probably silk-screened on so I doubt that any are available. I wounder if a Toroid transformer would improve the sound some.
Nice job on yours.
Nice job on yours.
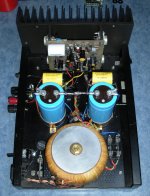
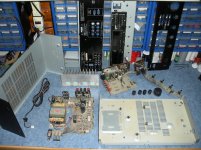
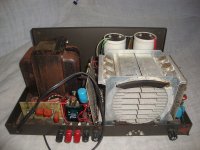
I actually ended up with 2 haflers that I didn't want to fire up because of their condition, and didn't want to risk damaging any components.
One was the downright nasty and rusty dh200 shown above, and the other was a dh220 that was modded, but not very well done.
It had huge monster wire soldered to the back of the boards, that was squeezed between the boards and chassis, and all the safety devices removed.
It also had boards that looked like they came from 2 different units, oem caps but were different from each other.
I took that one apart and with 2 dh200 chassis ended up making 2 monoblocks out of it.
As I was not sure what shape the boards and outputs were in, I stuck to using fairly inexpensive components, including a mix of caps I had lying around.
Even so, they are very impressive sounding units, and near dead quiet.
The mono units are a work in progress, just trying to decide what to do next.
Either upgrade those with better matching components, start again on another set of boards, or go for the musical concepts PA-4 boards.
Check Fabs dh200/220 mod thread, plenty of good ideas in there
http://www.diyaudio.com/forums/solid-state/31131-hafler-dh-200-220-mods.html
Attachments

I like your mono blocks made from the Hafler amp. What is the AC voltage coming from the secondaries on the Toriods? I'm having a hard time finding one that is 45VAC from each leg. I have a 50VAC and I think a 48VAC but I'm not sure if I increase the voltage to the board all will be well. The 48VAC would be the closest with around 68VDC. I could regulate it for all but the output drivers. I've been looking at the Musical Concepts site. I like the idea of upgrading the boards. I'm rewiring it and one of the large caps are down but I was planning on an upgrade on them anyway. The power switch is sticking and the amber light is bad so I've ordered them and I am planning on changing all the input and output connectors. Their power supply upgrade (Ps-100) is a possibility with either buying the raw board or the complete kit just depends on if the boss (wife) spend the extra money. I looked at the overall cost of doing all these upgrades and it will be over $200 and I only have $75 in it. It's a good thing I'm planning on keeping this one as I think it would be hard to recoup the cost on this project.
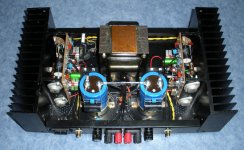
With the toroid equipped amps at idle (300mA bias, no load), it measures 135vdc across the main caps.
My original stock DH200 with the oem transformer measured 128vdc (275mA bias, no load).
Musical Concepts does offer some nice toroids as well, the ones I have are a pair of Hammonds I picked up back in the 80s.
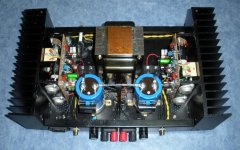
I just noticed I had posted a previous version of the blocks, here is a more recent one showing the inrush updates.
Other changes I made other than obvious cap and bypass cap upgrades so far include:
Relocate ac components as far away from dc/output side as possible.
Higher output toroids that are mounted with non ferrous materials (aluminum plate & brass bolts).
Added IEC C14 power sockets and removable power cords.
Heavy duty 20A toggle power switches mounted at the rear of each case.
Added .5 ohm thermistors to limit inrush, between the power switches and main fuses.
Increased bridge rectifiers to Fairchild 35A (oem was 25A)
Moved the board fuses to the secondary sides of the toroids, maintained speaker protection fuses with quality bypass caps.
Increased the main caps to 18,000 mfd each for a total of 72,000 mfd (oem was 10,000 mfd each for a total of 20,000mfd)
Increased internal wiring to 16 & 14 gauge, 12 guage between the caps.
For input wiring I used RG174/U coax, the same as what I use for interconnects.
Made a few ground changes, including grounding heat sink grounding points directly to the main ground (not rely on chassis/screw connections).
All new output insulators with fresh heat sink compound.
I am amazed at how good they actually sound, considering these mono units contain an assortment of different types of capacitors including vintage Wondercaps, Bennics, Daytons, Vishays, Sonnicaps, Auricaps, Nichicons.
The Nichicon Audio grades and Vishay MKP are fine, but I can't help but wonder what it would be like to have something better like Jantzen Superiors throughout.
Just got in some more goodies from Mouser, so plan on changing the onboard 100mfd @ 100v to 220mfd @ 100v (4 total).
Also have the diodes and resistors to ground the chassis to the main ground, as some have recommended, possibly with a lift switch.
Not sure if that is necessary though, because as they are they are very quiet as they are.
Might make up triangular ground straps as shown in the DH200 photo as well, something I read about that recommended putting some distance between the main ground and the transformer ground, for noise considerations.
My original stock DH200 with the oem transformer measured 128vdc (275mA bias, no load).
Musical Concepts does offer some nice toroids as well, the ones I have are a pair of Hammonds I picked up back in the 80s.
I just noticed I had posted a previous version of the blocks, here is a more recent one showing the inrush updates.
Other changes I made other than obvious cap and bypass cap upgrades so far include:
Relocate ac components as far away from dc/output side as possible.
Higher output toroids that are mounted with non ferrous materials (aluminum plate & brass bolts).
Added IEC C14 power sockets and removable power cords.
Heavy duty 20A toggle power switches mounted at the rear of each case.
Added .5 ohm thermistors to limit inrush, between the power switches and main fuses.
Increased bridge rectifiers to Fairchild 35A (oem was 25A)
Moved the board fuses to the secondary sides of the toroids, maintained speaker protection fuses with quality bypass caps.
Increased the main caps to 18,000 mfd each for a total of 72,000 mfd (oem was 10,000 mfd each for a total of 20,000mfd)
Increased internal wiring to 16 & 14 gauge, 12 guage between the caps.
For input wiring I used RG174/U coax, the same as what I use for interconnects.
Made a few ground changes, including grounding heat sink grounding points directly to the main ground (not rely on chassis/screw connections).
All new output insulators with fresh heat sink compound.
I am amazed at how good they actually sound, considering these mono units contain an assortment of different types of capacitors including vintage Wondercaps, Bennics, Daytons, Vishays, Sonnicaps, Auricaps, Nichicons.
The Nichicon Audio grades and Vishay MKP are fine, but I can't help but wonder what it would be like to have something better like Jantzen Superiors throughout.
Just got in some more goodies from Mouser, so plan on changing the onboard 100mfd @ 100v to 220mfd @ 100v (4 total).
Also have the diodes and resistors to ground the chassis to the main ground, as some have recommended, possibly with a lift switch.
Not sure if that is necessary though, because as they are they are very quiet as they are.
Might make up triangular ground straps as shown in the DH200 photo as well, something I read about that recommended putting some distance between the main ground and the transformer ground, for noise considerations.
Attachments
Thanks for the great info on the DH-200. The updates look even better on your mono amps. For the most part it sounds like you have done everything I'm planning to do to my amp except of course making them mono amps as I don't have two.
Toriods: I would really like to change out to toriods and would even like to go with seperate bridge rectifiers for the plus and minus supplies. I wonder how high one could go on the voltage before it becomes a problem. I think if it is much higher than stock then you should maybe replace the voltage dropping resistors R28 and R34 with slightly higher values to limit what the early stages see. Also good point on the non-ferrous bolt for mounting the toriod as that should reduce the overall voltage some.
Main Caps: I am planning on using some 18000uF 100V caps on mine and I'm thinking about buying the PS-100 board from Musical Concepts to mount the capacitors too as I have found some good snap in caps for that. I really like increasing the capacitance on the main caps as it really does a lot to improve the sound. I wounder how much inrush you have with the 72000uF caps, does the inrush limiters get hot on start up?
*Triangular ground straps: Do you have the link to this as I would like to read up on that as well.
Wiring and connections: I'm going thru and replacing the wiring with silver plated wire and have ordered some shielded twisted pairs for the input and outputs. I'm changing the RCA connectors out with better quality gold plated along with the speaker connectors. It would be nice to change out the regular power cord with the IEC type power connectors and use a heavier power cord.
What's your thoughts on using the Musical Concepts PA-4 boards? Are they really worth the investment. If you are going to do that then is there any other output transistors that would be better than the stock. How far do you go.
They want near $800 for one of their completely rebuilt units. You would almost have that much in these if you bought everything from them.
I think on my PCBs, I'm going to recap them and check all f the components that I can. I think the input differential transistors can be swapped for some better matching ones.
It's a good project and at the end I'll end up with a nice amp.
Not sure if going to toroids actually offers a cost effective benefit because I haven't done any direct comparisons, but I know that beefing up the power supply section will for sure though.
You might be able to pick up a second unit and make your own mono units for less money than heavily modding a single unit. Doing so would instantly double the transformer current output, as well as power supply capacitance. I also decided on the mono units to give me enough space to properly mount what needs to be in there. It also allows for distancing the ac components as far as possible, the ability to dress the wiring down along the chassis floor, and help with heat internal heat reduction/disapation.
Most main caps are usually in the 75 - 80V range, so that will definitely be a limitation to keep in mind.
Doubling up the bridge rectifiers is an interesting idea that Fab has recommended in his Hafler thread, but will require consideration when spacing out the final locations for components. Definitely something I will plan on when I put together another unit(s).
The main ground strap idea is in the Musical Concepts Hafler boards manual, a link to a pdf version of it can be found on their site, although it has not been updated since the PA-3E series. Page 11 shows it, not sure where the text on that is though. They show it more like a trapezoid than a triangle though.
For inrush limiters, if they are sized properly, then there should not be an issue. Keep in mind that their resistance drops as they operate, so it is not like a constant resistance/current limiting situation. I found recommendations stating that for doubling capacitance, use .5 ohm, for tripling capacitance use 1 ohm, etc.
I have heard nothing but good things about the musical concepts boards, definitely something I want to try, but in another set of mono units. For the money involved and performance gain, the PA-4 kit is a pretty good deal. You could easily spend that or more on quality board component upgrades in a 200 or 220 amp.
I have been told that if the oem outputs are in good shape, there is no need to change them.
I do like to use Nichicon Muse audio grade electrolytics and NPs on the boards, with decent quality PP caps where I can.
The DH200 PC-6 boards have a Bias adjustment, but do not have a DC Offset adjustment, so close input matching is an important consideration. I like the DH220 PC-19 boards better, because they are a much nicer constructed board, they do have the DC Offset adjustment, and recently discovered that they have bypass caps for the onboard electrolytics already.
In the Chassis ground bmp, it may be better to connect to the lower point of the "triangle" ground than the upper part as shown, will have to test that out.
Btw, if you check eBay, there is an excellent seller there named qua-co that I have dealt with several times. He carries good quality components, very knowledgable in Hafler build/repair and has worked to get me better combined shipping deals and shipping options. If you need some oddball thing like an oem style rear fuse holder, neon lamp or power switch, he carries stuff like that as well.
Attachments
Thanks again for the info. I had already found the seller qua- co as I had passed an order for some parts last week. I was looking a little while ago and noticed that he has a nice kit. For the 200 that includes the two boards as a build it yourself kit. It includes several other parts all for '$249 which I think will bring it to the level that they offer for them doing the work for $599.
I was planning on puting a copper flat bar across the two caps and then solder everything to it in the middle. It's about 1/2" wide a 3/32" thick. I could add a piece of copper wire and make a triangle out of it to attach the transformer ground to.
It would be nice to make a couple of monos out of the haflers. I think I would rather find two more units and use them rather than change this one as after I get all the work on this one, it going in my two channel room to drive the main speakers or I may use in a bi-amp system.
I noticed that kit as well, something he must have just added.
I will have to check more into it.
Be careful when going with a thick copper strap or stacking terminals on the caps, there is not a lot of clearance between the cap screws and the oem steel chassis cover when you use the stock height caps. For mine I glued in some plastic strips onto the inside of the covers, right over where the caps sit. That way if the cover is flexed for whatever reason, there will not be a short.
I found a good source for thin plastic sheets in discarded lcd monitors or tvs, they use several layers in various thickness and opacity for the backlighting.
Another option is to use shorter main caps, I bought some 18,000 mfd ones from qua-co that are the same diameter as the oem ones, but 1" shorter.
I recently did a few more mods to my monos and am evaluating them now.
The chassis is now grounded directly to the IEC ground, but have not connected the cap ground to the chassis ground yet.
The result is pretty much the same, it was very quiet before and is the same now.
I also changed out the 4 - 100 mfd 80v board caps to 4 - 220 mfd 100v Nichicon audio grade caps, and removed the excess bypass caps I had in there.
Others have recommended this, but my first impression is that the amps now sound bass heavy or exaggerated.
If you have a system and find it a bit lacking in the bottom end, then this might be the way to go.
My system doesn't though, and I find it excessive.
I could live with it as they are, and just dial back servo and driver settings, but I would prefer to get it right.
I will give it more time for evaluation, but will probably swap the 220 mfd caps out for 100 mfd caps.
I know what you mean about getting another set, that is what I want to do as well.
For one thing if you have 2 sets of working amps, you can make more accurate comparisons and evaluations.
I also don't like repeatedly taking things apart, as you can only do that so many times before something gets damaged, traces start lifting etc.
Make sure you post some pics of you build if you can, in progress and completed.
Its always nice to see someone elses approach to a build.
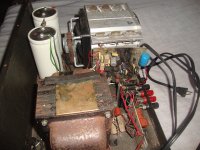
Got sidetracked by a few other projects, but finally got my DH200 "rescue" project put together.
Going to give it a good final check and then fire it up on the bench to check dc offset and set bias.
This was a low dollar overhaul using good but relatively inexpensive components, as well as a few wiring upgrades.
Main caps were increased to Mallory 12,000 mfd units, and audio grade Nichicons were used on all on-board electrolytics and NP caps.
Low cost Dayton Precision PP caps where possible, as well as Xicon 1% metal film resisitors.
Added a .5 ohm inrush limiter to the transformer primary, a new Carling 16A power switch, and increased the bridge rectifier to a Fairchild 35A unit.
Installed new output insulators, as well as new thermal compound on outputs and bridge rectifier.
Attachments
The dc offset worked out to 9mV on one channel and 30mV on the other.
Even though that was not too far off, decided to add dc offset adjustments based on the dh220 board designs.
Both sides are now set to less than 2mV now, at operating temperature.
Tested the amp on several sets of speakers, including my main ones and it turned out to be a nice sounding amplifier, a significant improvement over the stock unit.
I recently came across another project, a Yamaha RX-395 that was pretty filthy inside.
More of a cleanup than a restoration on this one, it had spent the majority of its working life in a woodworking shop.
By no means an audiophile piece, but I hate to see any potentially good working equipment end up getting thrown away
I tore the unit down into workable sections and thoroughly cleaned everything.
Installed new thermal compound on the outputs & cleaned all the controls and switches with Nu-trol.
I carefully inspected all components, found one slightly bulging cap that I then replaced, and resoldered a few shoddy looking solder joints in the power supply section.
I reassembled the unit and tested, and everything works as it should.
This one will now spend its remaining life in a buddies' project car garage.
Attachments
Hafler DH-500 in real bad shape.
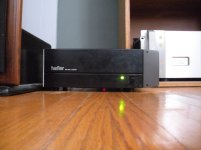
My latest acquistion is a very neglected Hafler DH-500 2 channel solid state amplifier. One channel is actually burned out and the PC board is damaged beyond repair. I plan to restore it and do some mods as well along the way. It's missing the top cover so I will need to find or make a new cover.
My latest acquistion is a very neglected Hafler DH-500 2 channel solid state amplifier. One channel is actually burned out and the PC board is damaged beyond repair. I plan to restore it and do some mods as well along the way. It's missing the top cover so I will need to find or make a new cover.
Attachments

...and the amber light is bad ....
FYI - the DH-200's amber neon lamp is a high-temp indicator, and glows only when one of the thermal breakers on the heatsinks opens due to excessive temperature. So you shouldn't expect the lamp to illuminate except under fault conditions. This is the same arrangement for all Halfer amps equipped with the amber light. For later models without the amber light, the power switch's lamp will blink under high-temp conditions.
- Status
- This old topic is closed. If you want to reopen this topic, contact a moderator using the "Report Post" button.
- Home
- General Interest
- Everything Else
- Neglected Audio Gear