I'm not sure if this is the correct place for this but here goes ") I'm sure the mods will put it in it's place...
I'm sure the mods will put it in it's place...
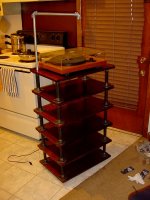
As i have no in progress projects right now i thought i'd show you my rack. The idea behind it was to prevent everything from becoming dusty & to at least attempt to prevent the sound from the speakers vibrating everything.
This is still work in progress as i'll be incorporating a PS Audio P600 powerplant to drive most of the front end (though this will be external). I'll also be fitting a nice air filter to prevent dust getting in to all the components. Right now it doesn't stop that, it seriously reduces it though
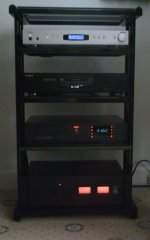
Here we go with a few pics... First up the whole rack, there are certain components missing (Pioneer CTF950 cassette deck for one). No DVD player either (Denon dvd 2930). Blu ray player will go in to shortly...I'm in love with the Krell DT10 top right

It was a bit of a PITA to build this rack, the shelves were easy though simply because i made a jig to make them all exactly the same. All the shelves can slide up & down the rack & be locked into position so any size of front end component can be fitted in, that is unless it's over 19" wide Excuse the dust, just shows how long it has been since the cassette deck was in there

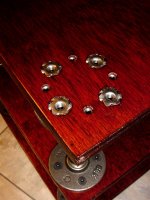
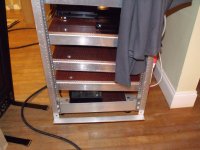
Here we have the central front shelf support. I happened to have a load of cross threaded bolts with square nuts so i simply made a channel that the nuts could slide in & another layer of MDF so they'd clamp tight. Works very well.

All the shelves get fitted from the top & then slide down to where i want them to be & then bolted in place.
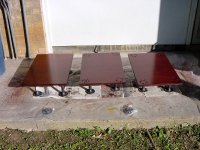
On each shelf there is a rather large & heavy what i assume to be concrete slab which has been painted to make it look a tad better. These are 18" by 18" & are standard fare from a garden centre. To decouple the slab fom the shelves there are 4 x 1/2" thick felt feet, one in each corner.

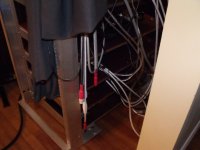
I don't tend to use a record deck very often, hense the thing is at the bottom. Just to aid my loading of records i added a 12" fluorescent tube just above it. This is switched on when the power switch on the record deck is turned on, makes sense to me lol. You can also see the air intakes of the rack. These will eventually be covered with some kind of speaker grill cloth to prevent dust ingress.

When things get warm we have some fan cooling, these are very quiet though as they are channeled from the middle of the rack to the outside & back again front & back.

Lastly the air outputs of the rack, the same is also on the rear of the rack itself. You might notice 4 of Yamahas finest beryllium midrange units that are going to be used in a speaker project hopefully coming soon

The whole thing ends up sealed and i'm using a load of secondary double glazing to seal up the front of it. Works very well indeed, it might have been a PITA to make but the result was better than i expected. Not only does my equipment stay cleaner for longer, it also sounds better due to less vibration
That's it for now, just thought i'd share a bit...
I'm sure the mods will put it in it's place...As i have no in progress projects right now i thought i'd show you my rack. The idea behind it was to prevent everything from becoming dusty & to at least attempt to prevent the sound from the speakers vibrating everything.
This is still work in progress as i'll be incorporating a PS Audio P600 powerplant to drive most of the front end (though this will be external). I'll also be fitting a nice air filter to prevent dust getting in to all the components. Right now it doesn't stop that, it seriously reduces it though
Here we go with a few pics... First up the whole rack, there are certain components missing (Pioneer CTF950 cassette deck for one). No DVD player either (Denon dvd 2930). Blu ray player will go in to shortly...I'm in love with the Krell DT10 top right
It was a bit of a PITA to build this rack, the shelves were easy though simply because i made a jig to make them all exactly the same. All the shelves can slide up & down the rack & be locked into position so any size of front end component can be fitted in, that is unless it's over 19" wide
Excuse the dust, just shows how long it has been since the cassette deck was in there Here we have the central front shelf support. I happened to have a load of cross threaded bolts with square nuts so i simply made a channel that the nuts could slide in & another layer of MDF so they'd clamp tight. Works very well.
All the shelves get fitted from the top & then slide down to where i want them to be & then bolted in place.
On each shelf there is a rather large & heavy what i assume to be concrete slab which has been painted to make it look a tad better. These are 18" by 18" & are standard fare from a garden centre. To decouple the slab fom the shelves there are 4 x 1/2" thick felt feet, one in each corner.
I don't tend to use a record deck very often, hense the thing is at the bottom. Just to aid my loading of records i added a 12" fluorescent tube just above it. This is switched on when the power switch on the record deck is turned on, makes sense to me lol. You can also see the air intakes of the rack. These will eventually be covered with some kind of speaker grill cloth to prevent dust ingress.
When things get warm we have some fan cooling, these are very quiet though as they are channeled from the middle of the rack to the outside & back again front & back.
Lastly the air outputs of the rack, the same is also on the rear of the rack itself. You might notice 4 of Yamahas finest beryllium midrange units that are going to be used in a speaker project hopefully coming soon
The whole thing ends up sealed and i'm using a load of secondary double glazing to seal up the front of it. Works very well indeed, it might have been a PITA to make but the result was better than i expected. Not only does my equipment stay cleaner for longer, it also sounds better due to less vibration
That's it for now, just thought i'd share a bit...
Nice rack.
Funny, I usually say that to the girls.
As i say though it's still work in progress. Some stuff will be removed & new stuff added. My present preamp (Classe DR5) will be removed & an ex dem Audio Research MP1 will be going in as a replacement, this means the Harmon Kardon AVR5500 will also be redundant & removed as the MP1 will take the place of that to.
DCX2496 will be added for active front speakers & various other bits & pieces.
One thing i didn't mention is the real PITA of moving or removing anything
Simply put each shelf & component above what i want to change needs to be disconnected & removed to get to the connections at the back of whatever it is that's being moved or changed.I wish i had thought about that earlier, but as it is it doesn't happen very often thankfully
The thing is it does exactly what i wanted it to do, so i can put up with some quirkiness.Bests, Mark.
Acoustat Rack
Hi there being an Acoustat fan since the early 80s my friend rebuilt a pair of 1+1s for me and a small but heavy audio rack that i named my Acoustat rack the only thing that's from Acoustat on that rack is a metal sticker that say's Acoustat here are a few pictures.
Work Almost Done
Finished Product
A Friends Bigger Rack
Hi there being an Acoustat fan since the early 80s my friend rebuilt a pair of 1+1s for me and a small but heavy audio rack that i named my Acoustat rack the only thing that's from Acoustat on that rack is a metal sticker that say's Acoustat here are a few pictures.
Work Almost Done
An externally hosted image should be here but it was not working when we last tested it.
An externally hosted image should be here but it was not working when we last tested it.
Finished Product
An externally hosted image should be here but it was not working when we last tested it.
An externally hosted image should be here but it was not working when we last tested it.
An externally hosted image should be here but it was not working when we last tested it.
A Friends Bigger Rack
An externally hosted image should be here but it was not working when we last tested it.
Nicely done MrAcoustat
Nothing so fancy for me... an of the shelf (ha) rack. One of my pet hates is seeing loads of wires so made a loom up for this.
One question I thought of starting a thread for... how much weight can you put on tempered glass shelves... mine are supported by just 4 small stick pads on the main framework.
Nothing so fancy for me... an of the shelf (ha
) rack. One of my pet hates is seeing loads of wires so made a loom up for this.One question I thought of starting a thread for... how much weight can you put on tempered glass shelves... mine are supported by just 4 small stick pads on the main framework.
Attachments
Nice rack.
Funny, I usually say that to the girls.
I'm not surprised. In all these racks prettiness trumps vibration control
I'm pretty sure tempered glass will happily support quite a bit of weight as long as it's not subjected to massive vibration. Unless you happen to be using a jack hammer nearby i think you'll be okOne question I thought of starting a thread for... how much weight can you put on tempered glass shelves... mine are supported by just 4 small stick pads on the main framework.
That or tiny contact area for the equipment if it weighs some may do some damage.On the contrary, in my own case the audio equipment is virtually sealed off from the environment. The rack is 3/4" MDF with rather large reinforcements which support the shelves & then the plinths are decoupled by 1/2" thick felt.I'm not surprised. In all these racks prettiness trumps vibration control
I think it works rather well

Sorry i haven't been about people, i have been suffering with my blasted back again
I keep saying i'm used to it (guess i should be since 1990) but it still takes me by surprise when it gets really bad I'll see if i can get some pictures of a friends setup which looks very similar to MrAcoustats & his friends racks. Very nice to
On the contrary, in my own case the audio equipment is virtually sealed off from the environment. The rack is 3/4" MDF with rather large reinforcements which support the shelves & then the plinths are decoupled by 1/2" thick felt.
Not sure what felt achieves as a vibration reducing layer but i fear not much under 100Hz.
Sorry to hear about your back; is it a slipped disk?
Ikea Rack
I needed more room for all my diy amplifiers. I've got 2 racks off to the side for source equipment and needed a big one for holding the amps between the speakers.
Here is a LINK to the project.
Here is a pic of the Ikea rack with cast iron pipes to help it support more weight.
I bought a cheapo used Ikea rack for about $40, added threaded rods, pipes and more wheels, and the result is kind of a crappy rack but one that can support many hundreds of pounds of amplifiers without bending. Looks good too.
I needed more room for all my diy amplifiers. I've got 2 racks off to the side for source equipment and needed a big one for holding the amps between the speakers.
Here is a LINK to the project.
Here is a pic of the Ikea rack with cast iron pipes to help it support more weight.
An externally hosted image should be here but it was not working when we last tested it.
I bought a cheapo used Ikea rack for about $40, added threaded rods, pipes and more wheels, and the result is kind of a crappy rack but one that can support many hundreds of pounds of amplifiers without bending. Looks good too.
Indeed yes, multiple discs that are so called "slipped" or in the doctors terms - prolapsed Like Pringles unfortunately, it's something that won't go away... Once you pop, you can't stop
Sub 100Hz there isn't a lot that's really much good. I was hoping the glass doors may help in that situation, well at least they'll certainly prevent some vibration energy from getting to the equipment. Not all though as you can understand
Perhaps a solid steel safe would help, not in the cooling department though
Like Pringles unfortunately, it's something that won't go away... Once you pop, you can't stop Sub 100Hz there isn't a lot that's really much good. I was hoping the glass doors may help in that situation, well at least they'll certainly prevent some vibration energy from getting to the equipment. Not all though as you can understand
Perhaps a solid steel safe would help, not in the cooling department though
I was wondering if there was a thread like this! I figured that with all the DIYers around here that we weren't all just building electronic stuff.
Speaking of cast iron pipes, I've taken quite a liking to building various pieces of furniture using steel pipes. In combination with floor flanges, they are incredibly strong. I've built speaker stands, a coffee table, and a CD/DVD/BD rack using those pipes.
Now I just recently completed my equipment rack. I've been meaning to build it for several years. It's very sturdy and weighs 65 pounds!
Materials:
This is the first time I had attempted to do a wood finish like this. It turned out pretty well. There are a bunch of tiny air bubbles in the poly finish, but overall it's pretty smooth.
The feet are 3/8"-16 carriage bolts. They are adjustable so that I can make the plinth of my turntable balanced. They screw into the bottom shelf via T-nuts and lock in place with hex nuts.
The 1/2" electrical conduit serves as an adjustable mounting for the white LED that illuminates the turntable. The conduit fits down inside the steel pipes. Both height and rotation are adjustable. Two 1/4" lag screws hold the conduit in place. The wire to the LED emerges inconspicuously out of the bottom shelf.
It was quite an adventure getting all 144 T-nuts in place. I could have had the screws go directly from one flange to the other, but I decided to screw directly into the wood instead. Wood screws probably wouldn't have been strong enough so I used machine screws and T-nuts. The holes for the T-nuts were sunk into the wood a little using a 3/4" Forstner bit. I used a hex bolt and a couple of flat washers to pull the T-nuts into the wood. Needless to say that by the time I got all of the T-nuts in, the head of the hex bolt was stripped and the washers were thoroughly flattened!
In case anyone is wondering, here's the equipment on the rack in the first picture (from top to bottom):
I suppose I'll make some posts of my other furniture creations too. I just need some better pics (my digital camera is old and pitiful in low-light situations).
Here is a pic of the Ikea rack with cast iron pipes to help it support more weight.
Speaking of cast iron pipes, I've taken quite a liking to building various pieces of furniture using steel pipes. In combination with floor flanges, they are incredibly strong. I've built speaker stands, a coffee table, and a CD/DVD/BD rack using those pipes.
Now I just recently completed my equipment rack. I've been meaning to build it for several years. It's very sturdy and weighs 65 pounds!
Materials:
- (6) 24" x 16" x 23/32" Sandply shelves
- (20) 3/4" x 6" black steel pipes
- (40) 3/4" floor flanges
- (144) 1/4"-20 x 3/4" black, flat-head, socket-drive machine screws
- (144) 1/4"-20 long-neck, six-prong T-nuts
- (16) #12 x 3/4" flat-head wood screws
- (4) 3/8"-16 x 2" carriage bolts
- (4) 3/8"-16 T-nuts
- (2) 1/4" x 2.5" lag screws
- 1/2" steel electrical conduit and angle fittings
- (1) 5mm white LED
- (1) 4.5 VDC wall-wart from an old CD Walkman
- (2 coats) red oak stain
- (2 coats) satin polyurethane
This is the first time I had attempted to do a wood finish like this. It turned out pretty well. There are a bunch of tiny air bubbles in the poly finish, but overall it's pretty smooth.
The feet are 3/8"-16 carriage bolts. They are adjustable so that I can make the plinth of my turntable balanced. They screw into the bottom shelf via T-nuts and lock in place with hex nuts.
The 1/2" electrical conduit serves as an adjustable mounting for the white LED that illuminates the turntable. The conduit fits down inside the steel pipes. Both height and rotation are adjustable. Two 1/4" lag screws hold the conduit in place. The wire to the LED emerges inconspicuously out of the bottom shelf.
It was quite an adventure getting all 144 T-nuts in place. I could have had the screws go directly from one flange to the other, but I decided to screw directly into the wood instead. Wood screws probably wouldn't have been strong enough so I used machine screws and T-nuts. The holes for the T-nuts were sunk into the wood a little using a 3/4" Forstner bit. I used a hex bolt and a couple of flat washers to pull the T-nuts into the wood. Needless to say that by the time I got all of the T-nuts in, the head of the hex bolt was stripped and the washers were thoroughly flattened!
In case anyone is wondering, here's the equipment on the rack in the first picture (from top to bottom):
- Pro-ject 2.9 Wood with Shure V15vxmr
- a hybrid tube/solid-state phono preamp that I've been working on for years
- Oppo BDP-83SE
- Crown Straight Line One (being used as a source selector for front left/right channels
- a cheap JVC VHS VCR (being used as a clock)
- Fisher 250 receiver (one channel being used to drive a sub)
- off to the right:
- Panasonic Viera 37LZ800 1080p LCD TV
- (2) Otari MX5050BII-2 tape decks (being use as a stand for the TV)
- off to the left:
- NHT SuperOne (1 of 5)
- on shelf below NHT: a 5.1 surround preamp on a breadboard (an impressive mess of wires). This will eventually be a 7.1 analog (digitally-controlled) preamp. Lots and lots of relays will be involved.
- just out of frame:
- (3) LM3886 monoblock amps for the front channels
- a stereo LM1875 amp for the rear channels
I suppose I'll make some posts of my other furniture creations too. I just need some better pics (my digital camera is old and pitiful in low-light situations).
Attachments

Last edited:
Indeed yes, multiple discs that are so called "slipped" or in the doctors terms - prolapsed
I had serious disk problems for years - the result of skiing injuries and silly dead lifts. A good chiropractor (20 years ago) and regular stretching routines allow me to do all kinds of silly things with practically no complains from the disks today. Maybe i'm just lucky.
Sub 100Hz there isn't a lot that's really much good. I was hoping the glass doors may help in that situation, well at least they'll certainly prevent some vibration energy from getting to the equipment. Not all though as you can understand
Perhaps a solid steel safe would help, not in the cooling department though
Glass is a horrible material for insulation and support. It may be usable only if the shelfs are very well decoupled from the rack. Neither does excessive mass help much - it just lowers resonance and makes it even more difficult to control.
About the only (sensible) way to achieve isolation over a wide range of frequencies is to use some lossy coupling. I have had good results using almost deflated inner tubes between layers of slate and wood and excellent results by following the recipe from Symposium's patent - a sandwich of layers of increasing compliance towards the center. The mid layer is closed cell polyethylene foam. To fine tune the sound i use either diy rollerblocks or myrtle wood blocks ( Cardas idea) under the individual components.
I like these Network server equipment racks. You need 1 set to complete a rack. You can check on ebay I think or google. All aluminum. I use aluminum angle brackets to connect the shelves onto the racks. The nice thing is that it is extremely flexible when choosing hight between racks...and you can even angle your shelves anyway you want (see pic). The screws/bolts/nuts needed come with the racks.
Attachments

MrAcoustat finished rack
Here are a few pictures of my DIY rack had a few on page 1 but they are now gone it would be better if whe could edit our posts but this is not the case.
Here are a few pictures of my DIY rack had a few on page 1 but they are now gone it would be better if whe could edit our posts but this is not the case.
An externally hosted image should be here but it was not working when we last tested it.
An externally hosted image should be here but it was not working when we last tested it.
DIYed 16mm high-glass MDF infinitely adjustable... love them!
up close view:
complete view:
An externally hosted image should be here but it was not working when we last tested it.
up close view:
An externally hosted image should be here but it was not working when we last tested it.
complete view:
An externally hosted image should be here but it was not working when we last tested it.
Not only does my equipment stay cleaner for longer, it also sounds better due to less vibration
That's it for now, just thought i'd share a bit...
How does vibration enter an electrical signal, excluding the turntable cartridge that is?
How does vibration enter an electrical signal, excluding the turntable cartridge that is?
I don't think vibration will affect sound signal in a conductor ... vibration will come into consideration when talking about a turntable or microphonics of tubes...
correct me if I'm mistaken- Status
- This old topic is closed. If you want to reopen this topic, contact a moderator using the "Report Post" button.
- Home
- General Interest
- Everything Else
- Racks, how do you support your equipment?