I tried this thread in Group Buys but I think it needs more discussion first. Here goes, again...
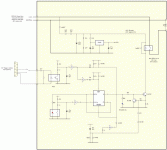
I thought it would be nice to create a relatively simple power/speaker output relay circuit for amp builders such as myself. Here were my requirements.
* accept momentary push button to toggle power state
* accept 12V trigger (actually 5-24V range) from receiver but with ability to change power state with on-device button.
* must have two outputs, power breaker and speaker outputs (helps with those nasty sounds at shut down)
* uses a wide range of voltages and very little power since it will most likely run whenever plugged in
* on board AC-DC (35V max to 5VDC)..
* accepts external relay power (any voltage will do) up to ~10A so you can use monster relays
* small outline but all through-hole parts (ended up 2"x4" with mounting holes)
So here is the sequence of events when you give the circuit juice.
1) There is a 0.5 second delay where nothing with happen (clears the logic states and makes sure nothing bad happens) when you initially power the unit. This is a safely precaution and should not be a problem for anyone really.
2) Toggle power with power button OR 12V trigger
3) Power turns on instantly. Speaker outputs are delayed 1 second.
4) Toggle power with power button OR 12V trigger
5) Power and speaker outputs are turned off instantly.
The circuit has been thoroughly simulated in PSPICE.
The parts cost $9.30+SH (all Mouser) and I'm hoping to get at least 20 requests for boards to drop that price to $6 each.
I think you mean something like this, right?
http://sound.westhost.com/project39.htm
I did not think to add this. This would require modification but is probably something I can do.
http://sound.westhost.com/project39.htm
I did not think to add this. This would require modification but is probably something I can do.
This circuit is more of a way to use momentary switch and external trigger. The trigger and switch signals work on catching their respective rising edges. This way either a trigger or button press will toggle the power. Some people would like to have a manual override to their amps without reaching behind for the infamous massive toggle switch (10A+ switches are massive.)
Hello Alexcd,
I must say that this circuit looks very familiar! While you've changed some details of the main relay drive and added the extra speaker delay, the heart of the circuit is identical to my one here: http://www.mhennessy.f9.co.uk/gainclone/control.htm
There's a couple of points to explain to anyone looking - mainly the purpose of R3/D9 and R10/D10. In my circuit, each of those diodes is an LED - Standby and On, respectively. Also, R3 should be 560 ohms (not 560K). If you're not using the LED's, omit all of these components. Alternatively, correct the diagram to show that these are in fact LEDs, and change R3 if you want the standby LED to light")
I'm not sure why you are using MOSFETs to drive the relays - perhaps a personal preference "thing" - maybe you're more comfortable with understanding how they work? Or maybe to differentiate your version from mine. I don't know. Whatever, "normal" transistors are certainly cheaper here.
Also, I note that you've passed the "inhibit" signal via an inverter - I chose to apply that directly to the base of a transistor because you cannot guarantee how CMOS logic behaves as the PSU rails are rising; obviously you can with a simple transistor circuit.
Regarding the soft-start option, it would be very easy to add in the same way you've added the speaker delay. Refer to the previous paragraph, and consider using U13B for this function instead.
BTW, while the circuit is (a) nothing special and (b) in the public domain, it would be nice to receive a mention if you plan to use extracts from it. If you publish on a webpage, let me know and I'll happily link to it. I also assume that a Group Buy is non-commercial?
FWIW, I did a lot of testing and debugging of the circuit, and it's pretty sorted. There's even a PCB layout, but as includes my dangerous mains dropper PSU, I won't be publishing it! Future enhancements, as well as soft start, include DC protect - essential in any amplifier. Just a couple of transistors and some diodes for the detector that Douglas Self promotes - see page 421 of his book (4th edition). I couldn't include this in my version because the circuit wasn't transformer-isolated from the mains...
Hope this helps,
Mark
PS: I've included a view of the schematic that isn't available on the website sorry about the quality, I had to downsize it. Here you can see that most of the diodes should be 1n4148 or equivalent rather than the 1n4007 that you've used in many places. Keep to those for the relay coils, however
I must say that this circuit looks very familiar! While you've changed some details of the main relay drive and added the extra speaker delay, the heart of the circuit is identical to my one here: http://www.mhennessy.f9.co.uk/gainclone/control.htm
There's a couple of points to explain to anyone looking - mainly the purpose of R3/D9 and R10/D10. In my circuit, each of those diodes is an LED - Standby and On, respectively. Also, R3 should be 560 ohms (not 560K). If you're not using the LED's, omit all of these components. Alternatively, correct the diagram to show that these are in fact LEDs, and change R3 if you want the standby LED to light
I'm not sure why you are using MOSFETs to drive the relays - perhaps a personal preference "thing" - maybe you're more comfortable with understanding how they work? Or maybe to differentiate your version from mine. I don't know. Whatever, "normal" transistors are certainly cheaper here.
Also, I note that you've passed the "inhibit" signal via an inverter - I chose to apply that directly to the base of a transistor because you cannot guarantee how CMOS logic behaves as the PSU rails are rising; obviously you can with a simple transistor circuit.
Regarding the soft-start option, it would be very easy to add in the same way you've added the speaker delay. Refer to the previous paragraph, and consider using U13B for this function instead.
BTW, while the circuit is (a) nothing special and (b) in the public domain, it would be nice to receive a mention if you plan to use extracts from it. If you publish on a webpage, let me know and I'll happily link to it. I also assume that a Group Buy is non-commercial?
FWIW, I did a lot of testing and debugging of the circuit, and it's pretty sorted. There's even a PCB layout, but as includes my dangerous mains dropper PSU, I won't be publishing it! Future enhancements, as well as soft start, include DC protect - essential in any amplifier. Just a couple of transistors and some diodes for the detector that Douglas Self promotes - see page 421 of his book (4th edition). I couldn't include this in my version because the circuit wasn't transformer-isolated from the mains...
Hope this helps,
Mark
PS: I've included a view of the schematic that isn't available on the website sorry about the quality, I had to downsize it. Here you can see that most of the diodes should be 1n4148 or equivalent rather than the 1n4007 that you've used in many places. Keep to those for the relay coils, however
Attachments
Yes, I did copy a lot of your circuit. I apologize for not mentioning this. The group buy thing was strictly non-commercial as well.
I changed the outputs to MOSFET because the current drive transistor circuit would not be adaptable for different relay coils. It may be adjusted for each user but I thought that would be too much of a hassle.
560k is a typo but I did in fact simulate it that way.
D9/10 are LED but I didn't find them quickly in PSPICE so I didn't use them. Also I used 1N4007 for the same reason. I was going to publish an accurate BOM at some point.
The additional inverter required for a soft-start is not available on the DIP14. If there is simply a larger package of inverters available I would get that and add an extra delayed output. NOTE: U13 does not exist. I used a single 6-inverter chip but PSPICE did not like me cut/pasting it around. Basically i have a lot of house keeping to do on the schematic but the idea is there.
alexcd said:Yes, I did copy a lot of your circuit. I apologize for not mentioning this. The group buy thing was strictly non-commercial as well.
No worries - glad to have provided some inspiration
I changed the outputs to MOSFET because the current drive transistor circuit would not be adaptable for different relay coils. It may be adjusted for each user but I thought that would be too much of a hassle.
I used a current source because of the wildly varying supply voltage, but here things are easier for you. I would stick with the original current source, as it will protect the circuit from mistakes caused by the relay being mounted off-board. Just choose a value of current that is higher than the largest anticipated relay current, then it will saturate (like a switch), but have built-in (short-term) short-circuit protection.
D9/10 are LED but I didn't find them quickly in PSPICE so I didn't use them. Also I used 1N4007 for the same reason.
Yes, I wondered if that might be the case
The additional inverter required for a soft-start is not available on the DIP14. If there is simply a larger package of inverters available I would get that and add an extra delayed output.
Yes, I know that you're using a hex inverter, but I was suggesting doing away with the inverter for the power-on inhibit (labelled U13B on your schematic) and using it for for the soft-start delay instead. But if you prefer not to change that, then there are myriad ways of implementing it using discrete transistors.
As an aside, have you considered a solid-state relay for the soft-start? That worked well for my A4 amp, where space was a problem. But perhaps you're trying to keep mains off the PCB?
Another thing - you're powering this circuit from the amp rails? Have you considered mains-fail detect? With my original mains-dropper PSU, the circuit drops out instantly, but if you power it from the main smoothing caps in an amp, the circuit won't drop out when the mains fails. Maybe not a proplem - maybe the amp deals with it gracefully, but if you're aiming for a general-purpose module that any amp can use, it's worth considering... It would only need 2 transistors...
Best regards,
Mark
mhennessy said:
I used a current source because of the wildly varying supply voltage, but here things are easier for you. I would stick with the original current source, as it will protect the circuit from mistakes caused by the relay being mounted off-board. Just choose a value of current that is higher than the largest anticipated relay current, then it will saturate (like a switch), but have built-in (short-term) short-circuit protection.
That does sound good and all but I have a wildly varying need for current. I am definitely more comfortable using them but I agree that I am throwing out the built-in short-circuit protection. A slightly more complicated 2-stage current source may be adequate (first 200% to mechanically switch the relay, then say 50% current to maintain it.) I would still need to guess on the current.
mhennessy said:
Yes, I know that you're using a hex inverter, but I was suggesting doing away with the inverter for the power-on inhibit (labelled U13B on your schematic) and using it for for the soft-start delay instead. But if you prefer not to change that, then there are myriad ways of implementing it using discrete transistors.
As an aside, have you considered a solid-state relay for the soft-start? That worked well for my A4 amp, where space was a problem. But perhaps you're trying to keep mains off the PCB?
No I had not thought of a soft-start at all until this point. I think I can come up with something though.
mhennessy said:
Another thing - you're powering this circuit from the amp rails?
That is possible but I would have liked to power-down the amplifier rails during non-operation hence the speaker output delay. I have a auxiliary 12Vac transformer that I was going to rectify and double as my relay coil power supply and reduce to 5VDC with a LDO reg since the current is minimal.
mhennessy said:
Have you considered mains-fail detect? With my original mains-dropper PSU, the circuit drops out instantly, but if you power it from the main smoothing caps in an amp, the circuit won't drop out when the mains fails. Maybe not a proplem - maybe the amp deals with it gracefully, but if you're aiming for a general-purpose module that any amp can use, it's worth considering... It would only need 2 transistors...
That is definitely something else to consider.
I have some work to do but I would like to make this as fully functional as possible without going nuts on parts. As of right now the parts cost $9.30 which is a bit high for something this basic. My selections may have been a bit over-kill.
alexcd said:That does sound good and all but I have a wildly varying need for current. I am definitely more comfortable using them but I agree that I am throwing out the built-in short-circuit protection. A slightly more complicated 2-stage current source may be adequate (first 200% to mechanically switch the relay, then say 50% current to maintain it.) I would still need to guess on the current.
Fair enough if you prefer MOSFETs, it's your project. But I just need to correct your statement about "wildy varying current". I was suggesting that in your application, you use the transistor as a switch, just like you're using the MOSFET. The current limit is just that - a limit.
Although the circuit looks like a current source, it's only a current source once you've reached the designated current. Choose a high current setting, and you satisfy your goals while having protection. Also, you don't need that inverter, meaning it can do something else.
Of course, those 180 ohm resistors skew your argument somewhat! I assume each user will have to calculate the value according to their relay? Which is actually no different than choosing a resistor in a current source!
You can add a capacitor to provide different currents for pull-in and hold-in, but this introduces even more variables if you plan to let others choose their relay...
That is possible but I would have liked to power-down the amplifier rails during non-operation hence the speaker output delay. I have a auxiliary 12Vac transformer that I was going to rectify and double as my relay coil power supply and reduce to 5VDC with a LDO reg since the current is minimal.
Good - that's what I suspected. A seperate transformer is definitely the best option all round, if you have the space. Incidentally, you won't need a LDO with this - there's no benefit. And choosing a small enough smoothing capacitor will allow the relays to drop out almost instantly, which saves having to put in a AC-fail detect circuit...
I have some work to do but I would like to make this as fully functional as possible without going nuts on parts. As of right now the parts cost $9.30 which is a bit high for something this basic. My selections may have been a bit over-kill.
I should point out that I strongly believe in high value, low-cost engineering! Anyone can come up with an OTT circuit that achieves a function, but the real skill comes in careful pruning and parts selection. A few small changes to the topology here and there might also facilitate other savings. Designing down to a price while not compromising reliabilty and functionality is a real skill that is increasingly rare these days. Note that this a lot more subtle than just removing parts until it stops working!
Examples: According to Mouser, that MOSFET costs $1.22. A BC337 costs $0.05! (Disclaimer - you might need a bigger tranistor and a heatsink if you plan to use it as a current source rather than a switch. But there's no need to run the source as a source, as I've repeatedly said).
You'll note that the changes I've suggested are implemented with BJTs and passive components that cost pennies. In return, think of the benefits: DC protection - how expensive are your woofers? Do you really want the endless emails from people who have zapped that expensive MOSFET because they've hooked up the relay while the power is applied?
And sometimes you save costs by adding components! Notice the 1K resistor in series with the switch contacts? R2 in your diagram. I added that to prolong the life of the switch contacts. Likewise D7/D8: the intrinsic diodes in the IC will perform the same function, but eventually they'll fail short/circuit, rendering the IC useless. On the PCB, I added extra diodes across R1/R5 for the same reason (must update that schematic).
Incidentally, an instant cost saving is to swap M5 for a NPN general purpose transistor of your choice - BC548/2N3904 or whatever you have in your parts bin - no other circuit changes required. Instant saving of what - $0.25. Again for M8. And as I said above, a LDO regulator does nothing for this - stick to a 78L05. Mouser have these for as little as $0.18!
Final point - you seem to be worried about investing time and money in this part of an amp. IMO, this is actually one of the most important parts to get right. Don't underestimate the ergonomic "interface" between the amp and the user. Soft-touch or remote switching is nice, as you've identified. Also nice is freedom from clicks, pops and bangs. Essential (IMO) to prevent the amp destroying loudspeakers. This "auxillary" stuff takes time and effort to get right, but it's well worth it.
Anyway, enough ramblings - please remember this is advice, not critism - hopefully to give you an insight into how I do this stuff, and maybe to save you money the long run in return for some intellectual investment at this stage. But ultimately, it's just IMO, and YMMV!
Keep us updated,
Mark
alexcd said:The current source idea is good and saving money is even better. I'll put in as much time as I need to get this beauty to work. Any other suggestions for BJTs? The issue is I have four 180ohm coils in parallel. I would rather go with one part than double/triple up.
Ah yes - I've looked again, and see that those 180 ohm resistors are representing the coils. I saw the inductors and assumed they were the in fact the relay coils. Sorry about that
What voltage are the coils? 12? If so, perhaps the easiest solution is to use a 7812 to regulate the coil supply - but it will need a heatsink, as 4 lots of 180 in parallel will take ~266mA at 12V. With 17V nominal in, a 7812 will generate 1.3W, which is a surprising amount to lose...
I presume 17V comes from 12VAC times root-2? If so, expect the real value to measure higher... If you don't want to regulate to 12V, then putting a resistor in series with each relay coil will spread that 1.3 watts around - each resistor will dissipate around 0.3W. I would employ 1W resistors here, at least, to ensure long-term reliability. Of course, the trouble is that the users will have to calculate the value of series resistors - not difficult, but one more "variable"...
The BC337 I mentioned before is rated for 800mA, but can't dissipate much power because it's in a TO92 case. In normal use, it won't get hot, but in the event of a short (when it enters current limit mode), it will obviously warm up. The protection offered should be considered very short-term only (someone playing with the connections while it's powered). If you want a better "margin", consider a TO220 device like a TIP31, but the HFE is lower, meaning that the series 10K will need to be lowered.
Out of interest, why 4 relay coils?
That's quick!
Sorry, I meant to say "why 4 in parallel". Obviously I can see the 4 on the diagram, but they're not all in parallel, meaning that the switching transistor only "sees" 90 ohms, not the 45 I assumed above...
Depending on the relays, you might not need two for the power. Presumably you have two mains transformers in the chassis? And therefore you're using 1 relay per transformer? You might not need that in practice - 1 relay might be plenty. Obviously, one relay per channel for the speaker outputs makes sense
Again, what's the relay coil voltage?
12V coils
Omron G4-11123A-US-TV8-12VDC ... phew, that is a long part number
I was actually planning on killing both transformers with 1 relay each. So that's two on the main switch.
The speaker output has to be cut off both positive and negative because they are differentially hot to ground, i.e. bridged amp. I hope that makes sense. So I will need 4 since this circuit runs two channels. These will attach to the delayed output.
Power Coil = 90ohms
Delayed Speaker Coil = 45ohms
I don't want to spoil the fun but...
Focus on a really simply circuit
Avoid HC logic due to RFI sensitivity, use slow circuits
The push button needs probably lot's of debouncing
Use a plain parts as possible.
Mind the regulations of mains circuits especially if you will offer your design as a group buy.
Looking at your schematics, I see that you lack of exerience in professional design so pick up any good advice you can get. Don't underestimate the need for a very robust design. It's very irritating if the amp switch on or off every time the washing machine starts and stops or when the fridge is doing the same thing.
peranders said:I don't want to spoil the fun but...
Focus on a really simply circuit
Avoid HC logic due to RFI sensitivity, use slow circuits
Use a plain parts as possible.
Mind the regulations of mains circuits especially if you will offer your design as a group buy.
I dont think main's for the relay coils is really an option if anyone plans on shutting them down like I am.
- Status
- This old topic is closed. If you want to reopen this topic, contact a moderator using the "Report Post" button.
- Home
- General Interest
- Everything Else
- Power/Outut Relay Control Circuit