@ Chamberman, glad to see another local here.
One would think there would be many more but
seems not the case.
Where in DFW are you located? Looking at your signature I surmised you were in Chicago?
@Kerryb - I would imagine you could easily print those onto overhead transparency sheets using a decent laser printer. Use a color laser printer and you could even print the light blue dBV text same as the original knobs. Then cut them out and then spray them with multiple coats of clear laquer and glue them onto the skirts.
@Sync - Your home brew solution looks pretty professional. I would prefer a bit shorter pointer so I could read the text when the knob is in position, but I could easily live with that.
@Sync - Your home brew solution looks pretty professional. I would prefer a bit shorter pointer so I could read the text when the knob is in position, but I could easily live with that.
Me too, but that is what I had. I"m over in north east Dallas.@Kerryb - I would imagine you could easily print those onto overhead transparency sheets using a decent laser printer. Use a color laser printer and you could even print the light blue dBV text same as the original knobs. Then cut them out and then spray them with multiple coats of clear laquer and glue them onto the skirts.
@Sync - Your home brew solution looks pretty professional. I would prefer a bit shorter pointer so I could read the text when the knob is in position, but I could easily live with that.
Where are you in GP?
Where are you in GP?
Far South GP near lake Joe Pool.
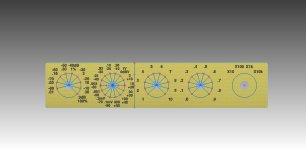
I had a bit of time to redraw the overlay plate this week. I attached the revised plate for my Option 1 339a. I also have a 12 range plate design. The option 1 plate with 14 ranges makes for a cluttered dial. I had to drop the font sizing to .110" down from .120" on the other knob dials.
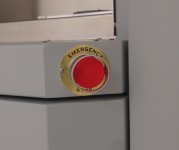
I'm leaning heavily towards the gold background with black lettering. I realized this week that one of the systems I support has a gold with black lettering plate on it and the contrast is very good. I attached a picture of it.
I'm leaning heavily towards the gold background with black lettering. I realized this week that one of the systems I support has a gold with black lettering plate on it and the contrast is very good. I attached a picture of it.
Attachments
@Kerryb - I would imagine you could easily print those onto overhead transparency sheets using a decent laser printer. Use a color laser printer and you could even print the light blue dBV text same as the original knobs. Then cut them out and then spray them with multiple coats of clear laquer and glue them onto the skirts.
@Sync - Your home brew solution looks pretty professional. I would prefer a bit shorter pointer so I could read the text when the knob is in position, but I could easily live with that.
Sync - thanks for posting the photo. The black knob with the scale fixed on the faceplate looks like it would work well. It should be easy to turn - the Elma knobs I'm using are similar in size to the HP originals but lack the large wing, so are a bit stiff to turn.
Chamberlain - your revised faceplate looks impressive. I agree that the numbers on the input range look crowded. I've also had that problem with trying to squeeze text for the 14 positions on the acrylic disc in a font that is legible. I originally left out the inner dBV range for that reason. I might go back now and have another go at including it in blue. Probably try the decal (with lacquer spray) approach first as I've already got the printable sheets - overheads can be a backup approach.
KB
I'll have to see what thicknesses of acrylic are available.
I could make the openings around the pots larger than the nuts so they don't clamp the acrylic. You could then use double-sided tape to affix the acrylic to the faceplate. For contrast, I often will spray paint an acrylic sheet in a contrasting color so that when the laser etches the surface the underlying color of the acrylic comes through.
I could also engrave coated aluminum sheets, but the laser would not be able to cut it, either in the overall shape nor the holes. (One of the nice things about cutting acrylic with a laser is how precise it can be.)
Last edited:
So far the thinnest acrylic sheets I've found are 0.118" thick.
Chamberman, what are the diameters of the small holes at the top, and what distance is their center from the top or bottom edge? Thanks.
I had the discs I intend to use for my replacement knobs lasercut from 2mm acrylic and that was the thinnest available at my local plastics fabricator. Doing a quick conversion I think 0.118" is around 3mm.
KB
There are thinner plastics. You could use two thin sheets with the letters sandwiched between to protect them. You can get polycarbonate is .030" thickness at the local source (Tap Plastics http://www.tapplastics.com/product/plastics/plastic_sheets_rolls/polycarbonate_sheets/516) for example. They can also laser cut to your drawing. I'm sure the stuff is available elsewhere. They also list PC down to .005" but thats too thin. They say you can print to it without special treatment.
Chamberman, what are the diameters of the small holes at the top, and what distance is their center from the top or bottom edge? Thanks.
Sorry, I've been sidetracked with some things and haven't been able to get back to this project. I'll look at my drawings tomorrow and see what I've got on there. I ended up dropping the holes and making the plates shorter in the last version of the plate. In the original plate that had the holes I made the holes slightly larger for LED's to make sure they were not blocked in any way.
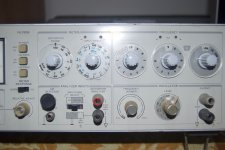
I finally got around to replacing the missing top row knobs on my HP 339A. Used Elma knobs with an acrylic disc skirt glued on and printed decal lettering on the back of the disc.
A fairly easy fix and seems to work OK, even if it doesn't match the originals.
Photo attached
KB
A fairly easy fix and seems to work OK, even if it doesn't match the originals.
Photo attached
KB
Attachments
Hi KB,
I have to agree with Chamberman. Your solution looks really good to my eyes, and an improvement on the originals. Care to through some more detail out and maybe the print file you used?
Best, Chris
Thanks for the feedback Chamberman and Anatech. I've attached a closeup photo of the distortion range and input range knobs - which unfortunately does show up some of the flaws.
Also a pdf file of the lettering for all 5 knobs. The lettering was done using The Print Shop 3 for Mac, but I couldn't upload the psf file because its not a valid file extension for the forum. Printing probably is cleaner using Print Shop, but the pdf should work provided actual size is chosen in the Acrobat print box.
The knobs used were Elma 1/4in 020-3510 collets, together with 044-3110 nut covers. Laser cut 2mm acrylic discs - 42mm diameter with 13mm centre cutout - were glued to the nut covers with JB Weld. The lettering was done using an inkjet photo printer on waterslide decal - mirror image so that it could be fixed on the back of the disc.
The main problem is that the decal can lift at the edges from the acrylic disc when dry. A glue stick can fix this if it happens. Also the knobs are a bit small and so the switches are stiff to turn. Probably why HP originally used the winged knobs. There is an Elma winged knob (022-3510) that would be better, but I couldn't find a supplier who sold it in grey.
My HP 339A seems to operate OK, but needs some work to bring it up to spec. so I'm currently doing the basic oscillator upgrade. I know this has been covered in depth on the main 339A thread - I may seek help there if I get into trouble.
Regards
Kerry
Attachments

Hi Kerry,
Just change the extension of the file to one the software will accept and tell us what to change in back to once downloaded. That should solve that issue with posting a file not allowed by the system.
Looks really good close up too. Maybe there are other choices with knobs that people would find more acceptable.
-Chris
- Status
- This old topic is closed. If you want to reopen this topic, contact a moderator using the "Report Post" button.
- Home
- Design & Build
- Equipment & Tools
- HP 339A Knob solution