I made one before but can't find it so made a new one yesterday. It is pretty crude, but the original one worked well enough. Thought I'd share as it is pretty easy to make.
I Still need to test to work out if my measurements are correct, but it is easy enough to drill more dowel holes to get whatever size hole you need")
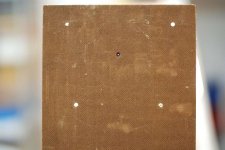
Basically I just used a piece of Masonite, removed the plate off the router (and used as a template to mark the holes for the mounting screws (suitably countersunk).
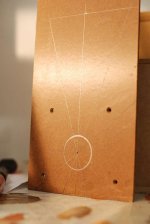
I then attached it to the router and plunged very carefully with a countersink bit to get a pinhole at the dead centre of the router bit.
I then got my compass and (initally with pencil) scribed a 40mm diameter circle around that point. I also scribed lines through the centre of the circle.
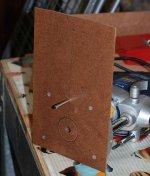
I reattached the piece of masonite and plunged the bit I will use for cutting through the board (note I may need to plunge a bigger hole to allow for dust extraction), I can't remember if that was an issue last time).
Holes are then drilled in the board measured from the outside of the hole made by the router along one of the scribed lines. The distance between the two points being the radius of the hole to cut. Later if hole is enlarged, the distance between the 40mm scribed circle and the edge of the bit can be determined and offset added to get the correct distance.
I had a ~1/4" dowel handy which fits very snuggly in a 15/64th" hole.
I may get a chance to try it out this evening, and then if ok will route the cutout for the speaker I'm currently building.
Tony.
I Still need to test to work out if my measurements are correct, but it is easy enough to drill more dowel holes to get whatever size hole you need
Basically I just used a piece of Masonite, removed the plate off the router (and used as a template to mark the holes for the mounting screws (suitably countersunk).
I then attached it to the router and plunged very carefully with a countersink bit to get a pinhole at the dead centre of the router bit.
I then got my compass and (initally with pencil) scribed a 40mm diameter circle around that point. I also scribed lines through the centre of the circle.
I reattached the piece of masonite and plunged the bit I will use for cutting through the board (note I may need to plunge a bigger hole to allow for dust extraction), I can't remember if that was an issue last time).
Holes are then drilled in the board measured from the outside of the hole made by the router along one of the scribed lines. The distance between the two points being the radius of the hole to cut. Later if hole is enlarged, the distance between the 40mm scribed circle and the edge of the bit can be determined and offset added to get the correct distance.
I had a ~1/4" dowel handy which fits very snuggly in a 15/64th" hole.
I may get a chance to try it out this evening, and then if ok will route the cutout for the speaker I'm currently building.
Tony.
Attachments
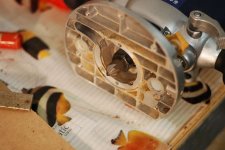
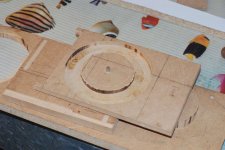
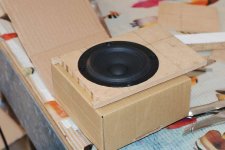
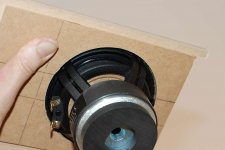
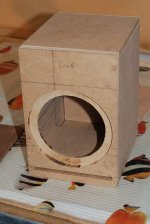
and just to show that it does actually work here are a few pictures
The first one is after doing the rebate, + an initial cut to the same depth as the rebate for the inner hole. Others showing speaker fit and the final baffle sitting on the box (not yet actually glued together).
Tony.
The first one is after doing the rebate, + an initial cut to the same depth as the rebate for the inner hole. Others showing speaker fit and the final baffle sitting on the box (not yet actually glued together).
Tony.
Attachments
and just to show that it does actually work here are a few pictures
The first one is after doing the rebate, + an initial cut to the same depth as the rebate for the inner hole. Others showing speaker fit and the final baffle sitting on the box (not yet actually glued together).
Tony.
Which driver is it, one You have shown in image
It is an SB acoustics SB12MNRX25-4 more info here --> http://www.diyaudio.com/forums/full...ics-sb12mnrx25-4-full-range-build-thread.html
Tony.
Tony.
- Status
- This old topic is closed. If you want to reopen this topic, contact a moderator using the "Report Post" button.
- Home
- Design & Build
- Equipment & Tools
- DIY Circle Jig