I hope someone can set me in the right direction on laminators suitable for toner transfer to PCBs.
I need to make a few small two-sided boards. I was planning to try toner transfer with a clothes iron when I got distracted by the laminator process which looks to be a little more controlable. Most people don't mention modifying their laminators but others describe modifying theirs for more heat, less speed, more open paper path, etc. Some have spent $100 or more on a machine that they say works and others have spent $20 on an ebay find they also claim works well. GBC makes machines that come up often in forums. Pulsarprofx even sells one which I gather is unmodified. But that is the very brand and model that others have based whole modification articles on.
Are these modifications truly necessary to have any success at all or are they enhancements to make a slow but effective process more efficient? In other words, can I use a stock laminator and pass the pcb through multiple times or must I rip apart the machine ro replace thermal switches and fuses to ever make this work?
Is it really necessary to spend $80-$100 on a Xerox XRX-LM1910 when Walmart sells a 3M machine for $25? Are there features that make one work and the other not? Are there features or specs that would make a machine totally useless for toner transfer?
If you are successfully using a laminator, what make and model is it and what mods have you been forced to make?
Thanks.
Ray
I bought one of those 3M/Scotch laminators. They use two pinch rollers that are soft which is great as it easily grabs the board. After a few minutes of use, the center of the top cover tends to droop just enough to rub on the board (no biggie as it can easily be modified if I keep it)
The heater looks less than impressive as it seems to be just a few aluminum plates along side of the rollers that heats up by a small heater.. somewhere
Well.. the innards don't really matter as I have run 2 transfers on it (my first two ever) and they both seemed to be ok. The first one I cleaned off because I know the printout was bad to begin with but all the traces stuck to the board. The second seemed fine as well. Both times the magazine paper jt fell off the toner after only a few minutes of soaking so it could be the paper I used was a quick releaser.
Actual etching on the second run resulted in good traces. Some pinholes on the larger traces.
Printer not liking the paper ? (I did notice streaking on the top of the pages)
Not enough heat on the transfer?
I will try the other printer if I get a chance tomorrow and see how the traces are. Might try some different paper and/or let the laminator warm up longer.
Thanks, Paragon. Did you use .0625" thick boards or were they thinner?
What I don't understand is if the laminator does a good job of transferring the toner, and if it can be used as is out of the box, why do so many people modify their laminators? Is it to reduce the number of passes or because the stock parts don't get hot enough regardless of how many times you run the board through? For the little use I'm likely to make of this machine, I'd rather send the board through a half dozen times than to rip it apart and start replacing components without knowing why.
If the 3M did the job for you (assuming you were using .0625" boards), I'll pick one up and give it a go. It appears to be about the cheapest letter size laminator out there.
Ray
According to the people that developed the toner transfer method, any laminator made by GBC should do.
PCB "Fab-In-A-Box" ... The 8min circuit board system
You can buy the laminator they sell for less than half the price on e*ay.......
Item #350269066568
WHAT'S SO SPECIAL ABOUT "GBC"?
What makes GBC the ONLY laminator manufacturer that works with our process is because of the way they redesigned the ordinary pouch laminator heaters. The ordinary laminator uses two parallel heating plates after the rollers to seal the pouch. GBC mounted two curved heaters, one above the top roller and one below the bottom roller and radiate heat into the neoprene coated rollers kind of like a rotisserie chicken cooker!
PCB "Fab-In-A-Box" ... The 8min circuit board system
You can buy the laminator they sell for less than half the price on e*ay.......
Item #350269066568
Last edited:
Thanks, Paragon. Did you use .0625" thick boards or were they thinner?
What I don't understand is if the laminator does a good job of transferring the toner, and if it can be used as is out of the box, why do so many people modify their laminators? Is it to reduce the number of passes or because the stock parts don't get hot enough regardless of how many times you run the board through? For the little use I'm likely to make of this machine, I'd rather send the board through a half dozen times than to rip it apart and start replacing components without knowing why.
If the 3M did the job for you (assuming you were using .0625" boards), I'll pick one up and give it a go. It appears to be about the cheapest letter size laminator out there.
Ray
Correct. The thicker boards. Not need to push it to start or anything. just line up the paper and slide it in to the top.
Some laminators either do not get hot enough or do not have enough pressure so people increase the heat. If the laminator has enough pressure, the you shouldn't need as much heat to fuse the toner to the board. Perhaps using the thicker boards actually helps in this situation by increasing the pressure.
I know it takes at least 2 passes to properly fuse it.
Once I get a chance to print some more pages and test, if I decide to keep it, I will probably space the top housing up or sand the edge so it doesn't rub the board when it gets hot. Other than that, I'm thinking it might be good.
According to the people that developed the toner transfer method, any laminator made by GBC should do.
WHAT'S SO SPECIAL ABOUT "GBC"?
What makes GBC the ONLY laminator manufacturer that works with our process is because of the way they redesigned the ordinary pouch laminator heaters. The ordinary laminator uses two parallel heating plates after the rollers to seal the pouch. GBC mounted two curved heaters, one above the top roller and one below the bottom roller and radiate heat into the neoprene coated rollers kind of like a rotisserie chicken cooker!
PCB "Fab-In-A-Box" ... The 8min circuit board system
You can buy the laminator they sell for less than half the price on e*ay.......
Item #350269066568
This laminator has two curved aluminum plates that wrap around the rollers. I think the soft rollers (I guess they could be neoprene) give even pressure across the board.
I should have taken a photo when I had it apart.
I just use a clothes iron that I picked up at Goodwill for a few bucks. Works great...
I'd think the reason many people report having to run the board through the laminator multiple times is that the board doesn't get hot enough after the first pass. Preheating it with an iron might help.
BTW, the HP Laser Brochure paper is the best I've been able to find. It doesn't wrinkle under the heat of the iron unlike magazine paper and other papers I've tried. HP part number: Q1987A. Available at office supply stores.
I just use a clothes iron that I picked up at Goodwill for a few bucks. Works great...
I'd think the reason many people report having to run the board through the laminator multiple times is that the board doesn't get hot enough after the first pass. Preheating it with an iron might help.
BTW, the HP Laser Brochure paper is the best I've been able to find. It doesn't wrinkle under the heat of the iron unlike magazine paper and other papers I've tried. HP part number: Q1987A. Available at office supply stores.
I use an iron too, though I would love to give a laminator a try. Sometimes I get "squashed" and deformed traces using an iron.
I have a broken high end GBC laminator that got thrown out at work. It looks brand new, but it won't turn on. Haven't had the time to look into what the problem is.
How well does that brochure paper release when soaked? I use the Staples glossy photo paper. It prints good, but it can be a pain to get all the paper out from between fine traces and pad holes.
I use an iron too, though I would love to give a laminator a try. Sometimes I get "squashed" and deformed traces using an iron.
I'm considering dropping $25 to try the laminator... Using an iron is a lot of work and the laminator would give a more consistent pressure on the board during toner transfer.
How well does that brochure paper release when soaked?
It releases surprisingly well. I use warm water with a little dish soap added to break the surface tension. I let the board/paper soak for a few minutes. That's enough to get the paper pulp all soft and it almost falls off the toner tracks. Tightly spaced traces (10 mil spaces) require a bit of work to get the remaining pulp out, but a soft brush works pretty well for this. Also rubbing with my fingers tends to get the last bits out. Holes in pads are a bit tougher to clear, but I find that even if a little paper is left in the holes, they'll still etch enough to create a pit for the drill to catch in the center of the pad. It seems the glossy surface is very thin compared to the photo papers, where I've seen it be several mils thick. Thin is good... That means less scrubbing.
I've made double-sided boards with the brochure paper and a clothes iron where the registration between top and bottom layer was on the order of +/-0.1 mm or so. Drilling a 40 mil hole in the center of the pad on the bottom layer would have the drill come out very slightly off center on the top layer. That's about as good as it gets with home made boards.
~Tom
Thanks for the feedback Tom. I will have to give some of that brochure paper a try.
For those little tough bits, I use a wooden toothpick or pointed bamboo skewer. I find trying to use a brush to get the last bits out can end up rubbing the toner too thin.
Tightly spaced traces (10 mil spaces) require a bit of work to get the remaining pulp out, but a soft brush works pretty well for this.
For those little tough bits, I use a wooden toothpick or pointed bamboo skewer. I find trying to use a brush to get the last bits out can end up rubbing the toner too thin.
Using an iron is a lot of work and the laminator would give a more consistent pressure on the board during toner transfer.
That's why I was thinking that the laminator was the better way to go, provided it didn't require modification to work at all. From what I'm reading here, it does sound like it should work albeit with a few passes.
I will be doing a double-sided board although there are only two traces on the component side. I should be able to make them wide enough that a slight miss in registration won't be a problem. Are there any tricks to keeping the two pieces of paper in place as they go through the laminator? I'm guessing that after the first pass, the paper is stuck, so maybe run one side through once then add the paper for the other side and run the whole sandwich through a few more times?
You can buy the laminator they sell for less than half the price on e*ay.......
Item #350269066568
Thanks for the heads up on the ebay laminators. They're actually slightly cheaper (with no tax and free shipping) than the 3M units from Walmart.
Ray
Those are not the same laminators.
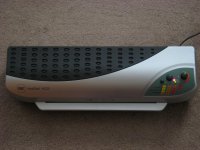
The image shown on the Fab-on-a-box page is different than what is sold in the bay. The bay one only has one swithc. The Fab one has a top switch for heat level and side switch for power.
All the places that carry the better laminator use that same image with the heat selection on top.
Anyhoo.. I was able to get a print on the other printer and it turned out much better. Sent it through the laminator a few more times than my first attempt - 1/16" 1 oz double sided board with the same trace pattern on both sides with much better results. No pinholes with only a few spot but totally useable.
Those are not the same laminators.
The image shown on the Fab-on-a-box page is different than what is sold in the bay. The bay one only has one swithc. The Fab one has a top switch for heat level and side switch for power.
All the places that carry the better laminator use that same image with the heat selection on top.
I see that now......
It looks like the one with the heat switch is model #1701987, and the one without it is #1701860.
Other than the heat switch, they function identically. As long as they are both 350W units, I don't see what the point of the heat switch would be when used for toner transfer. You want it as hot as it can get, so a low setting is pointless anyway.
If the heats are the same, the only advantage (or possibly a disadvantage) of the GBC is the lower feed rate. The 3M has around a 14-15"/min rate. Slower rate could help fuse the toner better.. or it could also start to squish the traces. I don't have enough exp to know. Not sure if I want to order it to find out.
Before I saw Paragon's post, I ordered one of the 1701860 laminators on ebay last night. I guess we'll see how well it works when it arrives next week.
I can't find anyone selling the 1701987 model except pulsarprofx and neither is listed on the GBC site. If you're right about the heat being the same, I suppose it doesn't matter but I can't verify that on any of the sites I've looked at. I may open it up when it arrives to see how it's built.
I won't be using this for production. It's all for prototyping so running a board through a few times won't be the end of the world.
I think the one PulsarProFX sells is an older model (1701987), and they did away with the low/hi heat switch on the newer model (1701860). They both look to be out of production though; replaced by the 1702760.
PulsarProFX seems to be the only place still selling the 1701987, even though there are google references to other sites that used to sell it. Those sites now sell the 1701860 or 1702760.
I could almost guarantee that the roller and heating system is the same, so I don't see the point of taking it apart (unless you like to do that sort of thing).
Last edited:
Any update on the laminator Ray?
I got the GBC H425 working that I pulled out of the trash at work. After spending quite a few hours going over the unit trying to figure out what the problem was, I finally narrowed it down to a stupid $1 thermal fuse. I replaced the fuse and now it works like new (an looks new as well).
The H425 can take my largest PCB without even blinking (6"x6" 60-mil double sided 2oz.). I can even pull on the board quite a bit while it's being fed into the unit and the motor doesn't even care, it just keeps on pulling back.
I haven't tried to transfer a layout yet; maybe later this weekend.
Attachments

DIY laminator
Hi all
As i experienced trouble with my laminator (not hot enough , problems with thicker PCB`s etc.),i switched to a DIY laminator .
As i mainly use 'Euroboards' (100 X 160 mm) the method of ironing on didn't work reliable. So i cutted out 2 pieces of aluminum sheet metal, 3mm thick and 110 X 170 mm area. One piece lies on the bottom, then a piece of thin card board to equalize pressure, followed by the printout with traces up. Next the clean PCB with copper side down is adjusted to the markers on the printout and last is the second alu plate. All is fixed with 4 clamps, apply heavy pressure!
After all i put it in the oven at 150° C for about 15 min, then take it out (gloves!) and cool it in the sink.
As i use this waxy paper leftover from CD labels, peeling it off is very easy, no need to soak it.
Temperature applied may vary with toner brand, if traces a blurry it's too hot, if they don't stick too cold.
This method should work on large boards, give it a try!
Regards
Arne
Last edited:
I've had some time to play around with my laminator. All I can say is.... WOW.... why have I been using a cloths iron for the last 5 years?
This thing is amazing; completely effortless image transferring.
I also went out and bought some new paper. I was going to go with Toms advice and buy the glossy brochure paper, but my local store wanted $30 for 150 sheets.
Right next to it was some "Glossy Presentation Paper" (Q2546A) that was half the price and double the sheets ($15 for 300). This paper is a little thinner @ 34lb; and I assumed that would be a good thing. It seems slightly heavier than a magazine page, but not as heavy as a CD case insert.
The paper transfers the image perfectly and is much easier to remove than the Staples glossy photo paper I had been using.
I'm in the process of etching the board; will post a pic when I'm done.
Alright, here are the pics I promised.
In the first pic you can see how cleanly the presentation paper releases from the toner. It literally fell off the PCB when I picked it up out of the tub of water. It took only minimal effort using a micro-fiber towel to rub the remaining paper residue off the toner.
The second pic is the etched board. There is some slight pitting, but it's not too bad. It was my first time using HCL+H2O2 to etch; I normally use FeCL3 but I ran out.
An externally hosted image should be here but it was not working when we last tested it.
An externally hosted image should be here but it was not working when we last tested it.
- Status
- This old topic is closed. If you want to reopen this topic, contact a moderator using the "Report Post" button.
- Home
- Design & Build
- Equipment & Tools
- WHICH Laminator for Toner Transfer?