I have a Sieg X3 milling machine sitting in the garage for over a year now, still sitting on its delivery pallet. Time to get that bad boy going so I can make the enclosures and chassis I bought it for...

The reason it's been sitting untouched for so long is that I still haven't built a workbench in the garage - so I'll start there.
I want it to be quite simple in design, but enough to take serious abuse for later projects and to hold the mill permanently (a CNC conversion is planned for it).
At the moment all I have is an idea which I'd appreciate any feedback on:
- 2x4 batton 2.4m long fixed to the garage brick wall with M12 studs and injection resin
- 4 front legs made from 2x4s
- 2" or so mdf/chipboard laminate top
- rectangular steel tubing to support the worktop
Here's an earlier, overly-complicated design which I have dismissed (but to give you an idea)...


V
The reason it's been sitting untouched for so long is that I still haven't built a workbench in the garage - so I'll start there.
I want it to be quite simple in design, but enough to take serious abuse for later projects and to hold the mill permanently (a CNC conversion is planned for it).
At the moment all I have is an idea which I'd appreciate any feedback on:
- 2x4 batton 2.4m long fixed to the garage brick wall with M12 studs and injection resin
- 4 front legs made from 2x4s
- 2" or so mdf/chipboard laminate top
- rectangular steel tubing to support the worktop
Here's an earlier, overly-complicated design which I have dismissed (but to give you an idea)...
V
I think I'd prefer something free standing (as opposed to fixed to the wall). Possibly even on casters.
Here's an idea I've come up with using only 2x4 timber and a variation of lap joints. This would require only simply cuts and looks like it will be quite strong.
The whole rear and side would be boarded up for support and probably include a shelf.
I was looking for some opinions on whether the basic join method looks sound and will withstand some serious abuse?
V
Attachments
Since you're going to be putting some rather heavy stuff on it, perhaps plywood would be better than MDF, since it is more rigid.Vikash said:- 2" or so mdf/chipboard laminate top
I surfaced my workbench with laminate flooring. The commercial-grade stuff is made from thick HDF with an extremely tough surface on it. It will survive a lot of abuse.
It's a shame that standard kitchen worktops are only 60cm deep...
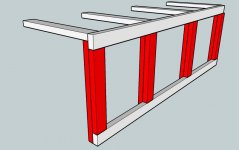
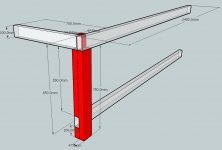
Here's an updated design. I figure there's more strength in using the worktop supports vertically, and I also I plan cutting a recess into which you can slide a shelf.
By my calcs that's about 10 pcs 2.4m long 2x4s (ok, 100 x 47mm), so about £32 from Wickes for the frame.
V
Here's an updated design. I figure there's more strength in using the worktop supports vertically, and I also I plan cutting a recess into which you can slide a shelf.
By my calcs that's about 10 pcs 2.4m long 2x4s (ok, 100 x 47mm), so about £32 from Wickes for the frame.
V
Attachments
Heavy duty
Hi Vikash
Congrats on your new mill!
I cannot comment on your planned base except for the fact that I used h/d castors but soon discarded them as I found them too unstable for precision milling. I removed them and leveled the stand, positioning small squares of thick leather (the type shoe soles are made from), under each of the 4 stand legs.
I know just having your own mill is incredibly useful and mine also originally came fitted with a h/d drill chuck. IMO the best upgrade I made was to fit a collet chuck system, which is indispensable for accurate milling and fine finishes.
The little mill I use is much older than yours and is a Maximat V10. The collet system I use is branded Horma for threaded cutters, made in Czechoslovakia.
bulgin
Attachments
Mill bench
Hey, your design looks perfect. I have a 2 x 3 CNC that I built a very, very similar design. I use loose or 'floating' tenons as opposed to your joinery method. Actually the Festool Domnio. My timbers are all engineered microlams that I scored as off cuts from a jobsite. It's killer. Dead nut stable and rock solid. I'd go with a layered approach to the top. From bottom to top: 3/4" CDX ply > 3/4" mdf > 1/4" masonite. It works exceptionally well, and the masonite is infinately renewable if you trash it. Wax the masonite and nothing will stick to it. My controller boxes are underneath, but suspended from the deck, so I have the lower deck floor for other stuff, especially my sawdust collection")
It's a solid design, you'll be fine with it. If you decide to go casters, try to go with only two on one end. Your table will be far less prone to rocking.
Good luck and be safe!
- Eric
Hey, your design looks perfect. I have a 2 x 3 CNC that I built a very, very similar design. I use loose or 'floating' tenons as opposed to your joinery method. Actually the Festool Domnio. My timbers are all engineered microlams that I scored as off cuts from a jobsite. It's killer. Dead nut stable and rock solid. I'd go with a layered approach to the top. From bottom to top: 3/4" CDX ply > 3/4" mdf > 1/4" masonite. It works exceptionally well, and the masonite is infinately renewable if you trash it. Wax the masonite and nothing will stick to it. My controller boxes are underneath, but suspended from the deck, so I have the lower deck floor for other stuff, especially my sawdust collection
It's a solid design, you'll be fine with it. If you decide to go casters, try to go with only two on one end. Your table will be far less prone to rocking.
Good luck and be safe!
- Eric
Thanks Eric.
I've made the cross members larger. Here's the final design (without showing the backboard or A-frame cross braces).
The saw has arrived so hopefully will start cutting this weekend. Thanks.
V
I've made the cross members larger. Here's the final design (without showing the backboard or A-frame cross braces).
The saw has arrived so hopefully will start cutting this weekend. Thanks.
An externally hosted image should be here but it was not working when we last tested it.
V
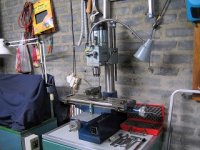
Started to get to grips with the new mitre saw. It's a really nice bit of kit. Here's a pic with the saw, milling machine and the workbench leg pieces cut.
V
An externally hosted image should be here but it was not working when we last tested it.
V
The finished bench:
An externally hosted image should be here but it was not working when we last tested it.
That's the part I'm deliberating on now. I have exterior waterproof varnish and PVA (not exterior stuff) to hand. So a tin of the varnish for the time being, and then perhaps an oil catch tray underneath the mill in the future.tryonziess said:What are you going to protect the top with? It will not take kindly to the cutting oil.
The first job is going to be stripping the mill and reassembling so that should keep me occupied while I figure the oil catcher out.
Suggestions welcome
Vikash,
Plastic laminate, formica, is a truly formidable material. Fairly easy to install and super durable. Looks good also.
You can lubricate and cool with a fine oil/air spray mist which makes much less mess. They are easy to fabricate using a small regulator and cheap air brush. Both from Harbor Freight for less than 20 bucks.
Fabricating a nice catch basin for full coolant usage might be more work. Plus the pan will always be getting in the way and catching shavings.
Now you have to buy tooling. There is so much you can do with a mill.
Tad
Vikash,
Nice bench.
I am doing things the other way round. I have just finished my bench and it looks similar to yours, but not quite so well finished. I have added drawers for all the tools for the mill and lathe. I have used varnished MDF for the top surface. It is double layered so can be replaced if it gets too badly damaged. I don't know what to do about a drip tray yet.
I already have a lathe on a rickety bench made out of a cast off kitchen bench. And in a couple of months I will be ordering my X3 from ArcEuroTrade(www.arceurotrade.co.uk). I will be using their strip down service so I won't have to deal with all that red gunk again (as on the lathe) and they will ensure all the bearing surfaces are correctly set up with the correct pre-load etc.
If you are interested they have a pdf file showing what they do to strip it down.
I have bought some scales and a DRO from Shumatech. Eventually I may convert it to CNC.
Jon
I'll be doing it myself following their instruction PDF, although I have no experience with mills at all - so it should be interesting. If the logistics were feasible I would probably just send it back and have them do it, so good call on having Arc doing the strip down for you from the off.
I guess the advantage will be in knowing the mill intimately for when I convert it to CNC...
Some lifting fun:
I guess the advantage will be in knowing the mill intimately for when I convert it to CNC...
Some lifting fun:
An externally hosted image should be here but it was not working when we last tested it.
Originally posted by Vikash
The finished bench
WOW, stunning work!
Looks incredible rigid and very pretty too, I really like it a lot !
I wish I could afford a workplace of that space You seem to have.
I have quite some fine tools but no space anymore to use them.

Certainly I would not only protect the top of the bench but the sub-construction as well and give it a coat of (for example) wood-oil, otherwise I think it will get filthy in no time, what really would be a pity considered Your effort to make it look that good.
May I ask You what software You use to make such beautifull and dimensioned 3D-drawings?
Google Sketchup.
I did a garage to workshop makeover. It went from this:
to this:
The bench was finished with about 4 coats of Yacht varnish on the worktop, and 1 thick coat everywhere else:
I was quite proud of the result, and decided that dragging a milling machine onto it would just ruin it (that's before considering cutting oils). So now it's just a dedicated general workbench (which currently has a a bunch of stripped out Polo engine parts on it)
V
I did a garage to workshop makeover. It went from this:
An externally hosted image should be here but it was not working when we last tested it.
to this:
An externally hosted image should be here but it was not working when we last tested it.
An externally hosted image should be here but it was not working when we last tested it.
The bench was finished with about 4 coats of Yacht varnish on the worktop, and 1 thick coat everywhere else:
An externally hosted image should be here but it was not working when we last tested it.
An externally hosted image should be here but it was not working when we last tested it.
I was quite proud of the result, and decided that dragging a milling machine onto it would just ruin it (that's before considering cutting oils). So now it's just a dedicated general workbench (which currently has a a bunch of stripped out Polo engine parts on it)
V
- Status
- This old topic is closed. If you want to reopen this topic, contact a moderator using the "Report Post" button.
- Home
- Design & Build
- Equipment & Tools
- Heavy Duty Workbench for Milling Machine