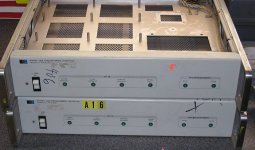
Hi, surplus store deal- A pair of HP59500A Multiprogrammer Interfaces for $10.00 each (insides already removed). I'd like to use the cases for amps/ preamps but the faceplates have all this extra writing/ silk screening.
Anyone know how I can remove the text and patterns that I don't want? I tried fingernail polish remover on the top one, above "gate" next to "multiprogrammer" but all it did was slightly fade the gray part- did nothing to the text "gate" which I tried to remove. Also tried a standard pencil eraser to no avail.
I could repaint it but thought I'd keep the original panel and some of the HP text if I could. Not sure I can so that's what I'm asking.
See attached.
Attachments
Circa 1850 will do the trick and then some. Remove the panels and all connected electronics and plastic bits. Then coat the panels with Circa 1850 and watch it all go away. Sand it, paint it and apply your decals as you wish. Follow the instructions on the container. You can purchase it almost anywhere in North America...I think.
Good Luck.
Shawn.
Good Luck.
Shawn.
TomWaits said:Circa 1850 will do the trick and then some. Remove the panels and all connected electronics and plastic bits. Then coat the panels with Circa 1850 and watch it all go away. Sand it, paint it and apply your decals as you wish. Follow the instructions on the container. You can purchase it almost anywhere in North America...I think.
Good Luck.
Shawn.
Thanks, I see at least 2 "Circa 1850" products that appear to be relevant, though they make lots of different products so I'm not sure I have the right ones:
Circa 1850 Heavy Body and Paint Varnish Remover
Circa 1850 Furniture Refinisher
Which one were you recommending?
Also, won't these remove the underlying paint ("sand it, paint it" gets me worried)? I just want to remove the writing and have the panel background color the same without the need to repaint it.
You can also get paint stripper at any Lowes or home depot for $5 a can. I usually get that and a few of those $0.50 foam brushes to apply, they swell and disintegrate after one use. I've found that the least messy way to remove paint. Sanding is too dusty for my location. Just remember to lay the panel down on aluminum foil, because it will eat through anything else. It is actually pretty cool stuff. It does not have too many harmful vapors, and I've been able to do it on an indoor table. It comes in a metal can and is usually located near the mineral spirits, which you should also get for clean-up, though water works well too, just slightly brush the face after with a 3M scour pad and then wipe with isopropyl alcohol or spirits to remove all dust and degrease it. You should see powder come off onto the paper towel. Avoid touching the surface prior to painting. The scour pad is to give the new paint some surface area to adhere to. Primer helps, but is not necessary.
good luck
the blue painters tape is nice for edges too...I've also had good success with rustoleum industrial spray paint, though it costs a little more than krylon or others
good luck
the blue painters tape is nice for edges too...I've also had good success with rustoleum industrial spray paint, though it costs a little more than krylon or others
lgreen said:Which one were you recommending?
Also, won't these remove the underlying paint ("sand it, paint it" gets me worried)? I just want to remove the writing and have the panel background color the same without the need to repaint it.
"Heavy body and Paint Varnish remover" looks the same as the can I have out back. Of course if you use the Circa product you would be looking at bare metal when you are done. A bath of acetone would provide a similar result. So my suggestion is to refinish it the way you want it to look. Paint it with your own preferred colors? If you put some elbow grease into it, the results would be nothing short of professional.
I don't know how you would ever remove the lettering off of the HP units without marring the paint underneath. If you figure it out, I'd sure like to see the results and an explanation of your method. This isn't some technics amplifier with an anodized aluminum face you're working with, this is a piece of HP test gear!
Save the ice cubes for your rum & coke.
")
Tell us how it works out. Good Luck!
Shawn.
One step further:
Since your cases are so hot lookin' I thought I'd make a comment about something else I would do.
Other than the power switch and one led means you have some holes on the face that could be filled in. It is easy to do. Place masking tape over the holes on the front of the face of the holes you want to fill. Then mix up some JB Weld and put it in the holes with the plate laying face down. Sand and repeat if necessary. This step should be done after the plate has been stripped to bare metal.
I have just done this on another project I have been working on and the results were astounding even on my first try. I will eventually post it when the Amp is complete.
Again good luck. You certainly have some fine looking metal there.
Shawn.
- Status
- This old topic is closed. If you want to reopen this topic, contact a moderator using the "Report Post" button.
- Home
- Design & Build
- Equipment & Tools
- How to Remove Writing from HP Front Panels?