I just completed a tu-879 kit. One channel has about 25% of the output than the other. I switched output tubes and replaced the 12AX7 without benefit. Used input 1 and input 2 without change. Checked my computer soundcard outputs which feed the amp. No deal. Reversed the inputs and even switched the speakers which did nothing. No matter what I change, one channel is down about 6 dB. Before I start tearing my hair out and tearing the amp apart, anyone have an idea as to where to look?
Here are my suggestions:
1. check the PCB board step by step with the manual.
2. check your wiring (input 1 and 2)
3. swap the output tube
4. if you still have problem, e,ail or call me
Victor
Turns out the input switch was defective. I thought I was going to need to replace it, but after numerous flips of the switch, the second channel came in fully. This was probably a one in a million defect.
I use my computer as a music media manager. Sound card is an M-Audio Audiophile 192. This feeds directly into the TU-879S and sounds great through a pair of Klipsch speakers. When people use different 12Ax7s or output tubes, are the results subtle or more clear cut? I'm trying to decide if it is worth it to me to invest in multiple output tubes.
Which will make a more noticeable impact on sound, new caps or different tubes?
.
Which will make a more noticeable impact on sound, new caps or different tubes?
It is eaier to do tube rolling...
It is worth to trial both.
How do I get this unscrewed?
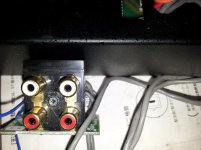
Attaching a pic of my current dilemma. I put this project on the back bench 3 months back when I realized I would never get the screw to properly insert into the RCA block without undue force. Vicktor told me to use "the right amount of pressure", but I was skeptical from the start as I knew the screw was already losing its groove while threading it in. Actually I was quiet fearful this would happen, so waited a few months for a brainwave to strike me about whether to use the m3x8mm screw or another size (then forgot about it for a few months).
So I went ahead yesterday deciding to complete it, now I am stuck with the results you see in the pic. Alas ...its totally jammed, the grooves are now worn out, and the Philips screw driver is of no use. the needle nose pliers is of no help. How do I get this unscrewed?
I need to attach this to the back plate of the chassis to complete the assembly, which means unscrewing it and screwing it back via the through hole of the chassis.
TIA
-G0bble
Attachments

Sorry, but I'm a little confused. Is the Elekit TU-879S kit an amplifier or an integrated amplifier (do I need a pre-amp between the source and the amp)? It appears to be an integrated amp, but need clarification.
Thanks, Mike
Its an Integrated. The 12AX7 is the preamp part with two RCA inputs.
HTH
--G0bble
I can order the replacement part for you. The part number is 4130352Attaching a pic of my current dilemma. I put this project on the back bench 3 months back when I realized I would never get the screw to properly insert into the RCA block without undue force. Vicktor told me to use "the right amount of pressure", but I was skeptical from the start as I knew the screw was already losing its groove while threading it in. Actually I was quiet fearful this would happen, so waited a few months for a brainwave to strike me about whether to use the m3x8mm screw or another size (then forgot about it for a few months).
So I went ahead yesterday deciding to complete it, now I am stuck with the results you see in the pic. Alas ...its totally jammed, the grooves are now worn out, and the Philips screw driver is of no use. the needle nose pliers is of no help. How do I get this unscrewed?
I need to attach this to the back plate of the chassis to complete the assembly, which means unscrewing it and screwing it back via the through hole of the chassis.
TIA
-G0bble
Pleasse let me know..
Victor
I can order the replacement part for you. The part number is 4130352
Pleasse let me know..
Victor
You mean the 4P RCA block in plastic mould? Please do. Can you also put in a M3x12.5mm spacer nut for the JFET? I put in a replacement of a different size as I could not find it (I am certain it came originally, guess I lost it). but it being smaller I cannot screw in the m3x10mm screw from outside the chassis for heat radiation. How critical is this for the JFET? Or can I leave it as is?
PM me the details via email.
Thanks!
--G0bble
Last edited:
You mean the 4P RCA block in plastic mould? Please do. Can you also put in a M3x12.5mm spacer nut for the JFET? I put in a replacement of a different size as I could not find it (I am certain it came originally, guess I lost it). but it being smaller I cannot screw in the m3x10mm screw from outside the chassis for heat radiation. How critical is this for the JFET? Or can I leave it as is?
PM me the details via email.
Thanks!
--G0bble
i will let you know soon
please email your mailing address to me
Ok, my friend reminded me that I have a dremel lying unused in my cupboard - one of those expensive fancy toys I dont know how to use really 
Cutting a groove into the screw head for use with a regular flat blade screw driver however was easier and quicker than it takes to read a page on the internet.
I removed it!! Now I will finish the project in a couple of hours.
--G0bble
Cutting a groove into the screw head for use with a regular flat blade screw driver however was easier and quicker than it takes to read a page on the internet.
I removed it!!
Now I will finish the project in a couple of hours.--G0bble
My build is complete!
Finally overcame my procrastination in Jan to finish it. Been listening to it for a month now. I posted a review here :My latest build - the Elekit TU879S since it is my local hangout.
Cheers
--G0bble
Finally overcame my procrastination in Jan to finish it. Been listening to it for a month now. I posted a review here :My latest build - the Elekit TU879S since it is my local hangout.
Cheers
--G0bble
According to the positive feedback review -Please, does anybody in the world have schematic diagram of 879S? I really need it, want to construct something but need reference.
Please...
The Elekit TU-879S is built on an elegantly modified Williamson circuit, and will accept a myriad of upgrades.
If you look up all the upgrade/mods link in the urls, you will find bits and pieces of the circuit diagram, but I think Victor only provides circuit after purchase.
HTH
--G0bble
Ordered from Victor on Sunday, the amp arrived on Friday, I finished the build on Saturday and have been enjoying it ever since.
I think I have found a new (potentially expensive) hobby.
I do have a questions/concern;
When I test from a point on the enclosure, to the ground on my power outlet (using a digital fluke multimeter) with the unit plugged in but turned off (not connected to any input or speakers) I read 50 Vac. I get 25 Vac when it's turned on. Is this a safety issue? There is no problem with the sound output and I don't see any pinched wires or components touching the enclosure.
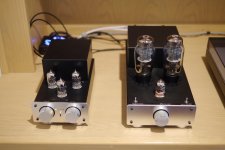
TU-879 with TU-875
Hi Everyone! I just thought I'd share a couple of photos of my Elekit setup. I initially built the TU-879 amplifier and was thrilled with it. Victor later sold me some Vitamin Q caps and an upgraded potentiometer for it. This amp is well broken in by now as it gets around 5 hours a day of play time.
Since the TU-879 was so easy and so much fun to build with such a great sound, I decided to order a TU-875 preamp as well. At first, I intended to use this with a different system, since it never really occurred to me to place a preamp in front of an integrated amp like the TU-879. I had always thought it best to keep the signal path as simple as possible.
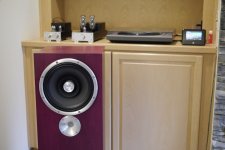
But the addition of the turntable to the system necessitated a phono preamp and I wanted to spend some time listening to the TU-875's onboard phono pre, so I put it in the chain ahead of the TU-879 amplifier. I was very surprised to find that I much preferred the sound of the TU-875/TU-879 combination to the sound of the TU-879 by itself. We just love it. This system produces a detailed sound that somehow does not fatigue you. With the Zu Omen speakers, the 9 watt TU-879 offers more than enough power.
If you have thought about building a TU-879 amp, don't hesitate. It has to be one of the greatest hi fi bargains out there right now, and you also get the pride of having built it yourself. And if you're game, adding the TU-875 preamp gives you a very good phono stage and also, to my ears, a rich and detailed presentation.
I spent quite a lot of time rolling tubes on the TU-879 and finally arrived at my favorites: Current production Tung Sol 6L6G and Tung Sol 12AX7. I am still using the stock Electro Harmonix 12AU7s in the preamp, but they seem to be quite good. I may try some Tung Sols in there as well.
Hi Everyone! I just thought I'd share a couple of photos of my Elekit setup. I initially built the TU-879 amplifier and was thrilled with it. Victor later sold me some Vitamin Q caps and an upgraded potentiometer for it. This amp is well broken in by now as it gets around 5 hours a day of play time.
Since the TU-879 was so easy and so much fun to build with such a great sound, I decided to order a TU-875 preamp as well. At first, I intended to use this with a different system, since it never really occurred to me to place a preamp in front of an integrated amp like the TU-879. I had always thought it best to keep the signal path as simple as possible.
But the addition of the turntable to the system necessitated a phono preamp and I wanted to spend some time listening to the TU-875's onboard phono pre, so I put it in the chain ahead of the TU-879 amplifier. I was very surprised to find that I much preferred the sound of the TU-875/TU-879 combination to the sound of the TU-879 by itself. We just love it. This system produces a detailed sound that somehow does not fatigue you. With the Zu Omen speakers, the 9 watt TU-879 offers more than enough power.
If you have thought about building a TU-879 amp, don't hesitate. It has to be one of the greatest hi fi bargains out there right now, and you also get the pride of having built it yourself. And if you're game, adding the TU-875 preamp gives you a very good phono stage and also, to my ears, a rich and detailed presentation.
I spent quite a lot of time rolling tubes on the TU-879 and finally arrived at my favorites: Current production Tung Sol 6L6G and Tung Sol 12AX7. I am still using the stock Electro Harmonix 12AU7s in the preamp, but they seem to be quite good. I may try some Tung Sols in there as well.
Attachments
- Status
- This old topic is closed. If you want to reopen this topic, contact a moderator using the "Report Post" button.