Hello everyone, I would like to post my current success and ongoing evaluation of a MOD I have spent a year working on. Been lots of mistakes, burnouts and god knows what... Blew up a few very good LED's and what not but hopefully I have something successful to tell you all.
In the end this will be a full Youtube video on how to do this, and my battles getting there, like a video log on projector modification, so keep your eyes on this post and subscribe for a notification when I get everything done, I am still testing at the moment.
But here is what I have so far:
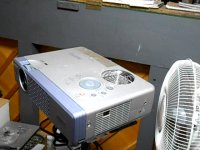
I got myself 3 Sanyo plc-xu41 projectors of ebay as a batch for £30 including postage. One was completely dead, the other two were working fine, but very dirty. I deep cleaned them thoroughly before proceeding.
I wanted to replace the expensive lamp and use an LED module instead. I only did it for fun and the challenge…….and to watch movies, anime and what else without sitting in front of my computer when I have a comfy sofa to sit on.
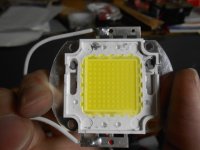
I looked for the highest and manageable LED out there, and I found a 300W LED cob chip from E-bay. It ran of 36V at 8Amps.
Once I learned how to bypass the ballast check on the projector I was good to go.
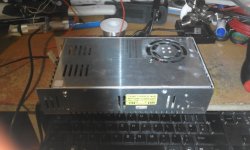
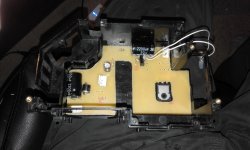
One big issue was the power. The original power supply in the projector would never power the 300W LED chip, even with a boost converter. I had to order a 350W power transformer and then rewire the projectors own power supply to run of this new power source and scrap the old one.
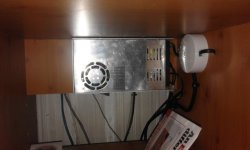
I did not want to have two power connectors to the projector. I decided to attach the power supply under my desk and run the power cord to the projector with the HDMI cable and sound. It is much more safer then connecting the projector to the mains and it would run the projector and LED at the same time.
I had to check all the power rails for the projector and create a voltage circuit that would give me 6V –6V and 15V for the projector. I also created a dimmer switch for the LED and a temperature controlled fan speed controller to control the speed of the fan depending on how hot the heat sink got.
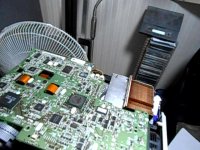
I then trimmed the light tunnel down to size, removed unnecessary light filters and lenses, replaced the BLUE LED lens with a clear one, as that had a UV filter on it. I noticed the blue UV filter blocked some of the blue light and since the LED did not let of any UV light, it was not needed. I also removed the wire mesh plate as this did cut the LED power by half.
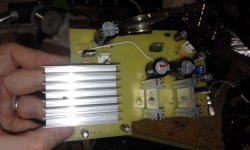
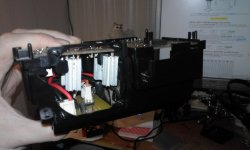
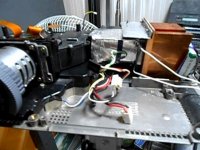
I then attached the LED to a copper Dell passive heat sink and stuck a 5000RPM fan to the underside of it. But the fan controller only runs the fan at low speed as the temperature sensor monitors how hot the heat sink gets. Surprisingly the Dell heat sink works like a charm and keeps the whole thing cool.
I created a bracket to mount the LED to the case and then isolated the light tunnel with a ….. food box and self adhesive foil tape.
I have had lots of problems before I got to this stage, I used a 100W led, but they only lasted for a month before the LED elements would fail and the LED would flicker. I will cover this and its cause in the video. I also had power problems. Blew up a 300W flip chip that cost me £100 and burned another £20 300W led… Not to mention nearly fry the projectors main board and cutting the case too much… All fun in learning.
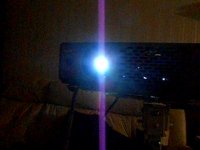
But the picture brightness is very good… and the projector can be used happily to see films and documents. I am testing at the moment to see if the LED will last past the one or two month before the chip itself dies. It was a heat issue before and with this new heat sink and LED cooling techniques combined together I might have solved this and the LED should outlive the projector itself.
Stay tuned and sorry for my spelling grrrrrrrrr.
In the end this will be a full Youtube video on how to do this, and my battles getting there, like a video log on projector modification, so keep your eyes on this post and subscribe for a notification when I get everything done, I am still testing at the moment.
But here is what I have so far:
I got myself 3 Sanyo plc-xu41 projectors of ebay as a batch for £30 including postage. One was completely dead, the other two were working fine, but very dirty. I deep cleaned them thoroughly before proceeding.
I wanted to replace the expensive lamp and use an LED module instead. I only did it for fun and the challenge…….and to watch movies, anime and what else without sitting in front of my computer when I have a comfy sofa to sit on.
I looked for the highest and manageable LED out there, and I found a 300W LED cob chip from E-bay. It ran of 36V at 8Amps.
Once I learned how to bypass the ballast check on the projector I was good to go.
One big issue was the power. The original power supply in the projector would never power the 300W LED chip, even with a boost converter. I had to order a 350W power transformer and then rewire the projectors own power supply to run of this new power source and scrap the old one.
I did not want to have two power connectors to the projector. I decided to attach the power supply under my desk and run the power cord to the projector with the HDMI cable and sound. It is much more safer then connecting the projector to the mains and it would run the projector and LED at the same time.
I had to check all the power rails for the projector and create a voltage circuit that would give me 6V –6V and 15V for the projector. I also created a dimmer switch for the LED and a temperature controlled fan speed controller to control the speed of the fan depending on how hot the heat sink got.
I then trimmed the light tunnel down to size, removed unnecessary light filters and lenses, replaced the BLUE LED lens with a clear one, as that had a UV filter on it. I noticed the blue UV filter blocked some of the blue light and since the LED did not let of any UV light, it was not needed. I also removed the wire mesh plate as this did cut the LED power by half.
I then attached the LED to a copper Dell passive heat sink and stuck a 5000RPM fan to the underside of it. But the fan controller only runs the fan at low speed as the temperature sensor monitors how hot the heat sink gets. Surprisingly the Dell heat sink works like a charm and keeps the whole thing cool.
I created a bracket to mount the LED to the case and then isolated the light tunnel with a ….. food box and self adhesive foil tape.
I have had lots of problems before I got to this stage, I used a 100W led, but they only lasted for a month before the LED elements would fail and the LED would flicker. I will cover this and its cause in the video. I also had power problems. Blew up a 300W flip chip that cost me £100 and burned another £20 300W led… Not to mention nearly fry the projectors main board and cutting the case too much… All fun in learning.
But the picture brightness is very good… and the projector can be used happily to see films and documents. I am testing at the moment to see if the LED will last past the one or two month before the chip itself dies. It was a heat issue before and with this new heat sink and LED cooling techniques combined together I might have solved this and the LED should outlive the projector itself.
Stay tuned and sorry for my spelling grrrrrrrrr.
Attachments
-
 vlcsnap-170574.jpg32.6 KB · Views: 245
 -
 300wled.jpg219.3 KB · Views: 251
 -
 350psu0.jpg180.7 KB · Views: 237
 -
 350psu.jpg160.9 KB · Views: 230
 -
 propsu01.jpg304.5 KB · Views: 230
 -
 propsu02.jpg303.7 KB · Views: 178
 -
 propsu04.jpg281.6 KB · Views: 188
 -
 vlcsnap-145017.jpg34.4 KB · Views: 176
 -
 vlcsnap-142698.jpg39.6 KB · Views: 177
 -
 vlcsnap-179039.jpg38.2 KB · Views: 185
"I then attached the LED to a copper Dell passive heat sink and stuck a 5000RPM fan to the underside of it. But the fan controller only runs the fan at low speed as the temperature sensor monitors how hot the heat sink gets. Surprisingly the Dell heat sink works like a charm and keeps the whole thing cool."
300W, even 100W is a very high power for LEDs. and it produce much more heat comparing to MCUs.
Ever check the temperature right at the LED case and at the sensor point, and see the difference ?
300W, even 100W is a very high power for LEDs. and it produce much more heat comparing to MCUs.
Ever check the temperature right at the LED case and at the sensor point, and see the difference ?
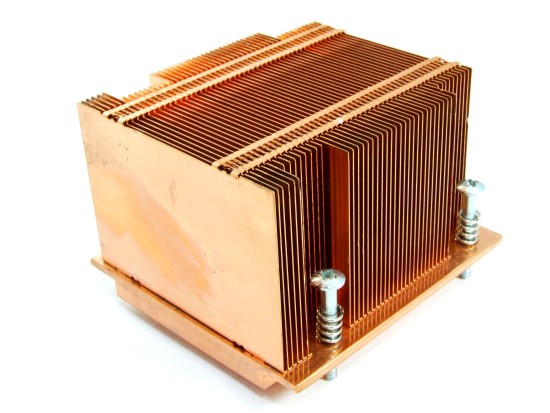
That was one of the biggest problems I had to contend with... 100W LED in my earlier mod got too hot and damaged the LED. I then moved to 300W LED and tried and tested all kinds of heat sinks, even made my own copper heat sink and that failed. But for some reason, this Dell heat sink keeps the temperature no higher than 40c with the fan cooling it from underneath. The LED datasheert says the LED operates just fine from 45c - 60c. The copper fins on the heat sink are very thin and there are lots of them at nearly 57mm length. The LED die does get extreamly hot, but I am using the projector fan to cool it directly. So far all is good, but I am still testing and keeping a close eye on things..
The copper heat sink is dissipating a lot of heat quickly into the air, I have cut a hole in the top of the projector and plan to cut a metal grill once I find my cutters. This allows the heat to enter the bottom, pass through the heat sink and out the top quickly.
Here is an image of the heat sink: Passive Full Copper Heatsink Copper Cooler Socket 754 939 940 84 mm x 80mm x 57mm
Last edited:
At the beginning, I apologize for my English ")
Hello, I have the same question, the most important in this whole project, how to get around the ballast? Without this information, no further action is possible
Regarding LEDs: controlling LEDs is simple, requires adjusting the current, supplying the same voltage is a mistake that commits a lot of people. If you connect the LED eg to 36V, because it writes on the LED, you will make a mistake. The diode's electrical resistance increases with temperature so you have to regulate the current, not the voltage. The easiest way to do this is to use the common step up / step down available on the market, but those that have 2 potentiometers, one for voltage, the other for the current. Such a regulator will always maintain the appropriate diode current, such as LED diode at 8A, you set the voltage with 1 potentiometer close to the supply voltage, and with 2 potentiometer you set the current limit at 8A and now as the LED will heat it will never charge more than 8A.
The second mistake I see is the lack of a focusing lens between the projector, Power LED, the diode shines at around 150 degrees from side to side, and the original lamp at the most 10 - 15 degrees. Application? Instead of increasing the power of the diode to 300W, it is better to take 100W and purchase its light and only supply it to the projector. Now you have 300W and most of the light goes sideways instead of in the LCD matrix from the projector.
- Status
- This old topic is closed. If you want to reopen this topic, contact a moderator using the "Report Post" button.
- Home
- General Interest
- Everything Else
- The Moving Image
- DIY Projectors
- Sanyo Plc-xu41 300W LED MOD