Ignore the above post. Grounded the Lamp Lit (pin 14) without the resistor, direct to ground. Powered up and everything. From my DIY LCD projector experience, these DLP's are Lumen Hungry! Thanks Crazyfunguy.
BTW have you considered shooting coloured lasers down the tunnel? Somehow I feel that this will be the next generation of projectors.
BTW have you considered shooting coloured lasers down the tunnel? Somehow I feel that this will be the next generation of projectors.
If anyone wants to have a read at this article, it's well worth the read :
http://download62.mediafire.com/phmjtgmmp4ug/jmziwzmwm4w/DIY+LED+Projector.pdf
For those who are not sure how the thing comes apart, here's a service guide. Saves you from looking around:
http://download747.mediafire.com/em9yc4m4vozg/jlqgj1zhnym/X1+Service+Guide.pdf
http://download62.mediafire.com/phmjtgmmp4ug/jmziwzmwm4w/DIY+LED+Projector.pdf
For those who are not sure how the thing comes apart, here's a service guide. Saves you from looking around:
http://download747.mediafire.com/em9yc4m4vozg/jlqgj1zhnym/X1+Service+Guide.pdf
links dont work.....but is that the DIY led DLP projector?
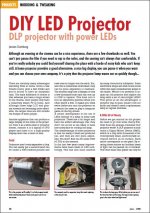
Wierd that...anyways try the link below. It is an article of a commercial projector modified to work with power LED and CPU Heatsink which has had the colour wheel removed and synchronised with the LED's. Check the attached thumbnail. If it don't work then please name me a good file host.
PS: what would happen if I deliberately broke a lamp burner. Would it explode as I hve heard they have a lot pressure. My lamp burner is just not coming out.

DIY LED DLP Projector Article
Infocus X2 Service Guide
Attachments
Last edited:
I've read that article.....the brightness is very low. To get the lamp out.....take a nail or something hard and pointy and chip out the white cement holding the back cap on then give it a twist with some pliers. Then chip out the cement around the lamp and it will fall out.
I replaced my lamp with an HID lamp. I used black HIGH temp 500 deg f RTV silicone thats used for automotive sealing. These lamps dont get as hot as the stock ones so I dont know if it would work for that. I do know that it would help the reflector from cracking if it could handle the temps.
Hi, thought I would give this a shot since my last bulb only lasted 275 hours(another $300 is way out of my budget). I'm working on a x1, not an x2. I think the diagram in the first post in from an x1(page 83 in the service guide), the pin outs seem the same. Did you disconnect the wires from the power/ballast end of the harness or from the control board end? I just tried the power/ballast end, (page 89 in the service guide) pin 18 grounded, pin 19 pulled and capped off. I turned it on, and the green light flashed a few times and went solid. I thought all was well, but shinning a light down the light tunnel and looking in the lens all that is showing is black and white pixels, it never goes to the splash screen. Any ideas? Thank you for posting, I wouldn't have made it this far without your help.
From the power/ballast end. Looks like you have done it correctly and pin 18 grounded and pin 19 capped is the correct wires for the X1. The fact that you have a solid green led states that you have successfully bypassed the X1, however I'm thinking you may have other problems (not related to your diy) on you projector.
Not that you should have to but just out of curiosity, have you plugged in a video source and checked?
Not that you should have to but just out of curiosity, have you plugged in a video source and checked?
I have tried with a composite and vga, to no avail. Thought maybe it was the projector, so i tried with another x1 from a friend. Both will run with a stock lamp with the wires in stock configuration. Neither display the splash with the wiring modification. I found 2 other forums with people trying similar things with the x1(neither in English). One was cross wiring the opto-couplers to fool the projector, and one put a resistor across the temp switch to fool it into thinking the bulb was putting off heat. I'm not sure if I should try one of these methods, or just try with a brighter hotter lamp.
I think the lamp lit wire (if followed) goes to one of the opto-couplers. By you shorting both those legs or shorting one of the legs (lamp lit) to ground is more or less the same. I am confused. I think you might have to ask crazyfunguy for his help as he has worked on a few of those I think.
A company called Edison makes a high output planar LED called a EdiStar Planar. They come in 50watt and 100watt configurations. The 100 watt light puts out 10000 lumens and are $150. They're a Taiwan company but can be ordered through their US headquarter. The LED chip is 19mm square and must be mounted to cooling fins and preferable a fan (like a cooling unit for a PC microchip) I'm going to give one a try. They run off 33 volts DC.
I think the lamp lit wire (if followed) goes to one of the opto-couplers. By you shorting both those legs or shorting one of the legs (lamp lit) to ground is more or less the same. I am confused. I think you might have to ask crazyfunguy for his help as he has worked on a few of those I think.
On my infocus LP530 the "lamp lit" pin does go to one of the opto-couplers. I've tried both shorting the pin to 3.3V and separately, bridging the output on the optocoupler. Both mods had the same effect: color wheel keeps spinning, but DLP chip isn't functioning... I'm thinking that the may be some sort of light sensor in the light tunnel enabling the functionality of the DLP chip...
I just purchased a new bulb from ywh for an Infocus X2. Can anyone tell me how to replace the old bulb. I have the housing apart, but don't know how to get the bulb out of the reflector. It appears that some type of cement holds it in. I'm a novice, so keep it simple. If I can't do this myself, where could I get it done? Thanks much
Did anyone succeed on doing it?
Hi guys,
did anyone really succeed on bypassing the lamp circuit?
I once did it on an Epson S5 Power Lite projector.
All I had to do was to connect to each other the two rightmost pins on the 5 pin connector.
Is it the same on this projector?
Thank you very much in advance.
Any help would be greatly appreaciated.
Best regards,
Filipe
- Status
- This old topic is closed. If you want to reopen this topic, contact a moderator using the "Report Post" button.
- Home
- General Interest
- Everything Else
- The Moving Image
- DIY Projectors
- Infocus X1/X2 Lamp & Ballast Bypass