does anyone have any info on a simple divider circuit so a single upgraded clock can be shared with the servo please? I'll give that a go first.
Some clocks got 1/2 and 1/4 divider fitted such as Fidelity Audio's C2 premium clock
http://www.fidelityaudio.co.uk/clocks.html
- Did the OPA-SUN fit standing up or did you have to use the extenders?
- What wire should I use to hook up the clock power and signal with. I am assuming a twisted pair for power but was not sure about the signal. Is there good small shielded coax of some sort that should be used? I also need recommendation on wire/cable to use to go from DOS to RCA output jacks.
Thanks
I suggest you go through Ray's web page and you will find all the information you need. Ray's Audio Page
. . .
I have bought a pair of opamps (OPA-SUN) and a clock (Type1 - TCXO) from this seller: ºÍ§Ó*µ响 The products are of HIGH quality and the delivery is quick using DHL (parcel arrives 5-7 days from place of order with good communication) that I would also recommend.
Flea Kit - Surface Mount Componants
Well, I opened up the Flea Kit ready to assemble but noticed that there are a handful of Surface Mount Componants that need to be installed. Not sure as I am up to the task of trying to get these very small guys soldered onto the board. Any tricks of the trade?
Well, I opened up the Flea Kit ready to assemble but noticed that there are a handful of Surface Mount Componants that need to be installed. Not sure as I am up to the task of trying to get these very small guys soldered onto the board. Any tricks of the trade?
Ray's flea requires 18V supply and what you should have done was when you ordered the flea from Ray you should request him to order a 18V voltage regulator for you from his known source. In my case Ray ordered the 18V voltage regulator for me when I purchased the 2 fleas from him. Ray provides very good service indeed
. . .
QUOTE]

- Did the OPA-SUN fit standing up or did you have to use the extenders?
- What wire should I use to hook up the clock power and signal with. I am assuming a twisted pair for power but was not sure about the signal. Is there good small shielded coax of some sort that should be used? I also need recommendation on wire/cable to use to go from DOS to RCA output jacks.
Thanks
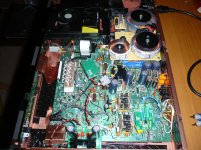
The OPA-SUN fits standing up and you can see my photo below.
For the clock power I use ordinary copper wires but twisted them together. For the coaxial I bought HF shielded coaxial cable from eBay having small diameter. From DOS to RCA I used OCC copper cables.
Attachments
Well when I bought the two fleas from Ray, Ray had done me a favor of soldering the very small surface mount components for me before shipmentWell, I opened up the Flea Kit ready to assemble but noticed that there are a handful of Surface Mount Componants that need to be installed. Not sure as I am up to the task of trying to get these very small guys soldered onto the board. Any tricks of the trade?
 Thanks Ray.
Check this video: EEVblog #186 - Soldering Tutorial Part 3 - Surface Mount - YouTube
It's a lot of talk, but shows you how to do it.
It's a lot of talk, but shows you how to do it.
Thanks
Thanks Ray and Higlander.
Thanks Ray and Higlander.
Check this video: EEVblog #186 - Soldering Tutorial Part 3 - Surface Mount - YouTube
It's a lot of talk, but shows you how to do it.
HDAM On the CD-67SE
Are you saying to remove all of the components in the HDAMs or not to remove them in case I want them back? ThanksTake them all out, you want the HDAM back!! :v
Thanks Hotiron. I have to get back at my CD player tonight. I made the mistake of putting some vinyl on my Thorens playing thru my Tube Sherwood receiver. . . Hard to go downstairs and fire up the desolder station.
One more side.
One more side.
Take them all out, you want the HDAM back!! :v
Guys who have built Ray's new CFP DOS, which components did you use for the bc550c and bc560c transistors?
The ones listed in the documentation from Farnells are discontinued now, but I don't know enough about transistors to identify a suitable replacement for them.
Any pointers?
Cheers
The ones listed in the documentation from Farnells are discontinued now, but I don't know enough about transistors to identify a suitable replacement for them.
Any pointers?
Cheers
BC549C and BC559C will work fine.
Thanks. Are there any particular ratings or brands to look out for or is it a case of if the part number's correct you're all good?
Well, I opened up the Flea Kit ready to assemble but noticed that there are a handful of Surface Mount Componants that need to be installed. Not sure as I am up to the task of trying to get these very small guys soldered onto the board. Any tricks of the trade?
Hi, I find it best to use a magnifying lamp when soldering smd's. This works really well. I happened to get one included with the purchase of a soldering station last year, which made it all a real bargain. But you should be able to find one somewhere on the internet for not too much. Once you get used to the magnifying lamp you will likely use it for most all pcb soldering. At least that's how it has gone for me.
I should have added in my post the following:
In soldering smd resistors I first put some solder on one of the pads. Then I get the resistor in place on that pad and hold the resistor with a pointy thing like a soldering tool or a pencil tip, and then heat the solder on the pad and hold the resistor in place until the solder cools, only a couple seconds. I try to have the resistor properly lined up on the other pad at this time. It's easy to readjust by just heating the one pad with solder on it and slightly moving the resistor. When all is well then just add solder to the other pad and the resistor. The one thing you do not want to do it apply too much heat directly to the resistor as the film is delicate. And I always check the connection with my dmm after soldering to be sure of things.
In soldering smd resistors I first put some solder on one of the pads. Then I get the resistor in place on that pad and hold the resistor with a pointy thing like a soldering tool or a pencil tip, and then heat the solder on the pad and hold the resistor in place until the solder cools, only a couple seconds. I try to have the resistor properly lined up on the other pad at this time. It's easy to readjust by just heating the one pad with solder on it and slightly moving the resistor. When all is well then just add solder to the other pad and the resistor. The one thing you do not want to do it apply too much heat directly to the resistor as the film is delicate. And I always check the connection with my dmm after soldering to be sure of things.
- Home
- Source & Line
- Digital Source
- Marantz CD63 & CD67 mods list