Hi,
Thank You Rarkov, that's my point. There's no programming datasheet available (while pinout and block diagram are documented!).
For this reason, my plan involves connecting the new controller to the old one and letting it "sniff" on the serial port. This way, I could determine the protocol (by trial and error, but I assume it's I2C) and let the new controller "learn" the old one's language")
So let me ask my original question in another way: Would the controller hardware and software discussed in this thread be suitable for connection to an I2C drive (I don't want to study the entire source code just to find that out)?
Thanks,
Sebastian.
Thank You Rarkov, that's my point. There's no programming datasheet available (while pinout and block diagram are documented!).
For this reason, my plan involves connecting the new controller to the old one and letting it "sniff" on the serial port. This way, I could determine the protocol (by trial and error, but I assume it's I2C) and let the new controller "learn" the old one's language
So let me ask my original question in another way: Would the controller hardware and software discussed in this thread be suitable for connection to an I2C drive (I don't want to study the entire source code just to find that out)?
Thanks,
Sebastian.
sek said:Hi,
Thank You Rarkov, that's my point. There's no programming datasheet available (while pinout and block diagram are documented!).
For this reason, my plan involves connecting the new controller to the old one and letting it "sniff" on the serial port. This way, I could determine the protocol (by trial and error, but I assume it's I2C) and let the new controller "learn" the old one's language
So let me ask my original question in another way: Would the controller hardware and software discussed in this thread be suitable for connection to an I2C drive (I don't want to study the entire source code just to find that out)?
Thanks,
Sebastian.
The PIC18F452 (the microcontroller used in my cd player) does support I2C, and there are available pins for it. As for using it for controlling your existing transport, that will be a problem, unless you have a logic analyzer that you can plug into your existing setup, or can find the datasheet for the controller chip.
--
Brian
Hi BrianGT,
I'm in the process of designing the "supply sequencer" by using some transistors as switches.
The main issue is how to get negative voltage from the pic that could only provide 0 or +5V.
But for the DAC I'e got a negative voltage (-15V) that needs to be sequenced as well. Do you have an idea of ho to do this ?
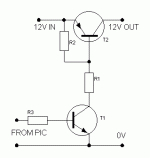
Attached is a schematic to explain how using transistors as switches instead of relays.
Moreover, I need your background regarding the connectors you used to for the CDPRO.
While looking at the datasheet, I noticed that the connectors on its board are "JST" CMS types.
I bought a set of connectors with the CDPRO unit, but I got only connectors for the unit and not for the CI of the controller board.
What kind of connectors do you use for your contoller board ?
I found the JST types in EAGLE while routing the board but there are only CMS types.
I would be grateful if you help me in choosing the "female" connectors that has to be used on the board.
Regards
I'm in the process of designing the "supply sequencer" by using some transistors as switches.
The main issue is how to get negative voltage from the pic that could only provide 0 or +5V.
But for the DAC I'e got a negative voltage (-15V) that needs to be sequenced as well. Do you have an idea of ho to do this ?
Attached is a schematic to explain how using transistors as switches instead of relays.
Moreover, I need your background regarding the connectors you used to for the CDPRO.
While looking at the datasheet, I noticed that the connectors on its board are "JST" CMS types.
I bought a set of connectors with the CDPRO unit, but I got only connectors for the unit and not for the CI of the controller board.
What kind of connectors do you use for your contoller board ?
I found the JST types in EAGLE while routing the board but there are only CMS types.
I would be grateful if you help me in choosing the "female" connectors that has to be used on the board.
Regards
Attachments
Brian what about a soft button power on function? The front panel would always be on, but in standby. At the touch of a button or the eject function currently included, the power could be switched on sequentially to any number of relays that would power up the drive and DACS and bring the front panel out of sleep mode.
Regards
Anthony
Regards
Anthony
Coulomb said:Brian what about a soft button power on function? The front panel would always be on, but in standby. At the touch of a button or the eject function currently included, the power could be switched on sequentially to any number of relays that would power up the drive and DACS and bring the front panel out of sleep mode.
Regards
Anthony
This wouldn't be too difficult to implement in conjunction with configuring the power supply to power up based on the microcontroller. You probably wouldn't even need to have a power switch on the unit, just a standby switch, which powers down everything except for the microcontroller.
I would rather see relays used for the power supply, rather than transistors. This would make life easier. A few control lines, or a serial IO expander could be used to control the relays. This would be a cleaner implementation. Relays aren't that expensive that it will be much of a worry.
--
Brian
Rarkov said:Hi,
Just to let you know, with APOX Controls' permission, I have started to rewrite the code to support the DSA protocol.
I'll let you know how it goes...
Gaz
Sounds good. Dale send me the code a long time ago, but I never got around to looking at it. Their IR code seems to work good.
--
Brian
If anyone is interested, I can get a run of control boards made for the cdpro2 project. I will get them made at my cost, and if we can get 10 people or so interested, they should be under $20 a set for a buttons control panel and main control board. I could include chips pre-programmed with the serial bootloader and cdpro2 code. This would allow for very easy updating of the code using a normal terminal software program.
I would like to see this project go somewhere, and keep it public domain.
picture of the current control board, which is the same dimensions as the Optrex 2x20 pcb.
The Apox board could work good, but it is quite big and bulky.
size comparison: http://www.apoxcontrols.com/images/APOX-display.jpg
--
Brian
I would like to see this project go somewhere, and keep it public domain.
An externally hosted image should be here but it was not working when we last tested it.
picture of the current control board, which is the same dimensions as the Optrex 2x20 pcb.
The Apox board could work good, but it is quite big and bulky.
size comparison: http://www.apoxcontrols.com/images/APOX-display.jpg
--
Brian
BrianGT said:If anyone is interested, I can get a run of control boards made for the cdpro2 project.
Most definitely interested.
batee said:Where can I find a display like that? I see "Optrex", but there were several hundred hits on Digikey.
Looks like VFD, but schematic says LCD. Anyone have a part number or description of that technology?
Thanks,
Bryan
It is an lcd:
http://www.optrex.com/Products/PartDetail.asp?PartNumber=C-51505NFQJ-LB-AE
digikey:
http://search.digikey.com/scripts/DkSearch/dksus.dll?Detail?Ref=4318&Row=136806&Site=US
mouser:
http://www.mouser.com/index.cfm?han...uctid=544330&e_categoryid=222&e_pcodeid=80504
--
Brian
Sounds like we have some more interest in this project.
Any concensus on how the control board/buttons should be done? I see two options:
Option A:
seperate buttons board
Option B:
buttons integrated with display pcb
For option B, it could be done as to allow the pcb to be trimmed and an expansion header installed for the buttons, thus allowing option A to be added if later desired.
I would like to keep this first run limited to 10-15 boards, as this is just the initial stage of the project, and I would like to see it improved on and another run of boards done.
As for what could be provided with this project:
- pcb set for control board and buttons board
- pre-programmed PIC18F452 chip with socket
- crystal oscillator for PIC along with caps
- RS232 chip with socket and caps needed
- serial connector for side of board
Another option for this project would to put a 5v regulator on the control board (would only make it a bit wider).
Please provide input, and we can work together to evolve this into a complete project.
Schematics and layout for boards I got made for my school project:
http://www.briangt.com/gallery/cdpro2-pcb
There are some mistakes in the layout, which I will correct:
-wrong footprint for pot, causing them to have to be mounted like this
-incorrect silkscreen for a couple of labels on the output pins (reversed labels for IR and Buttons headers)
-misaligned headers connecting to LCD, see this again.
These problems can easily be fixed and more features added.
As for the power supply, I foresee eventually making a pcb for the +5,+9 needed for the transport and also for the +5 for the control board, along with relays for proper power up on the +5 and +9 for the transport.
For those who missed the earlier post, see the first post for the current C code for this project.
Here is a quick assembly guide that I made for this project, for the kits that I mailed Peter Daniel and Anthony:
http://brian.prohosting.com/assembly/
note: these instructions account for the errors in the layout, which will be corrected before any more boards are made.
Wiki for expressing interest in this project:
http://www.diyaudio.com/wiki/index.php?page=cdpro2
I will not be providing cdpro2 units, as they can easily be purchased in the US from ENCO Group:
http://www.enco-group.com
or in Europe from Nico:
http://www.daisy-laser.nl/homeoptics/
Please note that if you want a fully functional kit, Nico is currently offering one on the above website.
Also, the control board/button board for this project isn't strictly limited to the cdpro2. It is essentially a PIC18F452 development board, which could be used for many other tasks, such as controlling a volume control like the APOX units did. My intent is not to compete with the APOX units, but provide an open source development environment for the cdpro2 and other projects.
Good picture of current control board layout:
http://brian.prohosting.com/assembly/images/controlpcb.jpg
Any input is appreciated.
--
Brian
Any concensus on how the control board/buttons should be done? I see two options:
Option A:
An externally hosted image should be here but it was not working when we last tested it.
seperate buttons board
Option B:
An externally hosted image should be here but it was not working when we last tested it.
buttons integrated with display pcb
For option B, it could be done as to allow the pcb to be trimmed and an expansion header installed for the buttons, thus allowing option A to be added if later desired.
I would like to keep this first run limited to 10-15 boards, as this is just the initial stage of the project, and I would like to see it improved on and another run of boards done.
As for what could be provided with this project:
- pcb set for control board and buttons board
- pre-programmed PIC18F452 chip with socket
- crystal oscillator for PIC along with caps
- RS232 chip with socket and caps needed
- serial connector for side of board
Another option for this project would to put a 5v regulator on the control board (would only make it a bit wider).
Please provide input, and we can work together to evolve this into a complete project.
Schematics and layout for boards I got made for my school project:
http://www.briangt.com/gallery/cdpro2-pcb
There are some mistakes in the layout, which I will correct:
-wrong footprint for pot, causing them to have to be mounted like this
-incorrect silkscreen for a couple of labels on the output pins (reversed labels for IR and Buttons headers)
-misaligned headers connecting to LCD, see this again.
These problems can easily be fixed and more features added.
As for the power supply, I foresee eventually making a pcb for the +5,+9 needed for the transport and also for the +5 for the control board, along with relays for proper power up on the +5 and +9 for the transport.
For those who missed the earlier post, see the first post for the current C code for this project.
Here is a quick assembly guide that I made for this project, for the kits that I mailed Peter Daniel and Anthony:
http://brian.prohosting.com/assembly/
note: these instructions account for the errors in the layout, which will be corrected before any more boards are made.
Wiki for expressing interest in this project:
http://www.diyaudio.com/wiki/index.php?page=cdpro2
I will not be providing cdpro2 units, as they can easily be purchased in the US from ENCO Group:
http://www.enco-group.com
or in Europe from Nico:
http://www.daisy-laser.nl/homeoptics/
Please note that if you want a fully functional kit, Nico is currently offering one on the above website.
Also, the control board/button board for this project isn't strictly limited to the cdpro2. It is essentially a PIC18F452 development board, which could be used for many other tasks, such as controlling a volume control like the APOX units did. My intent is not to compete with the APOX units, but provide an open source development environment for the cdpro2 and other projects.
Good picture of current control board layout:
http://brian.prohosting.com/assembly/images/controlpcb.jpg
Any input is appreciated.
--
Brian
Hi all,
I'll tell you what I really like the sound of is a single optical encoder (as you've made provisions for on your board). That gives you:
Play / Pause
Next / Prev track (if you click it slowly)
Search Back / Forwards (if you twist it fast)
It requires interrupts but you have also done that so it should be possible.
Gaz
- Status
- This old topic is closed. If you want to reopen this topic, contact a moderator using the "Report Post" button.
- Home
- Source & Line
- Digital Source
- CDPRO2 Group Project (open source project)