Another SA-8260 owner here with the TOC issue. I'd appreciate a copy of the fix instructions. Thanks Steve.
I have sent you a PM on the forum messaging. Please follow instructions and I'll send you the files.
I have sent you a PM on the forum messaging. Please follow instructions and I'll send you the files.
Hello, I'm in the same boat, played CD gloriously, amazing sound, then couldn't locate any of the next ones I tried. Could you send the instructions to me as well? Much obliged.
Hello, I'm in the same boat, played CD gloriously, amazing sound, then couldn't locate any of the next ones I tried. Could you send the instructions to me as well? Much obliged.
PM sent.
Update November 2017
Hello,
I continue to get requests from people for the TOC fix for their players, including a few very recently. It remains an ongoing issue with the player.
However as of the time of this writing, November 2017, it really is no longer an issue of installing a simple resistor to restore the player to life. It’s been a number of years since I’ve had any feedback from anyone that their player did not have this resistor. So unless you are an original owner who never sent your player in to Marantz it will most likely already have this resistor, though to be sure you do have to check.
The issue now is mostly one of laser replacement. With the 1k resistor installed the circuit has been corrected. But the laser may be longer fully functional. The replacement of the worn laser with a new one will bring the player back to life and make it as good as the day it was new.
The SA-8260 was built in Japan, one of the last players built in Japan rather than China, and the build quality of everything in the player is first rate. With a new laser the player should last as long as you should require a player.
The laser used in the SA-8260 is the Sony KHM-230AAA. This laser was used in a large number of Sony players in the early 2000’s. Marantz used it in the SA-8260 and SA-17. It was also used in an Accuphase player of the same vintage. I don’t know anything about the Accuphase player, but all the other players were out of production by 2005. Since then Sony and Marantz have largely run out of replacement laser assemblies from their Service Centers. However there are still a few NOS laser assemblies for sale at a few vendors.
There are 2 parts numbers that are relevant for sourcing a replacement laser for the SA-8260.
The first number is the above KHM230AAA. This is the actual Sony laser head and the part that goes bad. A Google or Ebay search for this number will give lots of returns for these units from various vendors in China and Hong Kong at prices from 50-100 USD. They all advertise their units as being new and genuine. They may be new but they are not likely to be genuine. They may or may not work. You only know by trying one.
I have not had any luck with these units. But I last tried one in 2012 so maybe these newer ones are better. I don’t know.
However, if you buy one of these you only get the laser head and you will have to take the laser assembly apart and install the new laser head in the assembly before reinstalling the assembly into the player. This is not difficult to do.
The second number worth knowing is 8-820-132-09. This is the Sony part number for the laser assembly in the Sony 9000ES player. It is generally available from Sony’s American parts distributor, Encompass Parts. Encompass only ships to CONUS addresses. Their price is currently 313 USD plus about 20 USD shipping.
The UK and EU vendors charge about the same price, maybe a little more, and will ship anywhere. If you buy one of these lasers you can be sure it will work.
There is one other vendor for these laser assemblies and that is Supermanmeliu, an Ebay player replacement parts seller in Taiwan. His price is less than Sony’s. I have purchased twice from Supermanmeliu with the same experience each time. First laser unit did not work perfectly with reading sacd’s. A subsequent unit worked fine.
Actual laser assembly replacement is very easy. It is a simple replacement and there are no other procedures needed.
Whether laser assembly replacement is a viable option for you is something that only you can determine. If the SA-8260 player, as it is, satisfies your needs in a player a new laser will keep it operating perfectly for a long time to come. Even at the highish cost of a new laser assembly the cost is still cheaper than any new sacd capable player at retail cost today.
As for Modifications to the player, I doubt there are people nowadays who even consider this. Ten years ago this was a hot topic, but not now. Nothing has really changed since I wrote the thread in 2013.
Steve
Hi Steve,
I guess i am one of the few that never got rid of my SA8260. I rarely used it because of the TOC issue and used a Pioneer in its place... i would like to try and fix it... I opened it up and saw the discs do not always spin up... Thanks in advance...
I've sent you a PM about this.
Hello Steve,
I actually boxed my 8260 up years ago with intentions of sending it for repair but never got around to shipping it. I recently discovered it on a shelf in my closet and would love to get it working. Could I get a copy of your instructions please?
PM sent to you.
Modification Update
I have recently done some new modifications on my SA-8260 player that have been quite significant in terms of sound quality improvement.
The first thing I did late in 2017 was to replace ALL of the 3 pin voltage regulators in the digital power supply voltage rails with new Dexa/NewclassD Low Noise regulators.
I had previously only used one of these regulators on the main supply rail to the dac and also for all the voltage rails on the DOS output stage. I never really considered doing it for the other digital supply rails, thinking it unnecessarily expensive. But when pcX had a closeout on the older Dexa regulators it was quite cost effective to do.
The effect of changing the regulators was subtle at first but as time went on I noticed that I was hearing more low level information in recordings. I could only conclude that I had lowered the electronic noise in the player with the addition of these regulators on all the voltage rails.
I consider this to be well worth doing on any player, not just the SA-8260.
The second modification I recently did was to change the output cap in the DOS from a 1.5uf EVO SGO cap to a 2.2uf EVO SGO cap.
The effect here was not subtle at all and heard from the get go. I can only conclude that the 1.5uf cap was too small. My DOS board will accept a 3.3uf size EVO cap, and I may give them a go at a later date.
Steve
Hi Steve
My SA8260 is in the same TOC issue. Please me a copy of your instructions. Thanks
You have a PM from me. Please read and follow. Thanks
Hello.
Since I still get inquiries about the TOC correction in the SA-8260 I thought I might post the first step in the process here in a post. This first step is to check the player to see if the correction resistor has already been installed on the transport board of the player.
So here goes:
1. Remove lid from player by unscrewing the 6 attaching screws from the lid. Note that the screw with the star washer goes above the power inlet, while the other 5 screws are all the same.
2. Lift the lid and slide backwards slightly to remove the lid from the case. This is pretty easy and simple. This will expose the inside of the player with the transport assembly easily visible.
3. Remove the transport assembly from the player:
A. Disconnect the 2 ribbon cables that connect the transport to the main audio board by carefully lifting directly UP on each cable.
B. Disconnect the 4 pin connector at the rear of the assembly. You may need long nosed pliers for this if you cannot get proper grip with fingers.
C. Remove the 4 screws at the corners of the transport. Three of these are easily visible. There is one screw somewhat hidden in the corner of the transport and case. Use a flashlight to locate this screw.
D. Slide the transport assembly backwards so it clears the opening in the front panel, then lift out.
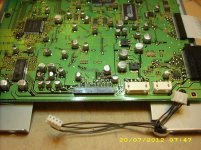
4. Turn assembly over and look at the exposed transport board. Look at the attached photo and try to locate the added resistor in the same location on the board.
If your board already has the correction resistor installed then you will need to replace the laser assembly to restore operation of the player.
If your board does not have the correction resistor, then email me for instructions on installing this resistor and I will respond with the full file of instructions.
It should be noted that I have received many inquiries about the TOC Correction ever since I first posted several years ago. There have only been a few instances where the correction resistor has not been installed. And it has been a few years now since that last time.
If you should require laser assembly replacement to restore operation of your player, you will have to decide if you are willing to spend the money to do this. Reliable replacement assemblies are expensive as the NOS stock depletes.
I have my own opinion on this, and it simply amounts to what the user desires the player to do. The SA-8260 is still quite a good 2 channel sacd player. However it is not up to date as a multichannel player due to the analogue outputs and no HDMI connection. And my opinion of the standard SA-8260 player for redbook cd is that it is not great. Modification is needed to upgrade the redbook cd sound.
Hopefully this post will help people out with the assessment of their players.
Since I still get inquiries about the TOC correction in the SA-8260 I thought I might post the first step in the process here in a post. This first step is to check the player to see if the correction resistor has already been installed on the transport board of the player.
So here goes:
1. Remove lid from player by unscrewing the 6 attaching screws from the lid. Note that the screw with the star washer goes above the power inlet, while the other 5 screws are all the same.
2. Lift the lid and slide backwards slightly to remove the lid from the case. This is pretty easy and simple. This will expose the inside of the player with the transport assembly easily visible.
3. Remove the transport assembly from the player:
A. Disconnect the 2 ribbon cables that connect the transport to the main audio board by carefully lifting directly UP on each cable.
B. Disconnect the 4 pin connector at the rear of the assembly. You may need long nosed pliers for this if you cannot get proper grip with fingers.
C. Remove the 4 screws at the corners of the transport. Three of these are easily visible. There is one screw somewhat hidden in the corner of the transport and case. Use a flashlight to locate this screw.
D. Slide the transport assembly backwards so it clears the opening in the front panel, then lift out.
4. Turn assembly over and look at the exposed transport board. Look at the attached photo and try to locate the added resistor in the same location on the board.
If your board already has the correction resistor installed then you will need to replace the laser assembly to restore operation of the player.
If your board does not have the correction resistor, then email me for instructions on installing this resistor and I will respond with the full file of instructions.
It should be noted that I have received many inquiries about the TOC Correction ever since I first posted several years ago. There have only been a few instances where the correction resistor has not been installed. And it has been a few years now since that last time.
If you should require laser assembly replacement to restore operation of your player, you will have to decide if you are willing to spend the money to do this. Reliable replacement assemblies are expensive as the NOS stock depletes.
I have my own opinion on this, and it simply amounts to what the user desires the player to do. The SA-8260 is still quite a good 2 channel sacd player. However it is not up to date as a multichannel player due to the analogue outputs and no HDMI connection. And my opinion of the standard SA-8260 player for redbook cd is that it is not great. Modification is needed to upgrade the redbook cd sound.
Hopefully this post will help people out with the assessment of their players.
Attachments
stvnhrr,
Thank-you for all the write up on this player. Not sure how often you read this posting, but hopefully you can give some guidance.
I purchased one of the lasers from eBay (suppermailuer) *sp probably a few years ago, but never installed it as the unit started playing again. Sometimes had a mind of its own.
I checked to ensure the resistor was in fact there and in the right location. It was. So, now I go about to change the laser transport. I did that, and still no luck with disc reading.
After reading the service manual, I wonder if I installed the transport incorrectly and caused it to fail or it was a faulty unit to start. It strictly states to remove the soldered short only after connecting the ribbon. The static soldered short, I removed that prior to inserting the ribbon cable. How critical is that and will it fail immediately if the ribbon is not connected?
So, now the transport is about $300+ from suppermailue. Not sure it's worth that kind of money for all the reasons you have stated, i.e., not a good redbook CD, multi-channel out, etc...
If there is anything you can suggest to check/debug it would be good 'fun' to tinker on, as the box is now pretty much worthless.
stvnhrr,
Thank-you for all the write up on this player. Not sure how often you read this posting, but hopefully you can give some guidance.
I purchased one of the lasers from eBay (suppermailuer) *sp probably a few years ago, but never installed it as the unit started playing again. Sometimes had a mind of its own.
I checked to ensure the resistor was in fact there and in the right location. It was. So, now I go about to change the laser transport. I did that, and still no luck with disc reading.
After reading the service manual, I wonder if I installed the transport incorrectly and caused it to fail or it was a faulty unit to start. It strictly states to remove the soldered short only after connecting the ribbon. The static soldered short, I removed that prior to inserting the ribbon cable. How critical is that and will it fail immediately if the ribbon is not connected?
So, now the transport is about $300+ from suppermailue. Not sure it's worth that kind of money for all the reasons you have stated, i.e., not a good redbook CD, multi-channel out, etc...
If there is anything you can suggest to check/debug it would be good 'fun' to tinker on, as the box is now pretty much worthless.
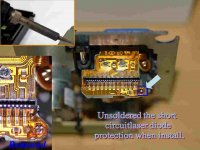
Did you remove the solder blob on the laser unit?
Supermanmeliu sends instructions and pictures to show this.
The below pic is the one Supermanmeliu sends and it's the best one to show the shorting solder blob.
This needs to be removed. Soldering iron and desoldering braid work best. Check with magnifying glass to be sure there is no small solder bridge between the 4 separate pads that are revealed with blob removal.
The unit should now play perfectly.
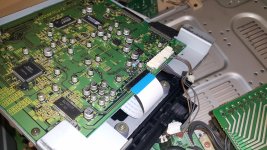
When you replace transport be sure to take replace the spacers exactly as before as there are two colors of them. Also be very careful with all the ribbon cables. There are no adjustments to be made, just take out the old transport and install the new one.
If you have any troubles, send me an email or a PM here, and I can help you out.
Steve
Attachments
I have sent you a PM, so please read that too.
Nice picture of properly installed "correction" resistor. You mention you replaced the laser head. Was this one of the cheap Ebay KHM230AAA laser heads? If so they usually do not work even if you remove the solder blob as shown in post #33. You really need one of the expensive complete laser mechs.
Nice picture of properly installed "correction" resistor. You mention you replaced the laser head. Was this one of the cheap Ebay KHM230AAA laser heads? If so they usually do not work even if you remove the solder blob as shown in post #33. You really need one of the expensive complete laser mechs.
Dear Steve, I have the same problem with the SA8400, will it help the same fix? Laser pick-up is replaced, but the reading problem remains.
Thank you very much Jiri
Jiri,
The SA-8400 uses a different laser head than the SA-8260. The SA-8400 uses the HOP1200 laser. These are in plentiful supply but do have known quality control issues. Be choosy about supplier and just keep trying until you get a replacement that works. Probably best to have a spare or two on hand for the future.
- Home
- Source & Line
- Digital Source
- Marantz SA-8260 Modifications Page