Wow, what a great thread!
I was offered a 555 for $50 and was researching the deck to see whether I should buy it - still undecided and looking for input from users.
I've had my share of problems; a Sony MD recorder that shows DISC ERROR and was never able to find the problem, so I hesitate when I see threads like this with folks spending countless hours getting the thing to work but kind enough to post their findings.
Monty_,
Here's my take on it:
If the 555 won't recognize any CD media, then don't buy it.
If it does, and the seller will let you take off the covers, then you can see whether the Elna cap has leaked or not - if it hasn't, then buy it and go with Stephen's advise and clip the Elna cap out.
If it has leaked, you'll at least have to take the board out and clean both sides, and probably you'd want to clean the traces too, so the board doesn't die later on. So then it depends on how much work you want to put into it, but if it's still working it ought to continue to work.
$50 is a good price for a working unit (and even better if it comes with the remote).
Good luck!
Mysteriously, my unit works again
I found this forum today after finding, to my surprise, that my unit is suddenly working again after having sat idle for about nine years. I did not fix anything, I only turned it on. After it started acting up I moved on and bought a 509, which has been great - and I use it for analog recording. There were times when I saw that "CHECK" message on the 555 but the end came when all the display would do is seemingly race through all of the characters.
Now that it seems to have magically repaired itself I'd like to snip out that troublesome cap mentioned above. How would I recognize it?
The pots are noisy - is that a simple fix?
Now that it seems to have magically repaired itself I'd like to snip out that troublesome cap mentioned above. How would I recognize it?
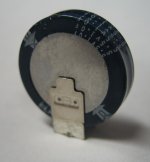
Here's what the supercap looks like (this is one that has not yet leaked). The markings are ELNA and 5.5V1.0F. It's pretty much in the middle of the large board on the right side that runs the whole depth of the unit. (Sorry, I don't have a photo handy of the whole board.)
Attachments
I wrote: One thing I've noted is that the CD-R's from all of these units don't test so well for errors.
I did another test and it looks like my PDR-555RW is in fact giving very nice burns. They seem better than those from my PDR-509, which may have had more use before I got it. But both test CDs are fully readable.
Also, I was reminded that the Memorex media I was using before is lousy (I KNEW that, really I did...).
Thank you, afecu, for the picture. Removing that part was easy. No leakage on the board but there is a bit of corrosion on the part - it looks like rust creeping from around the backside of the silver-colored center, along the edge where it meets the blue outer section.
After taking the unit out of storage it read four or five discs then started to fail to read discs and gave me its "CHECK DISC" message. Then, after removing the cap that message still displayed but the last few discs have been read fine. It seems to be working.
After taking the unit out of storage it read four or five discs then started to fail to read discs and gave me its "CHECK DISC" message. Then, after removing the cap that message still displayed but the last few discs have been read fine. It seems to be working.
Yes, great thread guys. I have a PDR-555RW that was working fine but barely used. I was mostly listening to pre-recorded CD's. Then I moved the unit to my 30 year old Audionics amp, preamp, and Nakamichi 581 cassette deck with the intention of recording some of my old cassettes to CD and dumping the cassettes.
Well, it went from reading and playing pre-recorded CD's to "Check Disc" on any and all media. I could sometimes trick it on CD-R's and CD-RW's by pressing the "Record" button while it was trying to ascertain which media it had. I could also sometimes get it to play a pre-record by pressing "Play" just as the tray closed. But 99% of the time I got "Check Disc". I unplugged it a zillion times to no effect.
Then I found this excellent thread. I opened it up and found the capacitor that Steven mentions. It hadn't leaked anything and everything was absolutely clean as a whistle. There isn't even any dust in the interior -- it looks brand new. Anyway, I removed the capacitor and it did help. It will now recognize CD-R and CD-RW except that it seems to take longer than I recall in the past. I was also able to record and finalize a CD-R. But the darn thing still gives a "Check Disc" on pre-recorded CD's.
Anyone got any suggestions? I also disconnected the cable from the servo to the laser as Steven instructed. Other than the cap and doing the disconnect/reconnect, I haven't touched anything else. Like I said, the interior is spotless and I couldn't see any obviously burnt or melted components. Could it possibly be a laser alignment problem? If so, is there an easy fix for that?
At least I should be able to record my cassettes now --at least the ones that sound okay, which would be the ones recorded on my Nak.
Last edited:
Of the dozens of 555RW's(and it's variants) I have worked on and or upgraded, with the exception of one actually bad laser(would not even play a cd), and one unit dropped hard in shipping that caused the platter to slip down the motor shaft a bit(also would not even play a cd), EVERY symptom of ANY kind with these units has ALWAYS been caused by leakage from the memory backup cap. EVERY time.
This leakage is not always obvious, nor is there always visible leakage from the cap. So, it is always required that one removes that main board to inspect the color of EVERY through-hole connection point(those vapor-deposited 'plate-through hole') and re-inforce(by punching through the hole with a pin/needle and soldering through a very fine wire top & bottom) each and every one that looks significantly darkened or otherwise suspect. I can virtually guarantee that this will fix your problems.
This leakage is not always obvious, nor is there always visible leakage from the cap. So, it is always required that one removes that main board to inspect the color of EVERY through-hole connection point(those vapor-deposited 'plate-through hole') and re-inforce(by punching through the hole with a pin/needle and soldering through a very fine wire top & bottom) each and every one that looks significantly darkened or otherwise suspect. I can virtually guarantee that this will fix your problems.
Thanks for replying Stephen. I was hoping you would still be out there.
The top side of the main board looked great (even checked with 5x magnification) but I did not pull the board to examine the other side.
I probably won't get a chance for a few days, but will pull the main board and check the back side per your instructions as soon as possible.
The CD-R that I recorded played fine in the vehicles and other decks so the laser must be in proper alignment.
Thanks again. I'll let you know how it goes.
Cheryl,
I believe Stephen disagrees on this, but I'd suggest you try increasing the laser power a smidge. I had to do this on one 555RW for it to write reliably after I changed the supercap, and as I recall it also fixed problems in recognizing some media. It's the pot marked "PB.PWR" and I turned it clockwise about 1/32nd of a turn.
I'll second Stephen's suggestion to check the underside of the board, though if you don't see anything at all on the top, the bottom is probably also ok.
Hope this helps!
I hope you are still out there Stephen....
I've got the main board out. I clipped off the legs to the bad cap and have a question about that. Do I need to repair the circuit where I removed the cap-holder legs? It kind of leaves a hole in the trace for each leg. I removed them because it was easier to examine and clean the circuit board. Or since the cap is removed should those traces be left in the open state? Those are the only 2 holes in the area. Everything looks good under 20X mag.
When I originally removed the cap, I left the legs in place. Could that be why the check disc problem was only partly resolved (it started accepting blank CD's for recording but would not recognize pre-recorded disks)?
Any help will be appreciated.
Thanks,
Cheryl
Last edited:
Update:
I think I have more problems than just the cap. Initially, the unit worked fine. I unplugged it and moved it to a different room with different components. It never worked right again. I kept thinking it was like something got jarred loose in the move.
Today, after removing the main board to look for damage, I decided to poke around elsewhere. I noted that the assembly that hold the laser was coated in a white crystalline substance -- like a salt of some kind. These crystals were between circuits on the tiny circuit boards and also beneath the circuit boards. I'm real leery of taking the assembly apart -- but I cleaned it up the best I could.
What I suspect is that there are crystals shorting some circuits in the laser assembly. Is it as tricky as it looks?
My unit usually recognizes a CD-R and will let me record -- but nothing else. I took a picture before I cleaned it but don't know how to post a pic.
Cheryl
I'm back for a third time...
How do you enter test mode on this thing. I found a block of pins, one says Test and another says TE (test entry?). I tried shorting them and powering on but it didn't do anything. The manual I got just says to "short the test pattern". Well, that's real helpful.
I believe you have to enter Test Mode to crank up the laser. Anyone know what pins to short? AFECU?
Thanks,
Cheryl
I have to say it's starting to sound like your 555 may be close to hopeless.
Until you identify the source of the white crystal residue(not something I've seen before, if I read you right), and very thoroughly remove it, there's little chance of returning it to proper operation. I'll need more description about this residue & it's 'path of destruction' to be more helpful there.
As for test mode, I have never actually had to use it on a Pioneer recorder, so I'd have to research that a bit. I can tell you that TE is the tracking error test point. On Pioneer cd & ld players, there's generally two pins or board jumpers side by side that are marked 'test' to be shorted on power up.
I've just had a look at the HHB CDR850 manual, the pro version of the 555, and the test mode shorting point is on the foil side of the front panel pcb. It's two large solder pads that you short during power up. Appears to be right behind the record mute button.
I'm going to get out my jewelry tools and magnifier glasses and see if I can get the pickup assembly out of the unit and clean it. It does still recognize blank CD-R's and records fine -- it just a recorder now and not a player.
Do I need to fill the holes where I removed the electrolytic cap or just leave the holes open?
I've lived in Hawaii for about 5 years -- not too far from Kilauea. People always say that electronics have a short life here but this is the first real problem I've had. We rarely get VOG where I live, but on occasion I can smell the sulfur dioxide from the volcano. I suspect that it is reacting with the metal that the pickup assembly is mounted on. It looks like it started on the part of the assembly that mounts to the rails on either side and then spread to the rest of it. What is strange is that everything else inside the unit is very clean and looks like it just came from the factory.
I found the "TEST MODE" words right where you said Stephen, but I can't tell for sure what pins to use. Right in the middle of the 2 words there are 2 through-holes that are soldered on the other side -- I might try those since I haven't got a whole lot to lose at this point.
Hi Cheryl,
To put photos in your posting, use the "advanced" posting form and there is an "attach files" section under "additional options".
If you want to try my suggestion to increase the laser power, you do not need to go into test mode. Just turn the pot at "PB.PWR" very slightly clockwise - try 1/32nd of a turn and at most 1/16th. And first mark the starting position so you can go back to it if you want!
You don't need to fill the holes where you took out the supercap leads - the traces should go around the holes and continue.
I'd also be curious to see the photos of the laser pickup area...
Good luck,
Aron
Thanks Aron!
The pic is attached. It's as close as I can get with my camera, but you get the idea. There is a heavy buildup of corrosion. This morning I removed the pickup assembly and carefully cleaned it with a very soft brush and some contact cleaner. I put it back in and I'm pretty sure I have it aligned right, but now I'm back to "check disc" on everything including CD-R's. That's what it was doing BEFORE I removed the cap. Are there any tricks to making sure the assembly is engaged to the gear at the right location? I couldn't find any "timing" marks for alignment. The first time I put it back in I was getting "no disc" so I knew it wasn't in right spot. I re-did it several times before getting to "check disc".
Even with 20x magnification I could not see any corrosion or discoloration at all where the bad cap was or anywhere within a radius of 3-4 inches. But since I'm now back to square one I guess the only thing I have to lose is time, so maybe I'll re-solder everything in the vicinity. I tried poking a straight pin through all of them but they are very well soldered and none of them seem weak. I ordered a new tiny tip for my soldering iron but it isn't here yet and I can't do that with a 1/4" blade.")
I increased PB.PWR to no avail.
The pic is attached. It's as close as I can get with my camera, but you get the idea. There is a heavy buildup of corrosion. This morning I removed the pickup assembly and carefully cleaned it with a very soft brush and some contact cleaner. I put it back in and I'm pretty sure I have it aligned right, but now I'm back to "check disc" on everything including CD-R's. That's what it was doing BEFORE I removed the cap. Are there any tricks to making sure the assembly is engaged to the gear at the right location? I couldn't find any "timing" marks for alignment. The first time I put it back in I was getting "no disc" so I knew it wasn't in right spot. I re-did it several times before getting to "check disc".
Even with 20x magnification I could not see any corrosion or discoloration at all where the bad cap was or anywhere within a radius of 3-4 inches. But since I'm now back to square one I guess the only thing I have to lose is time, so maybe I'll re-solder everything in the vicinity. I tried poking a straight pin through all of them but they are very well soldered and none of them seem weak. I ordered a new tiny tip for my soldering iron but it isn't here yet and I can't do that with a 1/4" blade.
I increased PB.PWR to no avail.
Attachments
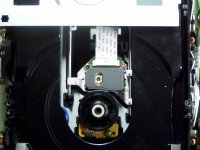
That looks like atmospheric pollution reaction, for sure. Something in the volcanic gases has reacted with whatever metal the base casting of the laser is made out of, but not with other types of metal. It is unlikely to have affected the optical pathway, so just clean as much as you can from the visible surfaces top & bottom of the pickup, as well as any that has shed onto the circuit board under it. Also, make sure that the parts in contact with the guide rails are thoroughly clean & greased with a light grease.
You can just leave the holes blank where the 'time bomb' Elna cap had been. Now that I've seen your photo, I do still hold to my opinion that you simply need to repair more through-hole connections on the main board that were damaged by the Elna cap.
You can just leave the holes blank where the 'time bomb' Elna cap had been. Now that I've seen your photo, I do still hold to my opinion that you simply need to repair more through-hole connections on the main board that were damaged by the Elna cap.
GOOD GRIEF!! Now it is working!!! WTF?
I must be living in an alternate universe. I turned the gain up and it started playing a CD! Turned it down a little and the CD stopped turning!!?? Turned it back up and it wouldn't read the CD again. Took the pickup assembly out and put it in again in the same spot as before. It started playing a CD I had recorded previously on the unit. Cranked the gain up a bit more (now up about 1/4 turn) and it is playing a pre-recorded CD that it would not play before. It appears that it might even record....
The service manual does not say what position to put the pickup assembly in when you reinstall. I tried putting it in the same spot it appeared to be in when I took it out (like the pic). Didn't work. The best method seems to be to install it as far back (AWAY FROM the CD) as possible and let it seek its proper position.
Now it is working and playing through headphones and I'm afraid to turn it off....isn't this fun! Are we having solar flares? That's always the excuse the satellite TV people use.... I guess I'll find out how long it actually works. Thanks for all your help!
- Home
- Source & Line
- Digital Source
- Please help fixing Pioneer PDR-555RW