brgds said:
I've found this 10n (100n original) as the most critical of all caps.
I've tried something like 10 various types, including paper, teflon, ero, even mica, and the clear winner in my setup is MultiCap RTX 10n. YMMV.
My input:
I have tried BG-NX 0.1, Silver Mica 0.01, Jupiter Bewax 0.22, Jensen Copper-Foil 0.1, Russian Teflon cap 0.1, Wonder Cap 0.1(NOS)--me and friend agree that the BG-NX and Jensen Copper Foil are both very close in term of tonality and balance and musicality, but we choose the Jensen over BGNX. Silver mica add edge to the sound, but it also add a lot of details, the more we listen we feel stress. Russian teflon cap is similar to the silver mica but to a lesser degree. Wonder cap sound ok. I will compare the original NATCON cap to the Jensen and report back.
We also tried IR Hexfred HFA08TB60 diodes to replace the MUR860, we feel that it add clarity and depth the the soundstage. BTW: we are using D-I non-oversampling DAC (8 piece of TDA1543.) So the Hexfred are here to stay in my transport. Hope this help.....
thekop-bkk said:.... to replace the MUR860,
Please note that MUR860 have never been suggested to use in this transport, only MSR860 which are slightly different (than MUR)
thekop-bkk said:
My input:
I have tried BG-NX 0.1, Silver Mica 0.01, Jupiter Bewax 0.22, Jensen Copper-Foil 0.1, Russian Teflon cap 0.1, Wonder Cap 0.1(NOS)--me and friend agree that the BG-NX and Jensen Copper Foil are both very close in term of tonality and balance and musicality, but we choose the Jensen over BGNX. Silver mica add edge to the sound, but it also add a lot of details, the more we listen we feel stress. Russian teflon cap is similar to the silver mica but to a lesser degree. Wonder cap sound ok. I will compare the original NATCON cap to the Jensen and report back.
You've tried not only various types but various capacities too, which makes also huge difference. My experience is that to get more ultimate and definite results is to use same caps type of different capacities. I've exercised that with ERO 2x47n in parallel, then single 47n, then 2x47n in series, 3x47n in series, 4x47n in series was bullseye, finaly replaced by 10n MultiCap RTX which was even better.
playermods.pdf file info
This great document list step by step all the transport mods to be done. However, some informations were missing to correlate these informations with the EZ31B service manual CD Circuit schematic. I found the missing informations so you can see on the schematic what was modified:
Parts Replaced:
ID, Schematic Designation, Original Part Value
R1,R2: C945, C964
R3: C942 - 200uF, 16V
R4: L901
R5: C952 - 470uF, 10V
Parts Exchanged:
ID, Schematic Designation, Original Part Value
E1: C939 - 100uF, 10V
E2: C953 - 200uF, 16V
E3: C939 - 2.2uF, 50V
E4: C934 - 10uF, 25V
E5: C916 - 200uF, 16V
E6: C906 - 0.1uF, 50V
E7: X901 - Ceramic Resonator
SMD Parts to remove (PCB other sides)
3. C963
4. C917
Jumper from 5A to 5B: Seems to apply +8V to line going from IC902, pin 49 to IC901, pin 33
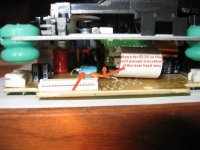
Here the side view of the modified PCB. It is rather easy to do.
One thing to take care is when replacing E3,E4 caps, make sure that the new ones to get in the way of the laser head assembly when it slides. Make sure to install these two caps as close to E2 as possible, incline them a little bit is possible.
I used blue tack to fix the new crystal and keep it from vibrating.
Attachments
Algar_emi said:
I used blue tack to fix the new crystal and keep it from vibrating.
You use it with or without caps ?
RCEZ32 Update
Just a couple of small things since I last posted.
I did change to a 50VA (12.6V/4A) power transformer, real NOS as I bought it nearly 30yrs ago brand new and never used it until now..
Guess I knew I would need it for my ShigaClone someday..
It added both mass and a little authority in the bottom end.
I added 7lbs of AL bronze last night to the subchassis and I was surprised at the fact that I could clearly hear the difference. I would umm, say it was even more "weighty," "solid," and "authoritative" giving real mass to sound.. All joking aside the difference was audible and I am totally sold on Peter's mass loading concept, although mine bears little resemblance to other clones here.
Some day I will post pix of my efforts. I'm very happy with the overall performance, and the sound would be hard to beat at many times the price. The Sony does no better on CD, and I actually prefer my dac and the ShigaClone for CD playback which was sort of the point actually.
I have had a lot of fun so far.
Just a couple of small things since I last posted.
I did change to a 50VA (12.6V/4A) power transformer, real NOS as I bought it nearly 30yrs ago brand new and never used it until now..
Guess I knew I would need it for my ShigaClone someday..
It added both mass and a little authority in the bottom end.
I added 7lbs of AL bronze last night to the subchassis and I was surprised at the fact that I could clearly hear the difference. I would umm, say it was even more "weighty," "solid," and "authoritative" giving real mass to sound..
All joking aside the difference was audible and I am totally sold on Peter's mass loading concept, although mine bears little resemblance to other clones here. Some day I will post pix of my efforts. I'm very happy with the overall performance, and the sound would be hard to beat at many times the price. The Sony does no better on CD, and I actually prefer my dac and the ShigaClone for CD playback which was sort of the point actually.
I have had a lot of fun so far.
Didn't turn on the transport yet to see if it is working with or without crystal caps. I still need to complete the modification on the LCD control PCB. I cut may traces to cut the PCB to the proper size and need to correct all that before I proceed.
Thanks audio1st for the parts list addition.
Thanks audio1st for the parts list addition.
I received my unit today, its still in 1 piece but it soon will be chopped up
Having hooked it up using the headphone out to my amp, I can already hear that this transport can produce some very nice sounds indeed.
The PRaT is unlike I have heard from anything yet (even my cd-pro2 doesnt do this)
The bass is really good defined also, its weighty and has a nice coherent sound that has lots of detail. Kinda like a musical fidelity a5 cdp, only more organic.
I`m really curious what I can expect from the mods, especially if the PRaT factor will be even more evident or?
Atm I`m using a tda 1543 dac with I2S so I have to get a dac with spdif or something first before I can do some modifications.
thekop-bkk said:
Can u post pictures? Thanks...
Sure:
http://homepage.mac.com/angaq0k/PhotoAlbum14.html
This is unfinished, of course, but the tube amp should provide an idea of the finished cd player.
Pendergast,
some very nice pics. it is nice to see the DIY community is going strong in montreal. i would definitely like to have heard some of those speakers.
your cd player will look great finished in stone like the bottlehead amp. are you considering using any of that stone to assist with mass damping? right now, in as far as i can see from the pics, you still have only the mass of the CD mechanism. obviously the green grommets cannot support much more mass so you would need to move to a different suspension mech to support the increased mass.
what DAC are you using?
side note, i like your old bang and olufsen phone
Peter's suggestion of direct mounting the mechanism with no isolation bushings and just two mounting posts seems to work really well. In my case that is in conjunction with a 3/16" aluminum subchassis and two heavy blocks of AL bronze for additional mass. The entire thing must weigh over 12lbs at this point.
okapi said:Pendergast,
some very nice pics. it is nice to see the DIY community is going strong in montreal. i would definitely like to have heard some of those speakers.
your cd player will look great finished in stone like the bottlehead amp. are you considering using any of that stone to assist with mass damping? right now, in as far as i can see from the pics, you still have only the mass of the CD mechanism. obviously the green grommets cannot support much more mass so you would need to move to a different suspension mech to support the increased mass.
what DAC are you using?
side note, i like your old bang and olufsen phone
Merci okapi!
What I might do is to move the transport on another sheet of plywood, and put it on top of three small blocks of rubbery foam (I got three types of the material) that I cut from kids footballs. It is rigid enough, yet quite flexible, so that might do the trick. I have to borrow a digital camera from a friend, and as I am still on a 56k line, that kind of documentation takes time.
So if you can picture it out, the base of the cd player will be quite thick.
I do not intend to add mass to the transport itself, but rather, to the base on which it will rest on. Thing is, I cannot measure jitter with my ears, nor do I have the instrumentation to research the various caveats this contraption may have.
The DAC is Peter Daniel's, packaged in 2 layers of slate stone (sides), a plywood bottom, and a top aluminum plate (resting on top, no attachment). I had the first version of the DAC from Peter, and plugged in a usb converter. There is a switch allowing for one input or the other.
The table the whole system it is on is quite rigid as well; it is from MAKE magazine (issue 9 or 10), and there are no screws or other attachments: the pieces fit together and ar easy to remove for transportation.
Pendergast said:
Sure:
http://homepage.mac.com/angaq0k/PhotoAlbum14.html
This is unfinished, of course, but the tube amp should provide an idea of the finished cd player.
You seem to have some kind of pictures and assembly instructions on your table (picture: disembowelment one ). Are they for the transport? Where did you find them?
Edit: Found it!
http://tim.cheapo.cc/images/CD player mods.pdf
http://www.ferdsaudio.com/RC-EZ31.pdf
MrMajestic said:
Oops, missed that option. Fixed it now.
Thanks a million Mattias. I will be swedish for the next three weeks.
Go Henke & Zlatan !!!!
I have gutted, I have found a fitting trafo, I have made the ps, (I have 8.13V), I have removed the three SMD caps ( the one partly under the heatshield was a pain ! ) and put it all together. But it won't perform.
The TOC switch works, it spins and checks, but when I try the remote or buttons on the control board nothing happens. The LCD displays says 00 and stays that way. Suggestions ?
Another thing, my trafo has dual seconderies, (2x12V)I am only using one.
I have bulit only a few PSs in my short and fragmented time as a DIYer, and still can't figure out how to make use of both pairs of seconderies in parallell. Can anyone point me to schematics showing this ?
Peter Daniel said:Here's the PS schematic. I tried some popular regulators (LM317, LM2937, LT1086, LT1129) as well dual regulation and separate regulation for 5V. Nothing worked better for me than a single LM7808 from National.
I also tried few diode types, including 31DQ09 Schottkies that are supposedly used in Zanden, but again, MSR860 worked best.
Using BG STD 1000/25 after regulator is quite critical, before regulator you see BG FK 2200/35. I later switched to not available any longer BG F 1000/35 which provided more high frequency extention. You could use BG STD 1000/25 with BG N 4.7/50 bypass to compensate slight brightness but you may loose some liquidity and naturalness.
Other caps are also OK, feel free to experiment. What I present here is exactly what worked in my system (for me).
The TOC switch works, it spins and checks, but when I try the remote or buttons on the control board nothing happens. The LCD displays says 00 and stays that way. Suggestions ?
Check the ribbon that connects the laser...
Did you add the bridge cable?
Attachments
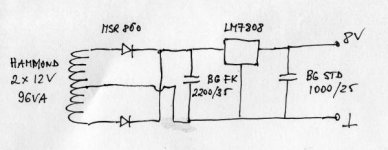
superhkm, PS schematic with 2x12 in post 6.
I have the same problem with reeding 00 and not playing after few modification and lose one small motor fixing screw.
Then I find small screw on thees strong magnets near laser. After removing screw all work.
Check magnets, maybe something metallic is there.
I have the same problem with reeding 00 and not playing after few modification and lose one small motor fixing screw.
Then I find small screw on thees strong magnets near laser. After removing screw all work.
Check magnets, maybe something metallic is there.
audio1st said:
Check the ribbon that connects the laser...
Did you add the bridge cable?
The ribbon cable went in with blue marker down, exposed metal ribbons up.
The bridge cable is which cable ? The ribbon is the only connection to the control panel rigth now.
- Home
- Source & Line
- Digital Source
- Finally, an affordable CD Transport: the Shigaclone story