No luck in ASDA in the nether regions here so I just bought one of these EZ51s (b grade) from ebay £32

 http://cgi.ebay.co.uk/JVC-RC-EZ51-C...photoQQcmdZViewItemQQ_trksidZp1742.m153.l1262
http://cgi.ebay.co.uk/JVC-RC-EZ51-C...photoQQcmdZViewItemQQ_trksidZp1742.m153.l1262hotiron said:Where can we buy FR4 stripboard in the UK????? Anyone???
Maplins if you want it with copper strips... strip board ...N98CF
hotiron said:Thanks for the link Jitter but still no cigar cant purchase from this site!
Where can we buy FR4 stripboard in the UK????? Anyone???
You can look for Velleman dealers here. Hopefully they sell them!

just got back from the hunt
- sadly no sign of those £25 EZ31's in Asda around here - so I bit the bullet and bought the last EZ51 from Argos - at a hefty £39.95
but at least it's actually here and I'm not hanging around waiting for a courier etc....
So ......................... let the dismantling commence ......
- sadly no sign of those £25 EZ31's in Asda around here - so I bit the bullet and bought the last EZ51 from Argos - at a hefty £39.95
but at least it's actually here and I'm not hanging around waiting for a courier etc....
So ......................... let the dismantling commence ......
Isn't this Vector board from Digikey very similar?hotiron said:Thanks for the link Jitter but still no cigar cant purchase from this site!
Where can we buy FR4 stripboard in the UK????? Anyone???
Vector Board
Regards,
Dan
dantwomey said:
Isn't this Vector board from Digikey very similar?
Vector Board
Many thanks Dan thats what Im looking for its FIBERGLASS.
UK supplier anyone?
hotiron said:dantwomey said:
Isn't this Vector board from Digikey very similar?
Vector Board
Many thanks Dan thats what Im looking for its FIBERGLASS.
UK supplier anyone?
If you go to Digikey.com it shows a U.K. page.
Regards,
Dan
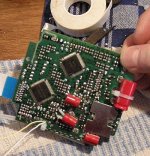
Found some fast Schottky diodes (1N5819) lying around and replaced the rectifier board with them. For the first time I thought I noticed a clear improvement, but it might also be that my ears got used the new headphones I bought a week ago. Even though they are exactly the same as the old, they sounded completely different (shows what a few mm of compression of the ear pads can do to the sound). After the getting used to period they sound like what I was used to (shows how adaptable our hearing actually is given enough time). That's why I think certain aspects of sound quality get 'lost' after a while by our brains only to resurface when a comparison to other/better equipment is made.
Attachments

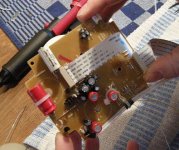
Picked up where we left and that is to finalize the board with all the possible modifcations after severe listening.
Meaning Boom box numero 10 !!! is transformed.
A big warning here is the -31 manual with electrical layouts…those are NOT CORRECT…
It is perfectly okay if you want to follow Okapi PDF but if you want to go further you need to study the print in real life.
Anyway here are the 2 pics of the top and bottom of the final print…ready for assembling in the PiTbull.
An experienced eye can spot the use of super E-caps…some hate them (some prefer the single N black gate above a non polarized pair).
We decided to use them in this configuration because we think it can be beneficial (interested guys can google there are a lot user-explanations.…)
Attachments
woodturner-fran said:Erik, you are a crazy dude!
Yes I know it sometimes makes me sick...
For those who lost faith in all the platforms and pucks I again ordered a platform and puck this time from :
http://www.quartel.nl/webshop/contact.php?PHPSESSID=3897cbddb9f09ff23442571adf4236c6
Not cheap but really 100 procent NO DEVIATION somewhere around 150 dollars...platform and puck....
I did so since I slightly damaged the spindle while modifying for the 100th time...so I have to take it apart anyway
I now have the luxery to choose (by sheer looks) and I can have a 100 procent platform/ puck as spare at the same time....(out of loads of bought puck/platforms !!!)
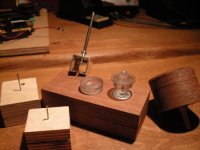
I also made better tools (used a tip from Peter) for mounting removing and adjusting platforms VERY IMPORTANT ''cause touching the spindle with your fingers is an equivalent of buying a new boombox for its motor...
You see a wooden 2 layer block with in the first layer a motor mounting (the hole is the same size in order to let the motor sit exactly straight up)...the 2nd layer has 2 tiny holes for the motorleads...so the pressure is only on the spindle center underneath the motorcasing .....after that I can press with a drill chuck (lefthandside) the platform home.
Inside that round piece of wood is a hole matching the platform..
Removing or adjusting I do in 2 stages ...the birch blocks have a 1.8 mm drill bit short and long...to fit inside the platform hole on top of the spindle...I then press...first with the short one and later with the long one (to avoid breaking the thin drill bit) in order to remove or adjust height.
Attachments
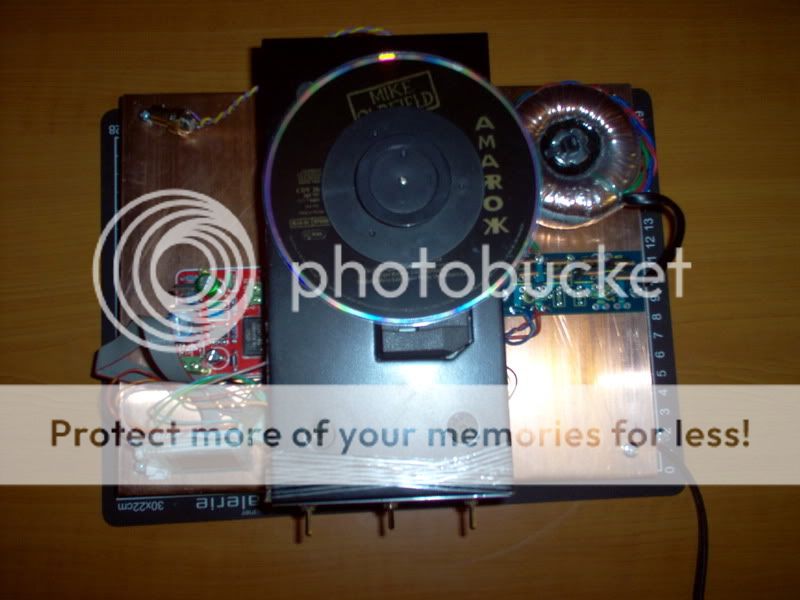
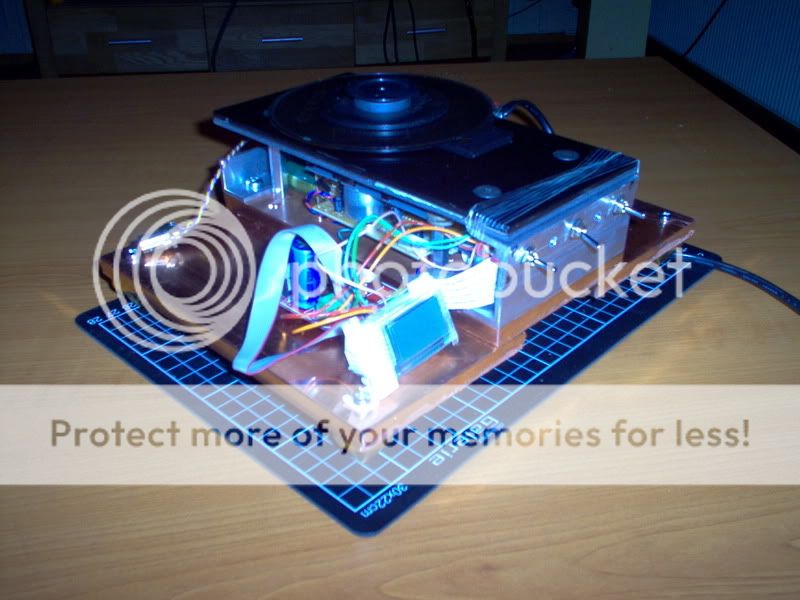
Hi did some work on lector look player today installed a ebay clock not sure what it did to the sound, but i like it and i did re do copper my frame and damn its heavy about 6 kg
its still a lot of work left to get that lector look taht i want .. here is some pics
more pics here
http://s393.photobucket.com/albums/pp18/mr6b/flatish/
and i did re do copper my frame and damn its heavy about 6 kg its still a lot of work left to get that lector look taht i want .. here is some pics
more pics here
http://s393.photobucket.com/albums/pp18/mr6b/flatish/
- Home
- Source & Line
- Digital Source
- Finally, an affordable CD Transport: the Shigaclone story