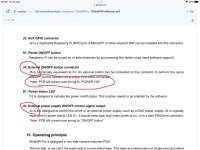
I always turn it off.Are many RPI users leave their RPI’s running 24/7? Or are there other options to shutdow?
https://www.diyaudio.com/community/...eapon-to-fight-the-jitter.192465/post-7425429
Ian, thanks for your superb products!@ Bensen
I have no any problem with ShieldPi Pro and the MkII. Please just follow the user's manual. It's very easy.
https://github.com/iancanada/DocumentDownload/blob/master/Adapters/ShieldPiPro/ShieldPiProManual.pdf
BTW, safe start up is the Linux feature which has no business with any software. But have the use the most updated RPi hardware.
Again, just follow the user's manual.
Ian
But, sorry, I did accurately follow the manual of the shieldpi pro. The manual of the shielpi pro MKII has been partly updated , similor with my findings. However not fully perfect yet.
My goal of mentioning this here is not to give critisism to the product or manual, but to help others with possible same issues.
Attachments
How to upgrade a TransportPi Digi with a IsolatorPi
TransportPi Digi’s performance can be upgraded greatly by cutting the noisy ground loop between the RaspberryPi with an IsolatorPi. The setups can be just:
1. TransportPi Digi
2. IsolatorPi
3. RaspberryPi
4. MonitorPi Pro or MonitorPi (optional)
5. PurePi power supply
The 3.3V isolated battery output of the PurePi should be connected directly to the J1 of the IsolatorPi. For the master mode isolation configuration, J13 has to be jumped by two jumpers while J12 keeps open.
TransportPi Digi doesn’t need any change just keeps everything default. As long as feeding the 3.3V to IsolatorPi J1, we can short the S1 of the TransportPi Digi later to lower the power supply ESR more (optional).
However, as an early design, the IsolatorPi may not have enough drive strength to drive the two XO select signals so that there could be a problem when playing 48kHz family music. If that’s the case, the solution will be simple.
You just need to solder a 360 ohms 0402 size chip resistor in parallel on top of the R36 of the IsolatorPi. The P/N of the resistor can be RC0402FR-07360RL or any others.
Ian
Attachments
Last edited:
Thanks for pointing out.Ian, thanks for your superb products!
But, sorry, I did accurately follow the manual of the shieldpi pro. The manual of the shielpi pro MKII has been partly updated , similor with my findings. However not fully perfect yet.
My goal of mentioning this here is not to give critisism to the product or manual, but to help others with possible same issues.
User's manual has been updated.
Attachments
@wdguru
Yes, you can. Just simply need an adapter such as a BridgePi, the setup can be
1. BridgePi
2. FifoPiQ7
3. HdmiPi Pro
Or, if you want you can wait for my flagship DDC solution
1. ReceiverPiDDC
2. FifoPi Q7
3. HdmiPi Pro
4. MonitorPi Pro
5. PurePi power supply or other ultra-low noise power supply.
Ian
is ReceiverPiDDC already released or yet to be released?Yes, you can. Just simply need an adapter such as a BridgePi, the setup can be
1. BridgePi
2. FifoPiQ7
3. HdmiPi Pro
Or, if you want you can wait for my flagship DDC solution
1. ReceiverPiDDC
2. FifoPi Q7
3. HdmiPi Pro
4. MonitorPi Pro
5. PurePi power supply or other ultra-low noise power supply.
Ian
ReceiverPi DDC is upcoming. Hopefully it can be released in 6 weeks.
Besides the RCA, OPT and the I2S over HDMI inputs, ReceiverPi DDC has an additional USB input which can adapt with an Amanero Combo384 or compatible USB interface. ReceiverPi DDC can be controlled by a MonitorPi Pro to setup a fully function DDC streamer with or without a RPi. A FifoPi can be installed to improve sound quality.
Ian
Ian and the good ppl here,
I ordered some 3M AB6005S EMI suppression sheets to add to my noob stack. I currently have it set up as the following
1. HDMIpi Pro
2. FifoPi Q7
3. Rpi 4
4. PurPi
I just ordered a UcconditionerMkII 3.3v, and it will be added to the stack in the next couple weeks.
Any pointers or experience where is the best spot to apply the 3M sheet? Is underneath the pi arm chip a good spot(Heat sink already installed on top of the chip)? How about sheets on the short power cables? Monitor pi cables? Unused USB ports?
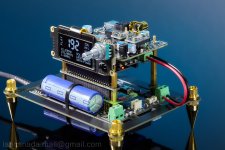
Attached a pic of my current stack. The shot glasses are to fill the empty space reserved for the UcCond MK2.
I ordered some 3M AB6005S EMI suppression sheets to add to my noob stack. I currently have it set up as the following
1. HDMIpi Pro
2. FifoPi Q7
3. Rpi 4
4. PurPi
I just ordered a UcconditionerMkII 3.3v, and it will be added to the stack in the next couple weeks.
Any pointers or experience where is the best spot to apply the 3M sheet? Is underneath the pi arm chip a good spot(Heat sink already installed on top of the chip)? How about sheets on the short power cables? Monitor pi cables? Unused USB ports?
Attached a pic of my current stack. The shot glasses are to fill the empty space reserved for the UcCond MK2.
Attachments
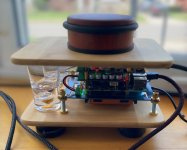
@wudai_e
That's a good idea. If you run a phase noise analyzer, you will know how much phase noise generated by vibration, especially for the close-in.
Yes, anti-vibration would be very important if you use the ultra-low phase noise clocks.
Please let us know if you have new updates.
Another thing could be the thermal isolation, but that would be a long story.
Ian
Hi community fellows,
i went to this and other threads and to this awesome Ian Canada components, I'd like to start with a build as well.
Hope this is the right place....
Now here is my challenge:
Thanks for enlightenment & appologize beiing the noob here!
Gerald
i went to this and other threads and to this awesome Ian Canada components, I'd like to start with a build as well.
Hope this is the right place....
Now here is my challenge:
- Mostly I understand each of those components, but struggling what I should combine & how to cable it together
- The final build should be in an closed alu-case (no fancy display)
- Pretty hard to cover all adapters, additional cable from Ian's list, to have a complete order
- As Power Supply I'll use an already existing Ferrum Hypsos (later maybe an DIY external power transformer)
- Still going 1 by 1 to all the PDF's....
- I'm using the correct components?
- How are the components connected correctly?

Thanks for enlightenment & appologize beiing the noob here!
Gerald
Hi guys! It's been a while since I have been here, but I am interested in building a DIY dedicated DAC for use with my PC music files and such. I use Jriver on my Windows 10 OS. I have a 5 meter Wire World Platinum USB cable that connects to my Peachtree Grandpre that has a USB type B/2.0 female connector on the rear side. So basically I'd like to have some digital input options when building a DAC. Sorry if this post is in the wrong section! Any help to get started would be appreciated! Thanks in advanced!
@FSHZ42
As you already have some good DACs, I would suggest you start from streamer transports. My digital audio gears are target the best possible low-jitter performance and ready to challenge all best commercial devices for sound quality.
Here are some solutions
https://www.diyaudio.com/community/...fight-the-jitter.192465/page-414#post-7263122
Please have a look the think about it. Is better to do it step by step. There will be a lot of fun.
Please let me know if your have more questions.
Ian
Thanks Ian! So as a beginner and as far as trying to build one of your DIY DACS, You have suggested 4 options:
A. Low cost but still great sound quality streamer transport solution
1. TransportPi Digi (#20B)
2. UcPi (#47A)
3. Optional MonitorPi (#49A)
4. Optional acrylic cover (#51A)
B. Fully function audiophile grade RPi I2S/DSD network streamer transport
1. TransportPi MKII (#20A)
2. FifoPi MA (#1C)
3. PurePi (#48A) with optional UcConditioner 3.3V (#26A)
4. Optional MonitorPi (#49A)
5. Optional acrylic cover (#51A)
C. Flagship RPi I2S/DSD network streamer transport
1. HdmiPi Pro (#17B) or TransportPi AES
2. FifoPi Q7 (#1D)
3. StationPi SMT (#35C)
4. LinearPi 5V(#32A)
5. UcConditioner 5V (#25A)
6. LifePO4 Mini 3.3V (#42A)
7. UcConditioner 3.3V (#26A)
8. MonitorPi (#49A)
D. Simplified flagship RPi I2S/DSD network streamer transport
1. HdmiPi Pro (#17B) or TransportPi AES
2. FifoPi Q7 (#1D)
3. PurePi (#48A)
4. UcConditioner 3.3V (#26A)
5. MonitorPi (#49A)
I'm not into using music streamer services as of yet. I am still old school as I still listen to cd's on my NAD C542 player and also play my music files using Win 10 OS with JRiver program. I am currently using an older Wire World Platinum USB cable that plugs in the back of my PC and then connects to my Grand Pre DAC using the other end of USB 2.0 Type B male connector. So my questions are can I purchase some type of DAC/interface module that would accept both USB 2.0/type B male connector and a coaxial digital cable? Last question: Is there a way to connect one of your components to my NAD C542 cd player that would allow better/cleaner sonics? Thanks!")
A. Low cost but still great sound quality streamer transport solution
1. TransportPi Digi (#20B)
2. UcPi (#47A)
3. Optional MonitorPi (#49A)
4. Optional acrylic cover (#51A)
B. Fully function audiophile grade RPi I2S/DSD network streamer transport
1. TransportPi MKII (#20A)
2. FifoPi MA (#1C)
3. PurePi (#48A) with optional UcConditioner 3.3V (#26A)
4. Optional MonitorPi (#49A)
5. Optional acrylic cover (#51A)
C. Flagship RPi I2S/DSD network streamer transport
1. HdmiPi Pro (#17B) or TransportPi AES
2. FifoPi Q7 (#1D)
3. StationPi SMT (#35C)
4. LinearPi 5V(#32A)
5. UcConditioner 5V (#25A)
6. LifePO4 Mini 3.3V (#42A)
7. UcConditioner 3.3V (#26A)
8. MonitorPi (#49A)
D. Simplified flagship RPi I2S/DSD network streamer transport
1. HdmiPi Pro (#17B) or TransportPi AES
2. FifoPi Q7 (#1D)
3. PurePi (#48A)
4. UcConditioner 3.3V (#26A)
5. MonitorPi (#49A)
I'm not into using music streamer services as of yet. I am still old school as I still listen to cd's on my NAD C542 player and also play my music files using Win 10 OS with JRiver program. I am currently using an older Wire World Platinum USB cable that plugs in the back of my PC and then connects to my Grand Pre DAC using the other end of USB 2.0 Type B male connector. So my questions are can I purchase some type of DAC/interface module that would accept both USB 2.0/type B male connector and a coaxial digital cable? Last question: Is there a way to connect one of your components to my NAD C542 cd player that would allow better/cleaner sonics? Thanks!
FSZH42,
Not saying you should follow this, just putting it out there, the quality of streaming with a dedicated streamer, be it over a subsription or over a network bridge with your local music files doesn't sound like yesteryear. It had evolved quickly. It can sound really really good and gives your best CD players a run for their money. I'm talking about CD players in the 3-4k price range.
Not saying you should follow this, just putting it out there, the quality of streaming with a dedicated streamer, be it over a subsription or over a network bridge with your local music files doesn't sound like yesteryear. It had evolved quickly. It can sound really really good and gives your best CD players a run for their money. I'm talking about CD players in the 3-4k price range.
@FSHZ42
The StationPi Pro or the upcoming ReceiverPi DDC together with the new MonitorPi Pro can meet your requirements.
https://github.com/iancanada/DocumentDownload
https://www.diyaudio.com/community/...fight-the-jitter.192465/page-461#post-7429394
But the project could be pretty advanced and complicated. I suggest you read some of the documents from my Github so that can help you have more good ideas.
Ian
Last edited:
How to upgrade a TransportPi Digi with a IsolatorPi
TransportPi Digi’s performance can be upgraded greatly by cutting the noisy ground loop between the RaspberryPi with an IsolatorPi. The setups can be just:
1. TransportPi Digi
2. IsolatorPi
3. RaspberryPi
4. MonitorPi Pro or MonitorPi (optional)
5. PurePi power supply
The 3.3V isolated battery output of the PurePi should be connected directly to the J1 of the IsolatorPi. For the master mode isolation configuration, J13 has to be jumped by two jumpers while J12 keeps open.
TransportPi Digi doesn’t need any change just keeps everything default. As long as feeding the 3.3V to IsolatorPi J1, we can short the S1 of the TransportPi Digi later to lower the power supply ESR more (optional).
However, as an early design, the IsolatorPi may not have enough drive strength to drive the two XO select signals so that there could be a problem when playing 48kHz family music. If that’s the case, the solution will be simple.
You just need to solder a 360 ohms 0402 size chip resistor in parallel on top of the R36 of the IsolatorPi. The P/N of the resistor can be RC0402FR-07360RL or any others.
Ian
oh, this is possible? i thought the isolatorPi needs 5V to operate like the manual states while the transportPi Digi needs 3.3V
@Ghoostknight
Yes, TransportPi Digi + IsolatorPi +3.3V PurePi solution is possible. Just need to increase the drive strength a little bit by parallel a small resistor.
Ian
Yes, TransportPi Digi + IsolatorPi +3.3V PurePi solution is possible. Just need to increase the drive strength a little bit by parallel a small resistor.
Ian
So this ReceiverPi DDC should be the one I would need for want I want to do? Any idea when they will be available to order? Thanks!@FSHZ42
The StationPi Pro or the upcoming ReceiverPi DDC together with the new MonitorPi Pro can meet your requirements.
https://github.com/iancanada/DocumentDownload
https://www.diyaudio.com/community/...fight-the-jitter.192465/page-461#post-7429394
But the project could be pretty advanced and complicated. I suggest you read some of the documents from my Github so that can help you have more good ideas.
Ian
@FSHZ42
ReceiverPi DDC is still under developing. I'm trying to make it available in 8 weeks. But to achieve a best possible sound quality, the whole system may not as simple as you expected.
There will be a lot of things need to consider, such as power supplies, clock and re-clock, Transport or DAC, I/V stage....and so on.
I recommend you download the FifoPi Q7 user's manual first. It can tell you how to improve the music sound quality in the digital world.
https://github.com/iancanada/DocumentDownload/blob/master/FifoPi/FifoPiQ7/FifoPiQ7Manual.pdf
Good weekend
Ian
- Home
- Source & Line
- Digital Line Level
- Asynchronous I2S FIFO project, an ultimate weapon to fight the jitter