ok, to try to sum up for my project, grateful for comments if i have forgotten important to think of:
It will not be MDF or chipboard for the first time.
For my two 20L main speakers (closed, with Fostex FP203) then I will use ply with one shelf brace. The joints should be strengthened by pieces of glued hard wood. I will experiment with bitumen pads or similar.
The 75L sub, also with ply, should have two horizontal shelf braces. The baffle I think will be 30mm beech if it works out well. If I can make out how to place and fix stiffeners in hardwood I will try that.
The joints should be strengthened by pieces of glued hard wood. I will experiment with bitumen pads or similar.
Now I must decide on the plywood.
If I can make out how to place and fix stiffeners in hardwood I will try that.
One uses the tools available. The braces I referred to could be pre-drilled for a tack or nail near each end. The nails are only needed to keep them in position while the glue sets. The length of the nails will not allow them to penetrate to the outside surface of the box.
Sorry, my brain fart...
The tacks or nails are used to keep things in position while the glue sets.
I should have written "stiffeners"...The braces I referred to could be pre-drilled for...
The tacks or nails are used to keep things in position while the glue sets.
Last edited:
Has anyone ever looked into non-wood material bracing? My 30yr+ old approx 60 litre 3-way Castle Conway II speakers have a nicely dead front panel which I attribute to their use of a 5" diameter very thick cardboard tube mid-range driver cavity which runs front to back, doubling up as a brace about 1/3 or so down from the top. Cardboard is very lossy compared with wood I would imagine, or if it isn't, it will have very different characteristics to wood and this could help absorb resonances. Forgotten technique? The only info I could find was research on lining propshafts with cardboard to dampen resonances...
www.mecheng.osu.edu/adl/files/adl/conference_papers/C03_1.pdf
www.mecheng.osu.edu/adl/files/adl/conference_papers/C03_1.pdf
OB panels made out of two 8mm thick plywood panels, spaced 8mm apart with flanges made out of cork, glued with white PVA to the plywood. Empty cavity filled with dry sand.
Regards
George
Regards
George
Attachments
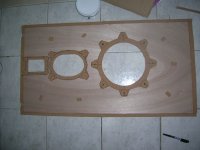
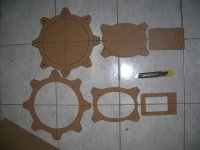
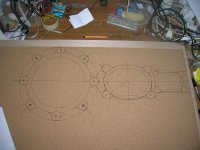
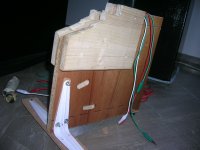
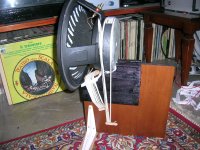
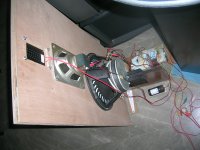
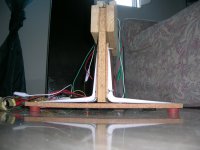
The panel is attached to the woofer rim by 8 bolts and sits lightly (balances) on the floor through a small piece of cork.
The woofer is supported on the floor by it’s own stand.
The full range elliptical unit and the tweeter are bolted on the panel.
The woofer is supported on the floor by it’s own stand.
The full range elliptical unit and the tweeter are bolted on the panel.
Attachments
Those baffles should have interesting performance.
Shoog is particularily enamoured of that isophon. All the ones i've seen *and have) have been in the co-axial form.
dave
The full range elliptical unit and the tweeter are bolted on the panel.
Shoog is particularily enamoured of that isophon. All the ones i've seen *and have) have been in the co-axial form.
dave
Shoog is particularily enamoured of that isophon. All the ones i've seen (and have) have been in the co-axial form.
dave
Hi Dave
Mine are not coaxial (they used to be fitted in a Blaupunkt radio/turntable console from the 60s)
")
Attachments

Those baffles should have interesting performance.
They are much more neutral (acoustically) than the pine wood panels (boomy!), but they do not achieve to (acoustically) disappear as much as the panels made out of roll package paper
Attachments
Last edited:
Great work. This kind of insulation I like. But there is a much more easy way to realize this.OB panels made out of two 8mm thick plywood panels, spaced 8mm apart with flanges made out of cork, glued with white PVA to the plywood. Empty cavity filled with dry sand.
Regards
George
Therefore you need also two 8mm thick plywood panels
The first step is gluing a frame along the outer edges of one plywood panel and some four square cuts in the same thick than the woods for the frame.
The next step is filling dry sand with a grain size of about 0.2-0.5 mm possibly mixed with lead shot. Please note, a bit more than the chamber size.
Now the second plywood panel closes (about gluing) the chamber with the dry sand where the sand is pressed a bit (third step).
The last step is the exact cut into the framing (of course, after the curing of the adhesive).
In this kind you can also create the the footprint parts in a hifi rack for the audio components.
My english is not so good, thus not all details I can explain in great detail - but I hope, the basic principle is to understand.
Now an off topic question: I need a little help by try to contact to a guy from your country.
At a forum are discussed any repair problems by the DVB-S reveiver "500" from Dream Multimedia (Dreambox). Here is the link:
http://www.sdtv.gr/smf/index.php?topic=18935.0
If you scroll down you will find a small schematic sample from the member "dimitris_p" arround the faulty MOSFET part.
This means, this member must have the complete schematic of this dreambox version.
Perhaps you can contact this member and ask, wheter he can send the schematic to you (if is not too much trouble for you).
And then you can send me this schematic to my address (not the PM aera here):
kirschner-hifi@tiefbasswiedergabe.de
Thank you very much
Last edited:
Looking around for sound dampening materials i came across this type of multiplex, not my thing as its very expensive but maybe useful for others.
Merfoflex geluidsdempende sanwichplaat met twee lagen multiplex
It’s used to isolate boats, trains etc and is available in 2 thicknesses.
Haven’t seen it before and didn’t read about it over here. If known, well, the better!
Merfoflex geluidsdempende sanwichplaat met twee lagen multiplex
It’s used to isolate boats, trains etc and is available in 2 thicknesses.
Haven’t seen it before and didn’t read about it over here. If known, well, the better!
Looking around for sound dampening materials i came across this type of multiplex, not my thing as its very expensive but maybe useful for others.
Merfoflex geluidsdempende sanwichplaat met twee lagen multiplex
It’s used to isolate boats, trains etc and is available in 2 thicknesses.
Haven’t seen it before and didn’t read about it over here. If known, well, the better!
check out this (from the German speaker builder magazine "Hobby Hifi")
Die Tricks der Profis
dämmung-und-versteifen
was-tun-gegen
HAUPT
Building Walnut Speakers
I plan on building a pair of 0.5 cubic foot, 2-way, rear-ported speaker cabinets for a kit that I just purchased and I want a hardwood finish. Due to the problematic nature of building speakers with hardwood that I've read about, I've pretty much decided to use walnut over 3/4" MDF, but I want to know the best way to do it. I have all the necessary tools for this project and I was considering planing down walnut to 1/2" or 3/4" and then attaching it to the MDF box. Here are my questions:
1) Should I use screws or biscuits to construct the MDF box?
2) If screws are recommended, should they be removed after the glue dries?
3) Would there be any problems that might arise from gluing the walnut to the MDF box or should some or all of the walnut be floated.
4) Would there be any problems that might arise from using 5/4 walnut for the top and bottoms of the MDF box, since it would simplify the construction and since these panels are relatively small and presumably not as susceptible to cracking?
Any advice that can be provided on these matters would be greatly appreciated.
1) Should I use screws or biscuits to construct the MDF box?
You gain nothing with screws and biscuits, if you don't have enuff clamps brad nails are useful. Use good plywood, not MDF.
3) Would there be any problems that might arise from gluing the walnut to the MDF box or should some or all of the walnut be floated.
It would be better if it floats, and if you do it right you get constrained layer damping.
4) Would there be any problems that might arise from using 5/4 walnut for the top and bottoms of the MDF box, since it would simplify the construction and since these panels are relatively small and presumably not as susceptible to cracking?
It is best if the solid material is actually a "butcher block" construction.
Now i'll encourage the guys who work with wood to comment.
dave
I'd use biscuits, but remember, the strength in the bond comes from the adhesive used. And yes, that can mean standard PVA glue which is surprisingly strong (Fine Woodworking has done some comparative tests which show that ....)
I know planet10 believes MDF is the work of the devil so I'm not going to belabour the point of whether you should use MDF or plywood. Regardless of which you use, the common woodworkers method for working with solid wood over a panel is to resaw the hard wood (use a bandsaw) to a thickness of approx 3/16” (5 mm if you're metric) and then use a thickness planer or thickness sander to get it down to 1/8” (3 mm) which you then glue to the panel. With a box of .5 cu. ft. Your panel sizes won't be large enough to cause a problem. Use this method for all panels, and don't use sold for top and bottom and ply/MDF/hardwood composite panels for sides, front, back.
If you don't have access to a bandsaw, there may be a millwork shop in your area that can do it for you. They'll need an extended throat on the bandsaw and at least a half inch blade (¾ inch is better). With the right equipment, and someone who knows what they're doing, 8” wide, or wider, boards can easily be resawn. Virtually any hardwood can be resawn. I've done birds eye maple without a problem.
The nice part of resawing is that it lets you maximize the hardwood of choice, and lets you 'bookmatch' the veneer panels for an exquisite look (with the right grain pattern).
Have fun.
MDF is the work of the devil
+2
Everytime we have used buscuits it has been a waste of time & money. Dadoes are much more useful.
dave
Of course, if you're using buscuits ....
It's all about the glue surface and the equipment you've got. The only issue with biscuits is that the joint should 'sit' for a couple of days before doing any finish sanding. The issue being the biscuits expand (which is why they hold), and if sanded while 'expanded' will then 'shrink' and leave a minor depression which can be visible.
It's all about the glue surface and the equipment you've got. The only issue with biscuits is that the joint should 'sit' for a couple of days before doing any finish sanding. The issue being the biscuits expand (which is why they hold), and if sanded while 'expanded' will then 'shrink' and leave a minor depression which can be visible.
- Status
- This old topic is closed. If you want to reopen this topic, contact a moderator using the "Report Post" button.
- Home
- Design & Build
- Construction Tips
- Discussion on what materials to build speakers out of