Cascamite is not available locally. You must be hording the good stuff away from us colonists. It may be the same as Wellwood "plastic resin glue" I'll look into it.
We have this stuff "Goralla glue" which may be similar. I did not use it because step one is to moisten the seam. I am working on the theory SOMETHING is shrinking. Glue or the fibers.
We have this stuff "Goralla glue" which may be similar. I did not use it because step one is to moisten the seam. I am working on the theory SOMETHING is shrinking. Glue or the fibers.
Hi,
how would you go about getting A nice smooth shiny finish on a beer can i.e. removal of logos & paint. That had been filed with resin, so it was solid.
Would paint stripers work? but leave a nice finish.
Jay
Stripper gets the paint off as you have very little material to sand.
Aluminum will flash oxidize, so you need special self-etching primers as the base coat. Then filler primers, sealer, color and clear. (wet sanding from 600 to 1200 or finer)
With the correct primer, it is relatively easy as you have a stable substrate. Our question here is when we do not.
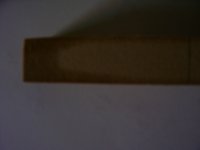
Here is a picture showing the level of penetration of the 50/50 varnish and thinner into 3/4 inch mdf. How much of this was carrying solids I can't say.
The seam is super glue. Looking closely I see voids. When glued up, it had squeeze-out. One point against superglue.
The seam is super glue. Looking closely I see voids. When glued up, it had squeeze-out. One point against superglue.
Attachments
The Gorilla original glue is polyurethane based and the foaming action can create a weak joint in wood. The new Gorilla wood glue is PVA based, and while a the top end of PVA glues it is still PVA based...
The resorcinol is kind of the next thing up from urea formaldehyde, I've never used it but I believe it is solid in a similar way.
The resorcinol is kind of the next thing up from urea formaldehyde, I've never used it but I believe it is solid in a similar way.
unibond 800. Dries hard..no creep.
This type of glue does not have the initial tack that yellow glue has so you need clamps/mechanical fasteners/vacuum bag to hold stuff until the glue sets. I use a heating blanket to speed setting.
When I glue up with this stuff I put a bit of the mixed glue into a ziplock bag when the glue in the ziplock is rubbery I know the glue has set enough to hold.
Vacuum Pressing Systems -- Veneer Glue
As an added plus the owner of the company is a great guy...
Evan
Unibond. Found it. Thanks. I still wonder what is used in production shops. I would guess a therma-bond of some kind for speed. some sort of modern version of hide?
Yes, the foaming gorilla glue may not be quite as strong as some others, but if you do test samples, you will see it is stronger than the wood providing you do it correctly. All 7 of my test samples are more than strong enough.
After baking the sanding sealer set at 170 for an hour, I was able to sand them with 220 by hand. Really strange, the seam was far more pronounced as if the tempered edge of the MDF expanded lengthwise. This did not happen on any of the varnish sealed ones. I sanded them smooth again which exposed raw fiber again.
After 4 coats of varnish, it is not building on the surface so it can start to fill and smooth. I went to varnish over top of the sanding sealer. Some soaked in still.
Having the deep penetration will greatly change stiffness, resonance and damping of the MDF. In some ways, it may be going in the wrong direction. In other ways, three layers of different stiffness is good for not transmitting vibration.
"Unibond 800 is a two-part, urea formaldehyde, liquid resin glue. Because of its relatively long open time (45 minutes @ 70°F), rigid glue line, and gap filling properties (up to 0.02"), it is ideal for veneering, bent wood laminations or any vacuum pressing application. Unibond won't cold creep like some PVA glues, so complex veneer projects and curved work are safe. Since it is water resistant, it makes a first-rate plastic laminate glue in kitchens and bathrooms. After mixing, apply with a short-nap roller or brush. Comes with hardener. Not for use under 70°F."
From Highland Hardware. ( good woodworkers supply) this has several telling comments.
From Highland Hardware. ( good woodworkers supply) this has several telling comments.
I produce a lot of cabinets almost all with yellow glue.
I think this is how it's done in higher production.
Radio Frequency Gluing | Article | CP Adhesives
I think this is how it's done in higher production.
Radio Frequency Gluing | Article | CP Adhesives
It looks like it might be. They do mention a shelf life on there, I've not had a shelf life problem with Cascamite myself but I do keep it in the house. If Cascamite is pre-catalysed then it makes sense that it will be affected by moisture/humidity/damp, which won't be such an issue where I keep it.
I produce a lot of cabinets almost all with yellow glue.
I think this is how it's done in higher production.
Radio Frequency Gluing | Article | CP Adhesives
RF, that would be thermo-set. I thought as much. Production has no time to wait for glue to dry and epoxy is expensive.
I have 12 blocks with 3/4 radius, all of which are viably smooth and touch smooth over the joint just with with a light primer coat. A couple seemed to soak in a little, but I "trued" them up with 120 and 220, so I could have cut in pretty deep. I'll hit them a second light coat and then sand to see if any of the seams are viable. If not, I'll hit them with a guide coat and let them sit for a week before I sand to see if any seam is sinking.
On first look, two coats of varnish is enough to stabilize the fibers and provide something to sand true. It is still porous. If the finish and not the joint were under test, I would either switch to the full coat of poly resin or Evercoat finishing filler. The latter may be the correct product.
Test blocks still show the poly resin to be the best bet over epoxy glue. Instead of using epoxy glue for my current prototype, I went ahead and used PVA for a test. Just squeegeed the first coat of poly resin on.
The varnish as a sealer was a disaster as it changed the dimensions of the MDF! I sealed it first and what a mess when it came to assembly. Chucked it all and went back to raw MDF.
Over on one of the woodworking forums they are almost laughing as "everyone" knows PVA shrinks.
The varnish as a sealer was a disaster as it changed the dimensions of the MDF! I sealed it first and what a mess when it came to assembly. Chucked it all and went back to raw MDF.
Over on one of the woodworking forums they are almost laughing as "everyone" knows PVA shrinks.
Well, solved why I was having issues with the poly resin. The instructions on the can are good if it is above 90 degrees out there. I found the real temperature corrected charts. It takes about 4 times the hardener as they say at 70 degrees. My shop was only about 65 degrees, and that too is a problem. Set the thermostat for 75.
Why can't things be easy!!! ")
Good work, keep it going.
So far for simple rectangular enclosure you might have to go miter edge.
What I did to my speaker baffle is use a 15deg chamfer.
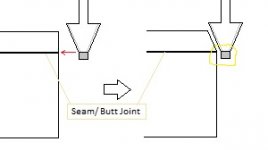
One I glued the baffle I took the 15def chamfer and set it so that it would exactly chamfer away the butt edge. No seams are visible. I wish I though it out better and chambered the other visible butt to butt joint located on top of the speaker.
I'll sketch a diagram.
Good work, keep it going.
So far for simple rectangular enclosure you might have to go miter edge.
What I did to my speaker baffle is use a 15deg chamfer.
One I glued the baffle I took the 15def chamfer and set it so that it would exactly chamfer away the butt edge. No seams are visible. I wish I though it out better and chambered the other visible butt to butt joint located on top of the speaker.
I'll sketch a diagram.
Here is how I avoided the visible seams on my baffle with a 15deg ( ithink it is 15 but I am sure it is not a 45deg).
It is possble to do this on all the important/visible butt joints, you just have to think it trough and take it into consideration for your design.
My speakers sound quite lovely with this chamfer btw.
It is possble to do this on all the important/visible butt joints, you just have to think it trough and take it into consideration for your design.
My speakers sound quite lovely with this chamfer btw.
Attachments
I have not tested bevels against round-overs. With flat bevels you could do wood veneer. My working premise based on listening tests is at least a 3/4 roundover is necessary for high end smoothness. A lot of OEM speakers have larger flat facets but I have not tested them.
With 3/4 MDF and a 3/4 roundover, the seam is about where the roundover finishes. Under a mm or so of poly resin, you can't find it. The hope is a year later, you stil can't.
I talked to the folks at POR-15. They suggested POR-15 with a top color coat might just work. It is really tough stuff.
With 3/4 MDF and a 3/4 roundover, the seam is about where the roundover finishes. Under a mm or so of poly resin, you can't find it. The hope is a year later, you stil can't.
I talked to the folks at POR-15. They suggested POR-15 with a top color coat might just work. It is really tough stuff.
Hi
Thanks everyone for this thread, it is such a great resource!
I have read few a couple of times, but one thing still is not clear to me (no pun intended)
When it comes to my 10 coats of clear coat...do I need to do them all 'at once'?
Some posts seem to suggest that they should be done at once, yet others suggest sanding every few coats.
If each coat really takes so long to cure, how can you sand between coats?
Thanks for you help
- Status
- This old topic is closed. If you want to reopen this topic, contact a moderator using the "Report Post" button.
- Home
- Design & Build
- Construction Tips
- A 'how to' for High Gloss Finishing