They are worth saving absolutely. DIY finishes are often easier to remove with paint and varnish remover. An orbital sander with progressively finer grits will get them level in no time. A bench sander with a straight edge guide would be my first choice. Of course new veneer will be required buts its just a bump in the road. Those are some extra deep boxes, I like those a lot.
Come to think of it a plunge router might be better. Take the entire surface down 1/16" sand smooth and re-apply veneer. The pros will steer you in the right direction. Thought I'd take a couple cracks at it until then. Good luck, nice work. Too bad the rest is out of our control sometimes. At least until fresh knowledge is gained for the next round.
Since I build those with only circular saw, and coping saw. Plus a drill, some sandpaper, paper knife, pva glue, brush and some weights  . I don't have many options. That is why it took me 40 hours.
I'm not sure on sanding, because I think when summer comes, and humidity drops, it will shrink back.
. I don't have many options. That is why it took me 40 hours.I'm not sure on sanding, because I think when summer comes, and humidity drops, it will shrink back.
When I need accurate stable wood, I do this:
1. Put the wood stock into the room it will eventually live. I have two pieces of 12 by 3/4 by 4 foot maple and one piece oak in my dining room, just hangin out for 9 months.
2. Since they will become pendulums, I will cut the top section to within 1/4 inch of final profile, and the full bottom length I will cut to 2 inches wide, centered along a straight line drawn down the piece. The top is a pair of rings, 4 inch diameter above and 10 inch diameter just below, with almost 3 feet of 3/4 by 3/4 shaft.
3. A month later, redraw the straight line (it becomes curved), and cut the wood to 1.5 inches width.
4. Repeat a month later, this time to 1 inch.
5. Next month, bring the entire piece to final dimension, again with a scribed straight line along the shaft, down to 3/4 inch.
6. IMMEDIATELY after the final sizing, apply three coats of a sealing coat to the entire piece. The intent is to STOP all moisture movement either into or out of the piece.
In my experience, ALL wood will relax a bit when cut. Sometimes it takes milliseconds, sometimes it takes a few days or weeks. And then, moisture movement becomes the dominant distorter. Anybody who has done crown molding can see this...when cutting crown, do not do the final size cut as first pass, cut 1/4 inch away, then 1/8th, then 1/16, then final.
A speaker cabinet has all internal panel surfaces wide open to moisture movement. One way is to seal internal surfaces, another is to build and run them half a year unfinished, then sand and veneer.
John
Thats pretty extreme.
Robert since you built them with such minimal tools i think you did a great job. Leaving them alone and obbserving any changes over the next year or so may be the best thing to do to learn where you may have went wrong for next time. As ive learned for most people in this hobby, theres always a next time.
Robert since you built them with such minimal tools i think you did a great job. Leaving them alone and obbserving any changes over the next year or so may be the best thing to do to learn where you may have went wrong for next time. As ive learned for most people in this hobby, theres always a next time.
When I had minimal tools I improvised too. I still use "weight clamps" from time to time lol. After table saw cuts I'd size things like baffle edges with heavy grit paper glued to a straight piece of oak. It makes a good plane along plywood edges. I couldnt love my first router enough when I got it.
That is pretty extreme j. I haven't had plywood change enough to be that noticeable. Lighter pine is really bad for bowing. Try to buy material where they store it in a temperature controlled room. Especially if your paying a premium price for the good stuff.
That is pretty extreme j. I haven't had plywood change enough to be that noticeable. Lighter pine is really bad for bowing. Try to buy material where they store it in a temperature controlled room. Especially if your paying a premium price for the good stuff.
That is pretty extreme j. I haven't had plywood change enough to be that noticeable. Lighter pine is really bad for bowing. Try to buy material where they store it in a temperature controlled room. Especially if your paying a premium price for the good stuff.
Agreed. I buy the best I can find locally. When I made the first pendulum, I was quite surprised at how much the straight line drifted as I step cut to final dimension.
Plywood should not do that much, but it is wood after all..
John
This is a handy thing to understand and calculate wood movement Lee Valley Tools
Wood movement refrence guide
Quarter sawen white pine is actually very stable, i use it as a sub-strait in solid core veneer work. The key is to have all your solid woods together for a few weeks for the moisture to acclimate.
Wood movement refrence guide
Quarter sawen white pine is actually very stable, i use it as a sub-strait in solid core veneer work. The key is to have all your solid woods together for a few weeks for the moisture to acclimate.
Last edited:
Now you're catching on. How long did you acclimate the material before you started building? If it had an appreciable level of moisture, you have your answer. If it's dry to start with, it will expand uniformly. If not, it will acclimate differently from edge to flat surface area.Since I build those with only circular saw, and coping saw. Plus a drill, some sandpaper, paper knife, pva glue, brush and some weights
I'm not sure on sanding, because I think when summer comes, and humidity drops, it will shrink back.
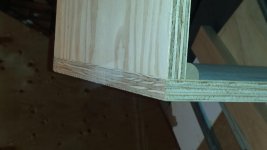
I really wonder if the issue is the panels expanding. Plywood and, especially, Baltic Birch is exceptionally stable along its face because of the alternating grain. Wood expands laterally more than it expands longitudinally. If the plywood was expanding this much, I would expect it to begin delaminating.
Here's my off-the-wall theory: The front and read panels were always oversized and the veneer covered the gap, supported by the glue underneath which has dried and contracted causing the difference to become visible.
To prevent this, do what auto body folks do. Apply a guide coat of primer and use a large sanding block to expose the low spots then fill them using autobody filler sanding it absolutely flat using a large sanding block.
Last edited:
Hello
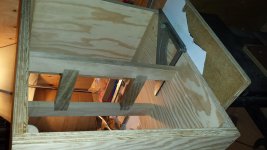
I built speakers few months ago. I made the cabinets out of moisture-proof 18 mm baltic birch plywood
Did you use real baltic birch?
I ask because there is a 4x8 sheet of 13 ply sold locally that is from China. They call it baltic birch. Cheaper version for cabinet makers. Probably more warp resistant than 5 ply and that's what they care most about. It has overlapping plys and voids, splintery, doesn't smell right, glue is not moisture proof and it is whiter than real BB.
Real BB is 5 foot square, and has the purple stamp in cyrillic.
It is real baltic birch. I bought it from a good place, that is only selling baltic birch. I'm not sure what the moisture proof means, I thought it makes it more stable.
They do have big warehouses, so there must be quite big moisture difference, but I bought the material in the end of summer, so it was dry. Anyway the speakers were fine, and it took me long time to veneer it. After veneering they were fine for 2 months sitting at my desk. And the horrible Autumn has been wery humid for about 2 months. For me the strange part is, why did the panels move suddenly standing on my desk. That is a long time sitting in the same climate, and a very fast sudden expansion.
And yes it is panels expanding. Like I said, I did not veneer the bottom, and there can see how the panels are not flush any more. No cracking.
Next time I will use 45 degree joints, add a few screws and front, back panels will go inside the other panels. That would force them to move together. Probably will let them be unfinished for a long time, to see how they react.
Current speakers, I have decided not to fix them right now. I will probably wait for spring to see if it shrinks back. And there is a strange voice in my head that wants to build 2.5 out of these. Maybe I'll try to sell them for a break even price. So someone could enjoy great speakers for more than reasonable price. And the most satisfying thing about those speakers is, that I wanted smaller speakers, that would be as good as the Yamahas, that can be seen on the pictures ns-515f. And they came out sounding a lot better, costing 1/3 the price.
Last edited:
Letting material stabilize before machining and assembly helps to avoid differential movement once the structure is complete, but there is also the need to design to avoid or accomodate relative movement between parts of the finished assembly. Your thought to use 45 degree miters at the corners is a good one so that the mating pieces are aligned along the axis of movement, and they will move together.
Wood structures including plywood (across its thickness) never rest and no pratical finish will stop the movement of moisture into and out of the wood. The biggest changes as you observed come at the seasonal boundaries, in the summer in your area I assume you are air conditioned and so fairly isolated from outside humidity changes. In cooler fall weather when air conditioning is not needed but humidity spikes the impacts indoors are larger. Here in the north during winter when temperatures are below zero there is a limit imposed on humidification to avoid condensation and freezing on cold surfaces. So the experienced builder develops instinctive insight into avoiding problem areas.
Wood structures including plywood (across its thickness) never rest and no pratical finish will stop the movement of moisture into and out of the wood. The biggest changes as you observed come at the seasonal boundaries, in the summer in your area I assume you are air conditioned and so fairly isolated from outside humidity changes. In cooler fall weather when air conditioning is not needed but humidity spikes the impacts indoors are larger. Here in the north during winter when temperatures are below zero there is a limit imposed on humidification to avoid condensation and freezing on cold surfaces. So the experienced builder develops instinctive insight into avoiding problem areas.
This is what I do now, to compensate for any slight differences during assembly. Even if there are permanent differences however slight. By leaving myself a 16th of an inch overlap at each of the end cuts. Square everything up best I can then I flush later with a bench belt sander with 90 degree fence. I'm close as I can get to guaranteeing myself perfect butt joints ready to be veneered.
It wouldnt hurt to leave cabs unfinished, to settle. Then proceed with this step later, weeks months, whenever you feel comfortable. You can still enjoy functioning speakers until then. Providing it won't have you in the doghouse with your better half.
It wouldnt hurt to leave cabs unfinished, to settle. Then proceed with this step later, weeks months, whenever you feel comfortable. You can still enjoy functioning speakers until then. Providing it won't have you in the doghouse with your better half.
Attachments
Last edited:
Some of what I see in the photos is telegraphing of end grain plies through the veneer. If the material hasn’t already been sitting in the shop for a few day before cutting, I generally fill will bondo then random orbit sand flush before proceeding to veneering. It also doesn’t hurt to apply two thin layers of glue to the box with at least a full hour of drying time before the second.
Just make sure both have only a light “eggshell” texture. The first could be considering a glue-sizing.
Just make sure both have only a light “eggshell” texture. The first could be considering a glue-sizing.
I gave one of my apprentices a wood moisture meter. Good reviews but checking its' calibration is nigh near impossible. He just got in a pallet of maple. Having been around too long I can pick up a piece and by feel tell him what the moisture content is, more accurately than the meter.
He did plane some pieces too soon and now they will be only suitable for barrel staves!
Interesting enough is that having a full shop allows us to resaw and plane inexpensive hardwood. Paying 47 cents per board foot for the maple randoms. Of course some of it is spalted. Will plane, size, sand and then resell as a table top unfinished for a reasonable price.
But the OP I think has done a fine job and made a good decision to wait and see how things cycle through the year.
When he wants to build new boxes my suggestion is to find a quality table saw he can borrow or rent time on. I would not try a miter cut with a hand saw even with a jig.
I would not try a miter cut with a hand saw even with a jig.
I made the most fire wood attempting angle cuts without a good power saw. And mitre jigs. I think they were invented not to cut properly with but to test a guys patients threshold. Either a table or sliding radial arm saw with a GOOD finishing blade is best.
All good practice to allow the material to stabilize to the environment and all, which he did, but the moisture in the glue sometimes takes a while to soak in when trapped under the veneer with a water based glue. End grain is going to suck up more.
If you can swing it, the 3m PUR system is pretty good, used by some commercial cabinet makers. Still not a solution for applying veneer though, I use a spray on contact adhesive for that, and a roller.
https://multimedia.3m.com/mws/media...yurethane-reactive-pur-adh-system-pckt-gd.pdf
Not exactly a practical purchase for a set of speakers however.
When you mention using miters and screws I assume you are talking about screws from
The inside, with corner blocks. Any screws from the outside are going to telegraph through just like your end grain is telegraphing. I like the bondo idea. Hell, even if you have nice miters you can use bondo any defects if you are veneering over the top. The other idea of 1x4” veneers might work, but will be more susceptible to shrinkage. Also can be tough to get full contact with the adhesives unless you have a vacuum press. Any bubbles/voids might (probably will) rattle and make wierd noises.
I would cut 45s on an accurate table saw with a sled. Glue only. If you really need to screw, apply from inside - full length glued corner blocks.
But all that to say - your speakers look great and if they sound great I bet you’re the only person who notices the flaws. And flaws are good because only god is perfect. At least what the guys who hand-knot the $25k rugs say.
- Status
- This old topic is closed. If you want to reopen this topic, contact a moderator using the "Report Post" button.
- Home
- Design & Build
- Construction Tips
- Baltic Birch Expansion