im hoping someone on here has a solution to my problem.
I'm in the middle of a speaker box build of my own creation and I've ran into a dilemma. For a clean look I decided to counter sink and rear mount the tweeter and woofer on the face plate of the box. It looks great but the problem is once the box is sealed I have no access to the mounting hardware. Also to maintain the clean look I decided to glue the panels together which also means if I ever need to change a component I'd basically have to destroy at minimum 1 panel to gain access to the interior. So to avoid having to break it open if something goes wrong, I plan on leaving 1 panel that isn't glued and instead use hardware to mount it to the rest of the speaker box. However I don't want to use screws, for astetic reasons, but I'm not sure what else I can do. At first I thought I could use tee nuts but that won't work as the panel is attached using a simple butt joint. (Basically the panel I want to remove is the same height and width of the rest of the box, and would just attach flush to the side) My only other thought is using a threaded nut with some bolts to tighten it down. However I'm not sure if that's what I want and I'm wondering if anyone on here has a solution or idea.
I know that's a bit wordy and I'm not sure it all makes sense. I'll attach an image later to help visualize the problem. I'm just currently to lazy to go out to the shop and take a pic.
Anyways, any help with this would be much appreciated!
"I decided to counter sink and rear mount "
I don't understand that. Do you mean that you will recess (counter sink) the front panel?
If so, then the drive units will mount from the front. If that is the case there are various ways in which captive nuts can be fixed to the rear of the front panel.
I don't understand that. Do you mean that you will recess (counter sink) the front panel?
If so, then the drive units will mount from the front. If that is the case there are various ways in which captive nuts can be fixed to the rear of the front panel.

I think you have painted yourself into a corner. Except "waiting for it to dry" won't help.
Either entomb the drivers until death, or re-visit the driver mounting. Whack those holes bigger. Use a thin front panel with the drivers rear-mount to it. Remove the whole thin front panel for access. Use nice screws.
Alternatively, decide which side is "bottom" and whack a big access hatch there. Fasteners hidden unless someone tips it to see the underside.
Hi, D or E nuts are often used in this situation with foam sealing strip
Actually this worked perfectly! Thanks for the help!
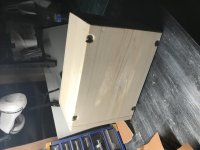
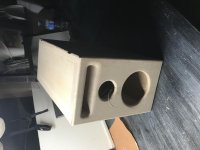
I used threaded inserts and I was surprised at how tight I could get the seal. And to be sure I'll caulk it with silicone before my final assembly. Then if I ever need to service the components it's as easy as removing the bolts and cutting the silicone. I puttered around the hardware shop and there are a plethora of different bolts and options so this could easily be adjusted depending on the look you are going for. Thanks again for the help.
I attached a few pics for reference. Still a far from finished, but getting closer.
Attachments
If not too late, I'd caution against using silicone -once compressed by the clamping pressure of the machine screws and threaded inserts, it can be more of an absolute bitch than you might think if you ever need to remove that panel.
In the millwork trade, silicones are used to adhere plywood or MDF cores to Stainless steel and "Corian" countertops.
Thin closed cell foam weatherstrip or glazing tape can more than suffice.
In the millwork trade, silicones are used to adhere plywood or MDF cores to Stainless steel and "Corian" countertops.
Thin closed cell foam weatherstrip or glazing tape can more than suffice.
- Status
- This old topic is closed. If you want to reopen this topic, contact a moderator using the "Report Post" button.
- Home
- Design & Build
- Construction Tips
- Help with creating a removeable panel on a speaker box