I have not tried a high gloss (Piano Black) finish before as I usually cover my sub boxes in either marine vinyl or leather.
· I was wondering if my plan below is a good one or should I try something else?
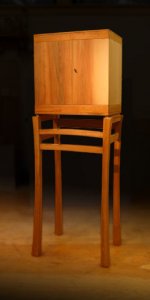
My next build is going to be for my home theatre and will be a rather tall (4’ to 5’) box with two 18” subs. I would like to try my hand at a high gloss black finish.
I use my local hardware store Bondo polyester resin to coat the MDF cabinet
Then follow up with Rage Gold to level it out.
I figure that I will be;
1) Using the Rage Gold to get as flat as possible, spread, sand, spread, sand repeat
2) Try the polyester primer – shoot, sand, shoot, sand repeat
3) Try the urethane primer – again shoot, sand, shoot, sand repeat
4) Urethane color coat - shoot, sand, shoot, sand repeat
5) Urethane clear coat – shoot, sand, shoot, shoot, polish, buff etc
I have a good 6 hp/ 60 gallon compressor with a water trap/regulator in my garage/shop which is where I will be spraying.
I do have a good selection of quality sanding blocks including some rather long aluminum ones that I use PSA papers on.
I have a good respirator that I will get new canisters for prior to any painting.
I do NOT have any spray guns or previous painting knowhow other than my fine rattle can experiences, but want to learn, and I do have time and Youtube.
My list to purchase is below;
The base coat material below seems to only be available in a gallon from Eastwood, they do have a single state urethane that I can get in a quart and I can use a clear over that material also.
Paint Guns
DeVilbiss Auto Paint and Priming System •Kit includes two 20-oz. aluminum cups, 1.3mm, 1.5mm and 1.8mm tips http://www.eastwood.com/devilbiss-auto-paint-and-priming-system.html $155
Disposable Paint Cups DeKups 34 oz. Pro Starter Kit http://www.eastwood.com/dekups-34-oz-pro-starter-kit.html $100
High Build Primer Polyester
Primer & Hardener – 1 Qt http://www.eastwood.com/contour-polyester-primer-surfacer-from-eastwood.html $39
Or
USC High Build Primer/Surfacer with hardener Gallon http://www.eastwood.com/usc-high-build-primer-surfacer-gallon.html $80
High Build Primer - Urethane
Urethane Gray 4:1 Urethane Primer and Activator - Gallon http://www.eastwood.com/eastwood-gray-urethane-primer-and-activator-gal-kit.html $90
Single Stage Urethane Black 3:1 Single Stage Paint 1 Qt w/activator and reducer http://www.eastwood.com/eastwood-boulevard-black-paint.html $79
or
Base Coat - Eastwood Blvd Black 4:1 Basecoat Gallon w/activator http://www.eastwood.com/low-voc-boulevard-black-basecoat-gallon.html $173
Clear Coat
Low VOC 4:1 High Solid Clear Gallon http://www.eastwood.com/eastwood-s-low-voc-2-1-clear-gal-kit.html http://www.eastwood.com/eastwood-s-low-voc-2-1-clear-gal-kit.html $133$133
Or
Urethane Clear 2:1 Quart – Not sure if this includes activator or not http://www.eastwood.com/ew-urethane-clear-2-1-quart.html $28
Reducer EW Zero VOC Urethane Reducer Quart http://www.eastwood.com/ew-universal-reducer-quart.html $16
Devilbiss QC3 Air Filter and Dryer http://www.eastwood.com/dvb-qc3-air-filter-and-dryer.html $180
Dekones Paint Strainers Fine 190 micron 100/box http://www.eastwood.com/devilbiss-dekones-paint-strainers.html $13
Aerosol Injected Cleaner http://www.eastwood.com/aerosol-injected-cleaner-11-oz-net.html $12
If you're looking to prevent telegraphing of the butt joints, you'll need to use the trench method or some similar technique to blend the joints together.
MDF Seam Test Box with Trenches - Techtalk Speaker Building, Audio, Video Discussion Forum
http://www.diyaudio.com/forums/multi-way/241286-my-first-wave-guide-speaker-lots-pics.html
MDF Seam Test Box with Trenches - Techtalk Speaker Building, Audio, Video Discussion Forum
http://www.diyaudio.com/forums/multi-way/241286-my-first-wave-guide-speaker-lots-pics.html
Well, it sounds like you have an understanding of the amount of work, materials and learning curve involved.
This is why I don't paint - except for the highest priced exotics, veneering with clear top coats is usually faster, and lower in end cost. Of course you can paint shapes / compound curves that aren't amenable to veneering.
This is why I don't paint - except for the highest priced exotics, veneering with clear top coats is usually faster, and lower in end cost. Of course you can paint shapes / compound curves that aren't amenable to veneering.
Well, it sounds like you have an understanding of the amount of work, materials and learning curve involved.
This is why I don't paint - except for the highest priced exotics, veneering with clear top coats is usually faster, and lower in end cost. Of course you can paint shapes / compound curves that aren't amenable to veneering.
I actually want to eventually do a combination of veneers and high gloss paint.
These are just for my own use/fun, I am definitely not trying to sell anything or make money at it.
How do you apply your veneering? I know a guy that does beautiful veneer work, but he is a bid of a odd duck (being nice there...). I have seen him use vacuum bags.
What coatings do you use over your veneer?
Where do you purchase your veneers?
BTW, this is how I go off on tangents and spend a lot of time in the shop!
Thanks for the help guys!
I use paper backed veneers, which generally come in 4x8 ft sheets, and the iron-on / yellow glue method. These sheets generally have at least 4 sets of book-matched flitches across the width of a sheet. Depending on the figuring on any individual sheet, and the size/shape of the enclosure, I might only get coverage of all sides of a single pair from one sheet. For example, the FrugalHorns curved side panels makes for poor yield, particularly since I insist on centering the book matched grain pattern on at least the front baffle of all speakers.
I also attempt to mirror image the pattern and alignment on the sides/top and bottom of a pair, and like to wrap the grain contiguously around the perimeter. Of course, every rule has its exceptions - particularly when the total perimeter is greater than 96" - which is where the engineered " quarter cut" varieties can justify their higher cost. They have almost uniform width/colour of grain, often with no discernible figuring at all, and I've been successful more than once on wrapping much more than 96" perimeter with almost perfect matching.
Sometimes I'll stain a cherry or lightly coloured walnut or mahogany to match colour of other furniture, and for top coat, I'll use an air assisted spray catalyzed nitro cellulose lacquer finish. Never been a fan of the waterborne "lacquers" / urethanes - even on a colourful veneer such as ribbon grain Sapele, they look cold to my eyes. On a birds-eye maple, or burled walnut / Macassar ebony, the urethanes can take in the look of a plastic laminate.
As I'm employed in the commercial millwork trade, I source all my materials through local wholesalers, who may have a few regional branches, but none do international shipping . Due to the size of packaged veneer sheets, if you're unlucky with the carrier, the cubed wieght freight costs can be more than the goods.
Last edited:
")
I'm using SW Pro Classic satin paint on MDF, Poplar and Maple. My first step is to spray on 2 coats of Zinsser BIN primer sealer,sanding between coats. Then I have a perfect base coat for top coating. The BIN sealer is alcohol/shellac/white pigment mixture so it seals MDF beautifully. It is explosive when sprayed, so I only spray outdoors, and it can be sprayed with temperatures as low as 1 degree C.
For High gloss polished style top coat I have not tried it. I might try it with the SW paint as it is a hard enough finish, and sands with nice powder. Looks appropriate for applying multiple coats to build a smooth gloss finish. Actual results TBD.
For High gloss polished style top coat I have not tried it. I might try it with the SW paint as it is a hard enough finish, and sands with nice powder. Looks appropriate for applying multiple coats to build a smooth gloss finish. Actual results TBD.
Seems to have overlooked the jist of the original postings:
that MDF has unstable joints.
These typically crack in a fairly short time.
One can only bury MDF under Veneer or possibly a F'glass skin.
Then... worry about what paint.
Otherwise the cracks Will appear, typically sooner rather than later.
that MDF has unstable joints.
These typically crack in a fairly short time.
One can only bury MDF under Veneer or possibly a F'glass skin.
Then... worry about what paint.
Otherwise the cracks Will appear, typically sooner rather than later.
Two part epoxy resin will seal it. A short strand or long strand fibre glass coat may or may not keep your finish from cracking around the joints.
You could use a gel coat over that. Nice finishes result and hold up by not cutting corners on any stage of preparation. I would be hesitant to invest a bunch of time and money over MDF.
You could use a gel coat over that. Nice finishes result and hold up by not cutting corners on any stage of preparation. I would be hesitant to invest a bunch of time and money over MDF.
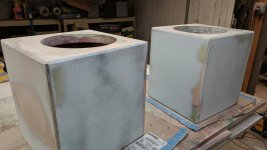
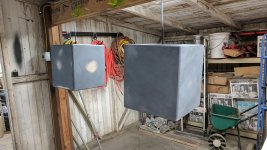
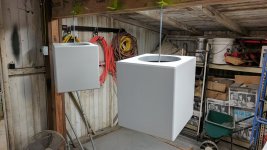
These boxes are test/experimental pieces (with respect to the finish) and will eventually be covered in a cloth material that goes with the auto's trunk.
Anyway, I used G2 Feather Fill, USC Icing then followed up with a couple of coats of HB (high build polyester primer) using a large 2.5 tip out of a HVLP cheapy gun.
Next I will block sand again, then HB prime again, then urethane prime and sand, then the color coat/clear coat.
I will have a few months to check to see where I have problems at the joints.
On these pieces I did use some face screws and staples that I will not use on the next (actual) build. I wasn't originally going to try a high gloss finish on these pieces but like I said I am using these as test/practice pieces.
Attachments
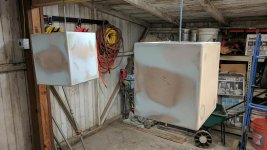
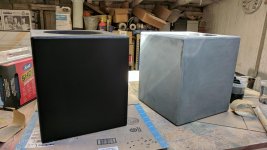
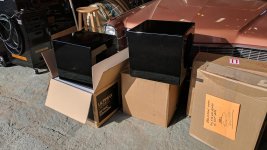
I sprayed some more HB (High Build) primer, G2 Feather Fill then I sanded the HB polyester primer with 180 dry then 220 dry and sprayed the boxes with some Omni MP803 (black) primer. The MP803 sprayed out a lot nicer out of my FinishLine primer gun with a 1.8 tip compared to the HB primer.
I then sanded them down starting with 320 dry, some of the areas I needed to go back down to 220 dry, then the 320 dry followed by 400 wet and finally 600 wet. I think that next time, I will use all wet sanding prior to the BC/CC, it seemed to give me better results.
I then used some Eastwood paint prep in an aerosol can with paper shop towels and thought that I had them clean inside and out. Turns out, it wasn’t clean inside enough.
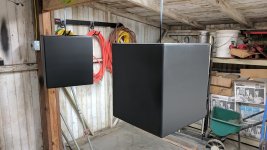
I used a Starting Line gun to spray the Omni MBPX 3.5 VOC Acrylic Urethane Basecoat in black. I got a bunch of dirt on the top of each box, one bug and one run. I was also having a hard time getting the spray pattern just right, but kept going anyways.
I then switched to my FinishLine gun with a 1.3 tip to spray the clear. That gun shot so much better. I could see a nice fan of the clear and sprayed three coats of Omni MC262 Urethane Clear.
I was surprised how well they came out, considering I have never done this and don’t really know what I am doing, but happy so far.
I then sanded them down starting with 320 dry, some of the areas I needed to go back down to 220 dry, then the 320 dry followed by 400 wet and finally 600 wet. I think that next time, I will use all wet sanding prior to the BC/CC, it seemed to give me better results.
I then used some Eastwood paint prep in an aerosol can with paper shop towels and thought that I had them clean inside and out. Turns out, it wasn’t clean inside enough.
I used a Starting Line gun to spray the Omni MBPX 3.5 VOC Acrylic Urethane Basecoat in black. I got a bunch of dirt on the top of each box, one bug and one run. I was also having a hard time getting the spray pattern just right, but kept going anyways.
I then switched to my FinishLine gun with a 1.3 tip to spray the clear. That gun shot so much better. I could see a nice fan of the clear and sprayed three coats of Omni MC262 Urethane Clear.
I was surprised how well they came out, considering I have never done this and don’t really know what I am doing, but happy so far.
Attachments

- Status
- This old topic is closed. If you want to reopen this topic, contact a moderator using the "Report Post" button.
- Home
- Design & Build
- Construction Tips
- Want to try high gloss finish on MDF