I've been kicking this around for a while about whether (or not) to post this. Full disclosure: there are things for sale on my site. This is purely about DIY speaker building. After consulting with a mod, the thought is that the members will decide it worthiness.
I see so many posts with specific questions that I thought it might be worthwhile to start a thread focused on the very basics. The reason for that is because having been through the process (read: pain)
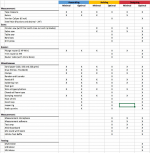
The chart below breaks down tooling into these three categories"
Assembling: Having a pre-packaged kit from a vendor with pre-milled wood. There is no requirement for cutting of material. Minimally, all crossover components and wires are defined. Speaker drivers are dictated.
Building: Having a set of plans from a third-party that you are going to follow. You buy the raw materials and cut everything per the plan. Components are spec’d and you build the crossovers.
Designing: Truly starting from scratch based on a need and design goals. You own the design of the cabinetry and crossover, speaker selection, test and measurement, etc.
Here's the chart up for debate... see attached file in this post.
While many of these are obvious, some may need some explanation. Brief descriptions of them follow:
Calipers: How think is ¾” MDF? It is almost always more than .750 inches. On average, we encounter MDF that is .770 inches thick. This is why folks end up with the head scratcher of “Gee, my dado measures ¾”, why doesn’t it fit? Calipers eliminate the inaccuracies of nominal wood stock. They come in both dial (analog) and digital. We use both. They can be cross-referenced and hey, batteries die exactly in the middle of a measurement.
Band Saw: Yes, you can cut arched lines with a sabre saw. We do it all the time. The flaw is that the blade of a sabre saw deflects very easily, making true flush routing more difficult. Band saws aren’t nearly as susceptible to deflection. If you don’t have access to one, be sure you get the rasp as it can smooth things out for pattern routing.
Trim Router: A massive hand router is not always needed for DIY speaker building. Not only do we use these $100 beauties for veneer trimming, they’re plenty powerful for routing rabbets and dadoes. And, they are much less unruly. Sure, you have to set up the depth manually, but (to us) it is a good trade-off. We use the Bosch Colt.
Clamps: The old fashioned, simple screw-tightening work fine. No need to get sucked into the Bessey K-Clamp super expensive models. They are mostly just holding the box firmly together while the glue dries. A nice add-on are the corner braces that you can get at Woodcraft so guarantee a squared up cabinet.
Heat Gun: You can use a lighter, of course. The heat gun applies even heat to heat shrink and leaves a professional finish with no burn marks. We use a Porter Cable and it works great.
Hand Rasp: For chamfering an edge or smoothing small imperfections it can’t be beat. Cheap and effective. I use the the flat-on-one-side-curved-on-the-other-side type.
Mic Stand With Boom: Accurate measurements without a boom are a challenge.
Infinite Test Baffle: We use a 4’x8’ plywood sheet to mount raw drivers to test before using Xsim for crossover modeling. We prefer mounting them in the actual cabinet/baffle that will be used, but that isn’t always convenient.
LCR Meter: Critical for unwinding coils to get the exact value that you modeled out. Also makes measuring components a breeze. Use it all the time.
This is meant to be debated, as it likely will be. It surely isn’t perfect and the feedback is welcome so we can all learn. Our hope is that we can provide some useful tools that helped us along. Build well and listen!!
Tim
----------------------------------
http://www.kayasound.com
I see so many posts with specific questions that I thought it might be worthwhile to start a thread focused on the very basics. The reason for that is because having been through the process (read: pain)
The chart below breaks down tooling into these three categories"
Assembling: Having a pre-packaged kit from a vendor with pre-milled wood. There is no requirement for cutting of material. Minimally, all crossover components and wires are defined. Speaker drivers are dictated.
Building: Having a set of plans from a third-party that you are going to follow. You buy the raw materials and cut everything per the plan. Components are spec’d and you build the crossovers.
Designing: Truly starting from scratch based on a need and design goals. You own the design of the cabinetry and crossover, speaker selection, test and measurement, etc.
Here's the chart up for debate... see attached file in this post.
While many of these are obvious, some may need some explanation. Brief descriptions of them follow:
Calipers: How think is ¾” MDF? It is almost always more than .750 inches. On average, we encounter MDF that is .770 inches thick. This is why folks end up with the head scratcher of “Gee, my dado measures ¾”, why doesn’t it fit? Calipers eliminate the inaccuracies of nominal wood stock. They come in both dial (analog) and digital. We use both. They can be cross-referenced and hey, batteries die exactly in the middle of a measurement.
Band Saw: Yes, you can cut arched lines with a sabre saw. We do it all the time. The flaw is that the blade of a sabre saw deflects very easily, making true flush routing more difficult. Band saws aren’t nearly as susceptible to deflection. If you don’t have access to one, be sure you get the rasp as it can smooth things out for pattern routing.
Trim Router: A massive hand router is not always needed for DIY speaker building. Not only do we use these $100 beauties for veneer trimming, they’re plenty powerful for routing rabbets and dadoes. And, they are much less unruly. Sure, you have to set up the depth manually, but (to us) it is a good trade-off. We use the Bosch Colt.
Clamps: The old fashioned, simple screw-tightening work fine. No need to get sucked into the Bessey K-Clamp super expensive models. They are mostly just holding the box firmly together while the glue dries. A nice add-on are the corner braces that you can get at Woodcraft so guarantee a squared up cabinet.
Heat Gun: You can use a lighter, of course. The heat gun applies even heat to heat shrink and leaves a professional finish with no burn marks. We use a Porter Cable and it works great.
Hand Rasp: For chamfering an edge or smoothing small imperfections it can’t be beat. Cheap and effective. I use the the flat-on-one-side-curved-on-the-other-side type.
Mic Stand With Boom: Accurate measurements without a boom are a challenge.
Infinite Test Baffle: We use a 4’x8’ plywood sheet to mount raw drivers to test before using Xsim for crossover modeling. We prefer mounting them in the actual cabinet/baffle that will be used, but that isn’t always convenient.
LCR Meter: Critical for unwinding coils to get the exact value that you modeled out. Also makes measuring components a breeze. Use it all the time.
This is meant to be debated, as it likely will be. It surely isn’t perfect and the feedback is welcome so we can all learn. Our hope is that we can provide some useful tools that helped us along. Build well and listen!!
Tim
----------------------------------
http://www.kayasound.com
Attachments
Some great points here. I am just now coming out of the "get it done anyway you can" mode to "hey, I want this to look good" mode  . So, this discussion is right up my alley.
- Good point about the calipers. I don't have any, but I'm going to buy one now.
- I hardly use my jigsaw anymore. With a circular saw, table saw, and router, you can pretty much do everything.
- Note about the table saw: small ones don't work for all projects. My table saw is a tiny basic model. I have often felt the need to have a bigger rip capacity, and I've been thinking about building a foldable extension table.
- You marked drill press as not a minimal requirement but I think it is an essential tool for drilling accurate holes. Maybe we also need to list some basic drill bits: brad point for centering holes accurately, forstner for flat bottom holes, etc.
- I like the sliding bar quick action clamps best.
- A jasper jig is not essential but it makes life so much easier. Accurate circles in no time.
Nice job with the list. This is a great starting point for any diyer with speaker building aspirations.
. So, this discussion is right up my alley. - Good point about the calipers. I don't have any, but I'm going to buy one now.
- I hardly use my jigsaw anymore. With a circular saw, table saw, and router, you can pretty much do everything.
- Note about the table saw: small ones don't work for all projects. My table saw is a tiny basic model. I have often felt the need to have a bigger rip capacity, and I've been thinking about building a foldable extension table.
- You marked drill press as not a minimal requirement but I think it is an essential tool for drilling accurate holes. Maybe we also need to list some basic drill bits: brad point for centering holes accurately, forstner for flat bottom holes, etc.
- I like the sliding bar quick action clamps best.
- A jasper jig is not essential but it makes life so much easier. Accurate circles in no time.
Nice job with the list. This is a great starting point for any diyer with speaker building aspirations.
Last edited:
How think is ¾” MDF?
I never use MDF for building speakers. It is not a great material. Its only asset is that it is cheap.
But the same does apply to other panel materials used to build speakers. And in the US (and Canada to some extent), metric materials will often get an imperial thickness. For instance, much of the ¾” (19.1mm) quality ply is actually nominal 18mm. That is a big difference.
dave
I have two items that I find essential in marking out cuts.
(1) Mechanical pencil - these offer a very fine lead that is much more accurate than a typical carpenter's pencil for woodworking. Accurate cuts = better joins
(2) Engineers square - Quickly check your joints and cuts for squareness. A requirement for most projects.
Sent from my iPhone using Tapatalk
There is certainly a limit to the size of hole I'd want to cut on a drill press, and of course you're very limited as to the number and precise sizes of hole saws.
My short list would include:
- contractor's size table saw - with a suitably sized outfeed table, you can cut a full 4x8ft sheet cleanly - once it's on the table;
- highest tooth count carbide tipped blades you can afford for the saw - they pay for themselves in the long run;
- 1.5HP or larger router(s) with plunge and standard bases;
- Jasper jig or equivalent circle cutting jig;
- Pattern following flush trim router bits (bearing at top of bit);
- Flush trim router bits (bearing at tip of bit);
- Chamfer / radius router bits;
- Japanese draw saw- you'd be amazed what you can do with one of those:
- Random orbit sander (air powered unit require higher CFM compressor than the average hobbyist might be able to afford)
5 axis CNC router for those complicated shapes
One category of equipment you missed is PPE.
When you go through trade technical training in every field I've worked across, the need for stuff like safety glasses, gloves and appropriate clothing is stressed multiple times each day every day.
So, appropriate hearing, eye and lung protection is a must.
Thats just a start.
Man, those routers make a huge noise that will have long term adverse effect on your capacity to enjoy your audio adventures... as will high SPL from what your making. Ya hear me?
Your jigsaw is the most likely tool after the router to throw crap in the eyes... and that hurts real bad.
Dust from machining is nasty stuff to breathe.. most 'mens sheds' don't permit dust generation process from cutting the likes of chipboard or MDF panel. Don't taste good.. and can be worse.
Agreed?

- Status
- This old topic is closed. If you want to reopen this topic, contact a moderator using the "Report Post" button.
- Home
- Design & Build
- Construction Tips
- Essential Speaker Building Tools