I'm likely to be moving home quite a lot over the next few years, so the plywood Hi-fi speakers I'm making will get moved about a lot too, and then get set up in various states of chaos. Obviously I'll take care, but it occurs to me that a reasonably robust and not too precious finish for the cabinets could be a good idea (I may veneer them at a later date).
That said, I don't really want to make them look like they're from a PA - they're already a rather inelegant dumpy shape, so need all the aesthetic help they can get. I was wondering if anyone has used Ronseal diamond hard floor paint, or have better tips for robust/cheap/attractive finish?
(EDIT: or I guess any other easily available floor paint thats available in small tins, such as dulux)
Cheers
Kev
Last edited:
Went to look at paint earlier; was a bit doubtful on the ronseal stuff as its non-slip so not sure what the finish would be like. So I decided not to worry too much about the robustness and just go for something cheap; I can always re-paint in the future, without any great effort or cost.
Found this rust-oleum stone textured finish:
which looks quite fun, so I'm going to try that. It says its scratch resistant, so we'll see. Perhaps the textured approach will hide minor blemishes in the finish, if nothing else.
Cheers
Kev
Found this rust-oleum stone textured finish:
An externally hosted image should be here but it was not working when we last tested it.
which looks quite fun, so I'm going to try that. It says its scratch resistant, so we'll see. Perhaps the textured approach will hide minor blemishes in the finish, if nothing else.
Cheers
Kev
I use a similar product to the Stone on rear panels of some speaker enclosures that are veneer on other 5 faces. It wouldn't hurt to seal with as close a color matched primer as you can find, and be sure to apply numerous light dusting coats and allow to dry between - otherwise it can take days to cure completely. I also apply a couple of coats of satin polyurethane clear top coat ( Varathane, etc)
Even then, I doubt you'd get the same durability as with any of the modern waterborne floor finishes
Note that it can take several cans of aerosol product and at least a full day to get thorough coverage and curing, and with any thin film "paint", surface preparation, and sanding between coats if recommended, is at least 90% of the work.
Thanks for the info! The can didn't mention colour matching of the base coat (being sceptical, perhaps it would suit the manufacturers for me to use more!); I'd be very happy to match it and so use less product. They did mention a top coat but only if likely to be subject to moisture, I'm not intending to let it get damp but it makes sense that a clear top coat could still increase stability; having sprayed a test area without a clear sealer, the texture seems a little friable if abused.
Yeah, I decided to compromise on the ruggedness and just go for cheap/easy at the mo. The cabinets I'm to be painting are my first; probably there'll be a more elegant mkII in the future after testing/tweaking these, and when I can take better care of them.
Yeah, I decided to compromise on the ruggedness and just go for cheap/easy at the mo. The cabinets I'm to be painting are my first; probably there'll be a more elegant mkII in the future after testing/tweaking these, and when I can take better care of them.
Last edited:
I always paint the front baffles with Blackboard paint [International paints??] from Wilkinsons. As long as it's well stirred and applied thinly, it's idiot proof. Hides shiny glue smears, filler etc. You can repaint parts eg after fitting drivers without tide marks as it's very matt and quite tough.
Just to repeat my thanks for this tip; the background has a huge influence on the finished colour! Some experiments showed that it took loads of stone effect paint to cover fully by itself whereas only a light coat is sufficient if the background is a suitable match. I could probably have done both speakers with one can, though a bit more generosity with the paint seems to give a more even stone pattern.It wouldn't hurt to seal with as close a color matched primer as you can find
I chose grey primer for the undercoat/background - I couldn't find the 70's brown that the manufacturer had used for the can lid. Consequently mine came out slightly greyer than their example, which actually seems to work quite well. It was quick and easy to apply (after all the prep), although the can says it then takes 24hrs to dry fully.
A bit different, anyway.
Cheers
Kev
Attachments
FWIW, by the time all the time and materials required for a decent paint job, even with something as "forgiving" as the textures - as opposed to piano grade gloss - I've found that provided the surface shapes will allow* veneering and clear top coat finishes can take less of each on larger enclosures.
But then, I just prefer the look of wood vs paint.
* it's quite easy to wrap paper backed veneer in the long grain direction around the type of radius shown, or beveled / faceted edges, but compound curves is a different story.
But then, I just prefer the look of wood vs paint.
* it's quite easy to wrap paper backed veneer in the long grain direction around the type of radius shown, or beveled / faceted edges, but compound curves is a different story.
Yeah, I like veneer too, in fact I didn't round over the horizontal corners to leave that option for the future. Its likely I'll make some more elegant cabinets first, but if these turn out well then I may stick with them longer and give them a cherry or dark oak veneer jacket.
In this case I was lucky enough to have lots of left over paint and filler about (I've just finished renovating my house to get it on the market). It was a bit tedious compared to automotive stuff as the drying times are a lot longer, but at least it turned out pretty well. I had to buy the stone effect paint and (thanks to your suggestion) some clear top coat though, which did indeed add up in cost. They've a reasonably large surface area so perhaps I should have expected it; they may look like small bookshelf types but they're about 1' square by 2' high. At least with the final spray finish being so quick, I'll be less upset if/when they get dinged.
Cheers
Kev
Last edited:
Well the paint has had quite a while to dry now, though still a bit short of the 24hs the can specifies. It seems to have become a lot more robust as it sets, and a coat or three of clear top coat has helped too so hopefully this will be good enough for frequent-but-careful handling.
The only minor issue so far is that I think it looks slightly better in its natural, very matt finish, whereas the clear top coat gave it a bit of a sheen. So I finished off with another light coat of the stone effect on top, and hopefully this will then be the best of both worlds.
After all the initial prep work it really does go on very quickly and easily, just a minute or so per coat. The downside is the drying time; it doesn't add anything at all to the man-hours so thats fine with me, but it would be very annoying if you wanted a quick turn-around.
Cheers
Kev
Kev,
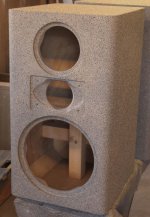
Your cabinet looks great! I know you've got this project about done, but i wanted to mention a product that i've had good luck with in the past:
acrytech.com
It's called Duratex. I used it on a couple of prototype cabinets I designed. It comes with a small textured roller that makes it easy to look nice. It kind of turns out like tolex, but much, much tougher. Back when i used it they only had one color, black...but now it looks like you can pick a custom color.
Anyway, just thought i'd throw that out there.
(btw, i'm in no way affiliated with this company, just a fan of this product).
Thanks!
Yeah, I've gone beyond that stage now, but its still interesting to hear about. I'd seen similar looking products over here (like DuraCab) but didn't know how living-room friendly their aesthetics were so I shied away. Good to know for the future, though.
Cheers
Kev
Yeah, I've gone beyond that stage now, but its still interesting to hear about. I'd seen similar looking products over here (like DuraCab) but didn't know how living-room friendly their aesthetics were so I shied away. Good to know for the future, though.
Cheers
Kev
- Status
- This old topic is closed. If you want to reopen this topic, contact a moderator using the "Report Post" button.
- Home
- Design & Build
- Construction Tips
- Ronseal floor-paint or other robust finish?