They are exactly the multiples of the given wood dimensions. The model was optimized restricting to such dimensions. I think the AFMG screen of this one is the attached (not sure, but it's at least a close one)
It is not a mathematically derived type diffusor like an MLS or RPG type, it is an empirically optimized/analyzed type (which can be just as effective, by the way).
What I can glean from the bits and pieces, the LeanFuser is a factor of 5 equal units high, each unit being 10 mm (of which they only use levels 0, 3, 4 and 5). Tim mentioned to make the imperial version of the LeanFuser, it would be acceptable to use 1/2" (approx 12.5mm) and that it actually worked better than the metric 10mm version.
Your version appears to be approximately 2X the LeanFuser unit height (or 2 x 10mm) given the available material depths (with a different height sequence).
LeanFuser - Yours (calculated from selected material)
50mm - 98.4mm (1.5" + .3" + (3 x .7"))
40mm - 80.9mm (1.5" + .3" + (2 x .7"))
30mm - 63.3mm (1.5" + .3" + (1 x .7"))
none - 45.7mm (1.5" + .3")
none - none
0mm - 0mm
Is this the correct interpretation (scaled by a unit factor of 2 and different height sequence) ?
LeanFuser Height Unit Sequence - 0, 4, 5, 3, 5, 4, 0
Your Height Unit Sequence - 0, 2, 3, 4, 2, 5, 0, 0, 5, 2, 4, 3, 2, 0
TIA
P.S. Debating on trying this one or a QRDude painted EPS version to experiment with.
Last edited:
The Diffuser Fabrication document stated that when repeating the pattern, the mounting depth needs to be varied to avoid "periodicity" (which I would assume to be similar to a comb filter effect). The center one could be slightly raised more than the flanking 2.]
Hello All;
being that I only have room for 2 diffusers, will "periodicity" be an issue with them side by side?
Thanks
MF
bwaslo,
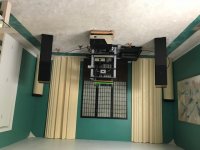
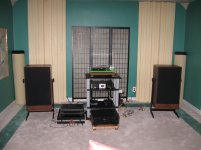
My friend Irshad and I recently completed a pair of diffusers based on your design. We both are very impressed with the outcome of this project.")
Thank you for sharing this with us.
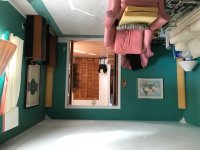
I have attached pictures of the diffusers in Irshads listening room of the front and back walls. If their any other suggestions or improvements we can make let us know.
My friend Irshad and I recently completed a pair of diffusers based on your design. We both are very impressed with the outcome of this project.
Thank you for sharing this with us.
I have attached pictures of the diffusers in Irshads listening room of the front and back walls. If their any other suggestions or improvements we can make let us know.
Attachments
Last edited:
Finally going to make some of these.
I need to hang them so I will hear how the 2 inch foam board works.
I would like to use the same size board for everything - instead of the plywood on furring strips a 12.7 x 96 inches piece and the other pieces using 2.34 x 96 inches but using the two inches thick material.
Would this extra depth upset everything?
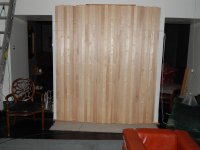
Finally built some.
I have this fireplace monolith two/thirds of the way in the room which is 91 inches wide. So I made 96 inches tall by 83.5 wide version of the 5 panel design at ARMG
I have moved my chair much closer to the speakers as you suggested - probably 5 feet minimum. I had tried this position before installing the diffusers just to get acclimated and found it acceptable but I did miss the blending I got from being back, almost to the monolith, in listening distance. At this point I had lots of rock wool 2 inches sheets behind me (tried in varying configuration).
I had tamed the bass with large traps in the corners. It measures what is probably as good as it gets in my room.
No question the room was overdamped. Maybe it is the power of suggestion but i suspect more of being made aware but the room did feel uncomfortable with too much damping. And this was a long way from a really damped room so i cannot imagine how strange it must seem in a seriously overdamped room.
The diffuser was finished yesterday afternoon so it is not as if I have listened for a properly long period to make any judgments. But that never stops us for going on, does it? (all of the rock wool was removed)
I was expecting a change in tone. Not that I felt my system was in dire need of that I just thought that would be part of the sound. More warmness was what was expected. What I do hear is a significant increase in resolution. As Mr. Waslo says these do make more difference than an amplifier upgrade and in many of the same ways of an amplifier upgrade. Most importantly the great benefit of doing this is you cannot get this increase in resolution any other way.
I did not use foam board. Gluing the stuff together seems to be a problem. I did not want to experiment with materials and then i started thinking if this thing is reflecting sounds we want to hear then it seems, aesthetically, wood would be a better surface.
I ended up using HD 1/4 birch ply - which ends up being not that thickness - for the back and the front of the "depth chamber". It might be a little too thin though the structures when glued and nailed (and left to dry) are extremely stiff.
I used studs for the spacers. Squared them off and then cut to the depth needed. had to add a spacer. The depths are 1.25, 3.25, 3.75, 3.25, 1.25 for the spacers.
For the first step I used HD 1/2 inch ply which again is not very close to 1/2. There was no other choice at home depot so I hope it is not too far off. I used 1/2" pine boards for the top steps. The birch play is nice looking and seems to be well made.
I am starting to wonder if the pipes formed by the "depth chambers" are adding some resonances? I did turn down the speakers that handle 40 to 125 hz and thought it sounded better after listeing for a bout an half hour. When i touch the diffusers they are lightly vibrating which could be good, as in Michael Green's tuning boards, or something that needs to be fixed. Only time will tell.
I am wondering if i should not fill the chambers with GREAT STUFF? I would appreciate thoughts on that.
I am very glad i made these. Now that I have done them I know I could do another set much quicker, which leads to another question - can one place a diffuser on only one side wall or would the effect be strange? Almost finished off a whole BIG bottle of TiTEBOND glue to make these. I did spend more money that the article suggests but these are in the main part of my house so I intend to make them look OK.
I like coating things with shellac so that is what will eventually happen to these.
THANKS very much to Mr. Waslo for the inspiration.
Last edited:
Pictures, if you would?
It sounds like you have left gaps at the sides where the levels change, but then you mention the pipes formed by the "depth chambers" so I'm a bit puzzled how you've put this together ....
For your bass traps, try covering part of the front surface with something reflective to higher frequencies like Ali kitchen foil, heavy plastic strips, etc - temporarily pin the extra material on and if it is beneficial, can replace this with a more attractive finish later - strips of newspaper is an east start - a couple of layers and about 2 - 3" wide and about 3" apart
There are "holes in the top and bottom - all sides are solid.
I placed a board on top to cover the opening and it did seem to stop the upper bass enhancement.
I am going to add another layer of this 1/4" (.200" actual) plywood to get closer to a step of 10 cms from wall to diffuser.
I will post a picture tomorrow.
Bass traps remain - I removed rock wool that was used for other reflections. Four of the bass traps are commercial devices with a diaphragm to aid in low frequency absorption. In the room behind the monolith I have DIY bass traps consisting of a huge roll of fiberglass in the corners with 5 - 2" x 4' x 8' sheets of rock wool across the corner. The big roll of fiberglass is within the triangle formed by the rock wool. These are so far away that adding a reflective surface would do nothing for them
20 hz to 100 hz sounds pretty good. I do perceive the diffusers adding greatly to the cohesion of the low bass to the rest of the range.
- Home
- General Interest
- Room Acoustics & Mods
- Making easy DIY "Depot" sound Diffuser panels, step by step