Hi, I have been looking over this project for a while (can't do it immediately as I am set for back surgery). Is it possible to use the wall (smooth covered with sheet rock) as the back. Then have two smaller easier to handle pieces to place against it? Or alternatively can the back be something like insulating foam board? I have only one set of locations where these will fit in my listening room so portability is not required. Once in place they will have to stay there. It is likely a good location though (fortunately) as they will be in line with the front edges of my ESLs and about 3 feet off to the sides.
Yes that is possible, but I don't think it will work as well as having the 'back' off the wall (that gives anther step change to break up sound waves).
Do you mean at the outsides of your esls, in line? Don't most esls have big nulls (no sound in that direction)? Figure 8 pattern?
Do you mean at the outsides of your esls, in line? Don't most esls have big nulls (no sound in that direction)? Figure 8 pattern?
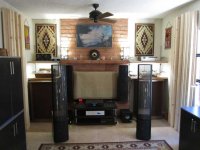
Hi everyone, I finally got around to building a set of these diffusers.
Thanks Bill for the detailed information on how to build them. I only made one alteration. I built each diffuser in halves. This was so I could move them around without a crane. Even still each half of a baffle weighs about 80 pounds or so. I fastened them together with lengths of 1 X 4 lumber on the rear with screws and fastened them to the walls with long screws into wall studs. I used “dry wall” screws to assemble the diffusers.
One thing for sure the effect on sound is not subtle. It may be more or less pronounced depending on the type of speakers and your room layout. I use Martin Logan Electrostatics which rely on both direct and reflected sound. My room has always been problematic. With one diffuser on each side wall just behind the speakers many of the issues went away. The focus and centering is much better without losing separation. I have lost a bit of the “air” the system had before, but IMO this has been a good trade off. My non-professional thought is that the diffusers effectively made the room seem about 50% wider. This is a great, not difficult or very costly project that can have a dramatic effect on the sound of your system. Thanks again Bill for posting it.
Attachments
Glad they worked out for you Bruce.
I know that it wouldn't work out as your room is arranged, but I would have liked to hear how the diffusers might've worked if standing more behind (less to the side of) the panels. It seems to me that might be a good use for time diffusion like this, to work on the back wave from a dipole. If anyone tries that, please post!
I know that it wouldn't work out as your room is arranged, but I would have liked to hear how the diffusers might've worked if standing more behind (less to the side of) the panels. It seems to me that might be a good use for time diffusion like this, to work on the back wave from a dipole. If anyone tries that, please post!
Paper Lantern Diffuser: another variation (or three) on this DIY diffuser
I am in the conceputalization stage of a lightweight diffuser based upon this design but with the diffuser contour made of paper instead of wood.
Since the diffuser contour only actually diffuses down to about 400Hz, it can work equally well if it is constructed from thick paper that reflects down to about 400Hz and that is certainly much lighter than wood.
The 'paper lantern diffuser' can hang anywhere in the room from the ceiling or from shelving brackets on fishing line, or it can hang on the wall like a picture using simple lightweight standoffs to space it from the wall a couple of inches and take advantage of that last countour step at its border. It can even be extended by one contour step on the left and right and folded behind at the edges for a clean line so the border fits flush to the wall while still getting the advantage of that last step at the border.
The diffuser contour could be formed in thin wire fencing or stiff coarse screen by molding the wire over an existing pre-assembled version of this diffuser. The paper could then be creased into shape on the same form and attached to the wire with spray glue.
The heavy wooden form does not even need to exist if one has a sheet metal bender or can devise a DIY jig to bend fencing/screen/paper to specification. Some boards and hinges ought to do it.
The kraft paper is available in 30"x30' rolls of Scotch Postal Wrapping Paper at my local crafts store (Michael's) for less than $5. Poster board or any other thick paper with a smooth surface can be used as well. Probably just about any thick paper will work, even wallpaper or posters from a gift shop. Michael's also has slightly thinner pre-printed paper in forest green vegetation print, violet print, patterns, etc., all of them potentially working fine in this application (though I only measured the reflectivity of the kraft paper).
I extended the 'paper lantern diffuser' concept also to address an issue in my apartment living room. There is no space to alternate absorption and diffusion in here and even with minimal corner bass trapping the life is sucked out of the room due to treble absorption.
Kraft on insulation improves its bass trapping capability while reflecting the treble. What if we combine the 'paper lantern diffuser' concept with absorptive corner bass trap for especially tight places (like my apartment) by making the front of a bass trap out of kraft paper formed into this diffuser contour and gluing a batt of insulation to the backside?
Chicken wire or screen is probably not such a great candidate for this concept if it adds too much rigidity to the paper, but it could work out with another method of forming the contour.
I considered making a 'super chunk' corner bass trap and cutting the diffuser countour into the front face of the insulation. Lots of cutting and mess but it should be easy enough to glue a paper face onto the countour. The handling of the fiberglass and the cost are strong deterrents though, as is the lower bass trapping ability of dense fiberglass board.
So what I decided was to form the 'diffsorber bass trap' countour using dowels in a frame as guides to thread the kraft paper through, then build a bass trap box onto the back of the frame and glue plain fiberglass batt to the backside of the contour.
The frame itself can be constructed from 1"x8" common board (actual size 0.75"x7.25"). Drill holes in the top and bottom pieces of the frame for the dowels, add very thin (paneling?) end caps on top and bottom to contain the dowels and form the corner or flat bass trap outline, then thread the paper through the dowels, spray some glue on the backside and stuff with fiberglass. Enclose the insulation with sides/rear/corner assembly made from the same very thin panel and use square dowel to attach/close at all the corners of the cabinet. Wrap in acoustically transparent cloth to protect the kraft paper. Done.
The dowels can be 3/8" with two 1" dowels at either end to act as spools. Simple attachment scheme just like a roll-up window shade -- unroll one if you need to see the actual design. Slip the kraft paper under the flap that is glued/stapled to the dowel, and roll the paper on. May not even require the flap if the friction on the dowel is high enough.
Tensioning can be done with nylon cord between the two rollers holding the paper at either end. Wind up and attach the cords to the dowels and to each other with a spring. Maybe just cut a thin bungee in half and attach the cut ends to the rollers.
I figured on using the 30" wide kraft paper and building the diffsorber bass trap 32"Hx36W". Dowels are commonly available in 36" length.
Anyway, all three of these approaches are viable options.
One could even possibly use the chicken wire/screen 'paper lantern diffuser' hanging in front of existing bass trap or use it as the front facing of a bass trap instead of the framed dowel assembly. Who knows, it might enhance the bass trapping equally well/poorly for less cost and hassle.
A psychedelic version could be constructed from strips of suspended ceiling light plastic lenses glued to the wire frame, with rear lighting pulsing in time with the music like the old 'color organs'.") Use your imagination.
Use your imagination.
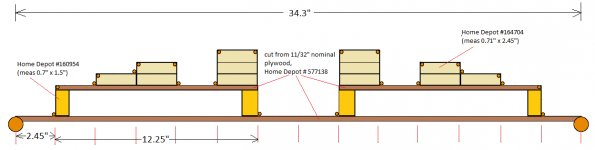
Here is a graphic of where to place the dowels to form the exact contour and the measurements I took on the paper plus the pillowcases that are holding my existing DIY bass trap pillows. The attenuation was measured with the cloth/paper very close to the speaker grill to block or absorb the sound and the reflectivity was measured by bouncing the sound off the cloth/paper at a shallow angle 30cm away:
I am in the conceputalization stage of a lightweight diffuser based upon this design but with the diffuser contour made of paper instead of wood.
Since the diffuser contour only actually diffuses down to about 400Hz, it can work equally well if it is constructed from thick paper that reflects down to about 400Hz and that is certainly much lighter than wood.
The 'paper lantern diffuser' can hang anywhere in the room from the ceiling or from shelving brackets on fishing line, or it can hang on the wall like a picture using simple lightweight standoffs to space it from the wall a couple of inches and take advantage of that last countour step at its border. It can even be extended by one contour step on the left and right and folded behind at the edges for a clean line so the border fits flush to the wall while still getting the advantage of that last step at the border.
The diffuser contour could be formed in thin wire fencing or stiff coarse screen by molding the wire over an existing pre-assembled version of this diffuser. The paper could then be creased into shape on the same form and attached to the wire with spray glue.
The heavy wooden form does not even need to exist if one has a sheet metal bender or can devise a DIY jig to bend fencing/screen/paper to specification. Some boards and hinges ought to do it.
The kraft paper is available in 30"x30' rolls of Scotch Postal Wrapping Paper at my local crafts store (Michael's) for less than $5. Poster board or any other thick paper with a smooth surface can be used as well. Probably just about any thick paper will work, even wallpaper or posters from a gift shop. Michael's also has slightly thinner pre-printed paper in forest green vegetation print, violet print, patterns, etc., all of them potentially working fine in this application (though I only measured the reflectivity of the kraft paper).
I extended the 'paper lantern diffuser' concept also to address an issue in my apartment living room. There is no space to alternate absorption and diffusion in here and even with minimal corner bass trapping the life is sucked out of the room due to treble absorption.
Kraft on insulation improves its bass trapping capability while reflecting the treble. What if we combine the 'paper lantern diffuser' concept with absorptive corner bass trap for especially tight places (like my apartment) by making the front of a bass trap out of kraft paper formed into this diffuser contour and gluing a batt of insulation to the backside?
Chicken wire or screen is probably not such a great candidate for this concept if it adds too much rigidity to the paper, but it could work out with another method of forming the contour.
I considered making a 'super chunk' corner bass trap and cutting the diffuser countour into the front face of the insulation. Lots of cutting and mess but it should be easy enough to glue a paper face onto the countour. The handling of the fiberglass and the cost are strong deterrents though, as is the lower bass trapping ability of dense fiberglass board.
So what I decided was to form the 'diffsorber bass trap' countour using dowels in a frame as guides to thread the kraft paper through, then build a bass trap box onto the back of the frame and glue plain fiberglass batt to the backside of the contour.
The frame itself can be constructed from 1"x8" common board (actual size 0.75"x7.25"). Drill holes in the top and bottom pieces of the frame for the dowels, add very thin (paneling?) end caps on top and bottom to contain the dowels and form the corner or flat bass trap outline, then thread the paper through the dowels, spray some glue on the backside and stuff with fiberglass. Enclose the insulation with sides/rear/corner assembly made from the same very thin panel and use square dowel to attach/close at all the corners of the cabinet. Wrap in acoustically transparent cloth to protect the kraft paper. Done.
The dowels can be 3/8" with two 1" dowels at either end to act as spools. Simple attachment scheme just like a roll-up window shade -- unroll one if you need to see the actual design. Slip the kraft paper under the flap that is glued/stapled to the dowel, and roll the paper on. May not even require the flap if the friction on the dowel is high enough.
Tensioning can be done with nylon cord between the two rollers holding the paper at either end. Wind up and attach the cords to the dowels and to each other with a spring. Maybe just cut a thin bungee in half and attach the cut ends to the rollers.
I figured on using the 30" wide kraft paper and building the diffsorber bass trap 32"Hx36W". Dowels are commonly available in 36" length.
Anyway, all three of these approaches are viable options.
One could even possibly use the chicken wire/screen 'paper lantern diffuser' hanging in front of existing bass trap or use it as the front facing of a bass trap instead of the framed dowel assembly. Who knows, it might enhance the bass trapping equally well/poorly for less cost and hassle.
A psychedelic version could be constructed from strips of suspended ceiling light plastic lenses glued to the wire frame, with rear lighting pulsing in time with the music like the old 'color organs'.
Use your imagination.Here is a graphic of where to place the dowels to form the exact contour and the measurements I took on the paper plus the pillowcases that are holding my existing DIY bass trap pillows. The attenuation was measured with the cloth/paper very close to the speaker grill to block or absorb the sound and the reflectivity was measured by bouncing the sound off the cloth/paper at a shallow angle 30cm away:
Attachments
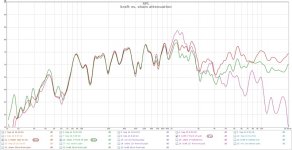
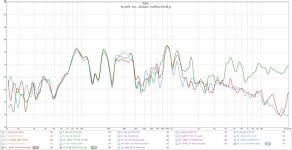
Looks like an interesting approach (though more than a one day project at least for the first one!). Does the graph show reflectivity at 450Hz though? It looks like the energy goes right through on the transmission plot. Or am I not reading it right?
For absorption I'm currently using 36 inch wide strips of this stuff with the foil peeled off, and hanging from the ceiling about a foot from the walls.
UltraTouch 48 in. x 24 ft. Radiant Barrier-30000-11424 - The Home Depot
It's cotton, so no itch and no frames to build. Not pretty though, Im going to have my wife "quilt" it between some open weave material to improve appearance, which will be good enough for my basement listening room.
Looks like an interesting approach (though more than a one day project at least for the first one!). Does the graph show reflectivity at 450Hz though? It looks like the energy goes right through on the transmission plot. Or am I not reading it right?
The plots are difficult to interpret. The info at Bob Gold's absorber measurements site indicates that kraft facing improves bass trapping up to about 500Hz and improves reflectivity down to about 500Hz but the data is approximate due to few measurements.
My plots are subject to the following caveats:
- Directionality of the speaker begins at about 1000Hz so below that the speaker is omnidirectional.
- There are reflections from various boundaries around the speaker including the concrete slab, awning, and fencing of the balcony I measured on.
- Bass frequencies will bend around objects that are much smaller than a wavelength.
- For the attenuation plot, sound will reflect off the paper and back to the baffle and back to the paper etc. causing combing undulations in the frequency response.
- For the reflection plot, bass frequencies will radiate off the backside of the speaker all the way up to 1000Hz where it starts to become directional radiator (plus the port is in the back).
- For the reflection plot, any reflections off the paper below 1000Hz will combine with the omnidirectional radiation off the backside of the speaker causing combing undulations.
The truth is that no accurate estimate of bandwidth of that paper can be made using my measurements. I only demonstrated that I should notice improvement in the treble using it, and that the diffuser should work fairly well using it too.
If you are considering this approach and concerned about lower frequencies, thicker paper should do the trick (though I would avoid multiple layers).
For absorption I'm currently using 36 inch wide strips of this stuff with the foil peeled off, and hanging from the ceiling about a foot from the walls.
UltraTouch 48 in. x 24 ft. Radiant Barrier-30000-11424 - The Home Depot
It's cotton, so no itch and no frames to build. Not pretty though, Im going to have my wife "quilt" it between some open weave material to improve appearance, which will be good enough for my basement listening room.
That is thin material. Is the face horizontal or vertical? Multiple layers?
It should help damp down slap echo/reverberation but it will be much more absorptive at higher frequencies. For first reflection points you probably want more broadband absorption or the combing might disrupt the low mid /upper bass frequency response.
Caveat: I no expert on any thing audio. Just got involved in home theater DIY a couple of years ago (on a whim mostly).
You may be right, it is relatively thin. But I'm going on the assumption that getting lossy material out where there is wave velocity is more important than overall thickness. At the wall surface, there is only pressure, no velocity, so thick material there does little except for its outer stuff that makes it out some effective fraction of a wavelength from the wall where there is velocity to work against. Even 6 inches isnt much of a fraction at bass frequencies. But some measurement is in order to see where the tradeoff is.
Lowe's has the same stuff in inches of thicknesses (for sruffing in walls and attics), but only in 15" widths. Not as easy to maken into a blanket. I may have to switch to that
Lowe's has the same stuff in inches of thicknesses (for sruffing in walls and attics), but only in 15" widths. Not as easy to maken into a blanket. I may have to switch to that
I found a couple of interesting things online that seem to be good candidates for the dowel diffsorber contour:
3/16" x 36" Birch Dowels
That is the best price I can find on dowels. I have a short piece of 3/8 and it seems too thick to be practical for this project. 3/16 seems more manageable.
Upgraded High Precision Dowelling Jig Dowel Jig With 5 Metric Dowel Holes(6mm,8mm,10mm) For Very Accurate Woodworking Joinery-in Dowel from Home Improvement on Aliexpress.com | Alibaba Group
Never done any finish carpentry or anything, just some very simple framing on a novice team... for a short while... very long ago... This is all new to me.
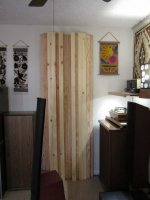
Photo of DD on a stand
Thought I'd toss an updated photo here of one of the tall diffusors as they are currently, coated with polyurethane and mounted to a rounded foot stand.
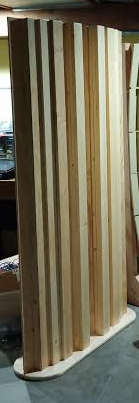
You can see on the right part of a new diffusor, that I'll be writing about soon. (Wish this site had an Acoustics forum so there was a more appropriate place for diy room treatment stuff).
Thought I'd toss an updated photo here of one of the tall diffusors as they are currently, coated with polyurethane and mounted to a rounded foot stand.
You can see on the right part of a new diffusor, that I'll be writing about soon. (Wish this site had an Acoustics forum so there was a more appropriate place for diy room treatment stuff).
(Wish this site had an Acoustics forum so there was a more appropriate place for diy room treatment stuff).
+1.............please Mods?
... You can see on the right part of a new diffusor, that I'll be writing about soon. ...
Looks like the new diffuser is going to instead be topic of an article in Linear Audio magazine early next year, so will have to wait for showing that. Sorry bout that.
+1.............please Mods?
+2 the forum is not complete without it
Thanks much Bill! This design is about as easy as it gets. With your recommendation and results, this addition was a no-brainer for the rear wall in my HT in progress.
I skipped the lowest layer of ply, and just used the drywall layer as the lowest layer. I was able to build 3 sets of the diffusers at 3 feet each, hopefully will have a positive impact on sound. I plan to paint them and cover with AT fabric panels.

I skipped the lowest layer of ply, and just used the drywall layer as the lowest layer. I was able to build 3 sets of the diffusers at 3 feet each, hopefully will have a positive impact on sound. I plan to paint them and cover with AT fabric panels.
Looks like the new diffuser is going to instead be topic of an article in Linear Audio magazine early next year, so will have to wait for showing that. Sorry bout that.
On sale today. Hoping the math in your article is not as difficult as in the typical LA stuff.
Thanks much Bill! This design is about as easy as it gets. With your recommendation and results, this addition was a no-brainer for the rear wall in my HT in progress.
I skipped the lowest layer of ply, and just used the drywall layer as the lowest layer. I was able to build 3 sets of the diffusers at 3 feet each, hopefully will have a positive impact on sound. I plan to paint them and cover with AT fabric panels.
Hey Schmidt, have you gotten a listen yet? How do they sound? Don't forget pictures when you get them painted!
Bill

Looks like the new diffuser is going to instead be topic of an article in Linear Audio magazine early next year, so will have to wait for showing that. Sorry bout that.
Any info on the new diffuser yet?
- Home
- General Interest
- Room Acoustics & Mods
- Making easy DIY "Depot" sound Diffuser panels, step by step