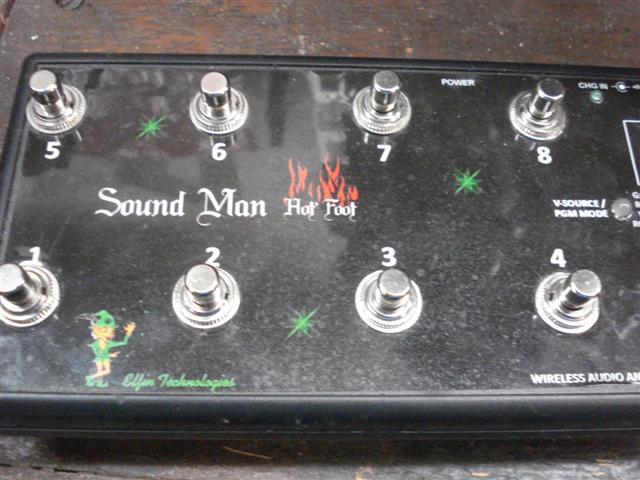
I have another general question about these brad point bits before I let the thread go for a while. I'm mostly working with plastic enclosures currently, and all these brad point bits seem geared to working with wood. In another post along time ago, I lamented my 'dismal' attempt to do something as seemingly simple, as drill a series of small holes (about 1/8") in a row, in perfect aliment and perfectly positioned. Despite my being able to mark perfect cross marks, my drills still "wandered", just enough to make the finished result make me gag.
OK, one stupid thing I was doing, was drilling into the top surface of a hollow plastic enclosure, without putting a block of wood under it. So of course the plastic would flex a little, adding to the problem. But aside from that, it seems that these brad point bits will help me through this task next time? Certainly the center point should let me position each hole start point with better accuracy, and maybe the drill construction will have less tendency to "wander.". But wood and plastic are two different substances, and this thread is probably one of the first times I've ever heard of this type of bit being used for plastic. Any "gotcha's" to worry about (aside from the caveats of using badly manufactured bits which Rundmaus already mentioned.
OK, one stupid thing I was doing, was drilling into the top surface of a hollow plastic enclosure, without putting a block of wood under it. So of course the plastic would flex a little, adding to the problem. But aside from that, it seems that these brad point bits will help me through this task next time? Certainly the center point should let me position each hole start point with better accuracy, and maybe the drill construction will have less tendency to "wander.". But wood and plastic are two different substances, and this thread is probably one of the first times I've ever heard of this type of bit being used for plastic. Any "gotcha's" to worry about (aside from the caveats of using badly manufactured bits which Rundmaus already mentioned.
Sorry,
I did not mean to sound rude. It was just the fact that you emphasized before how important it is for you to get a neat result. And then I read that you bought drill bits which you already thought for yourself would be of less-than-average quality. Just didn't fit, from my point of view.
Concerning drilling plastic stuff, you already mentioned the main problem: A part that is not clamped tightly and supported by a wood block or similar in the drilling area will flex and lead to unpredictable results.
Besides, I often had the problem I described before - if the drill bit isn't *really* sharp, the plastic heats up and you start burning/melting a hole instead of drilling. If the drill bit works nicely, you get loose plastic swarf with clean edges. Then the hole edges are also clean and nice. When the swarf turns into a compact substance that sticks to the drill and the part, something's wrong.
Regards,
Rundmaus
EDIT: For things like a row of perfectly positioned holes, I would consider making a sufficiently (2-4mm) thick 'mask' out of a well machineable metal, aluminum for example. For perfect alignment, I would have this one manufactured by some workshop with CNC tools (Front Panel Express?). Then clamp the mask to the plastic part and drill the holes with the mask holes as guide for the drill bit.
Last edited:
The "trick" is to hide the imperfect hole in the plastic with a nice, shiny, chrome bezel.
LED Panel Mount Indicators 3mm Red
SSI-LXR3612ID Lumex | Mouser
LED Panel Mount Indicators 3mm Red
SSI-LXR3612ID Lumex | Mouser
The best advise i could give in this situation is to make a test piece and try all the ideas posted and see what results you get.
Thanks again everyone for all the input. I thought I'd take a break here and let everyone know how this came out. I'll summarize it this way: Close, but no cigar. I took some unfortunately poor quality photos, but they'll do for this. I'll explain what I did, lessons learned, and what I intend to do next. First, I made a kind of negative print of my label on some clear laser self stick film (OnlineLabels.com product OL177CL). This served as a kind of drill guide, and a second top layer as many of you suggested.
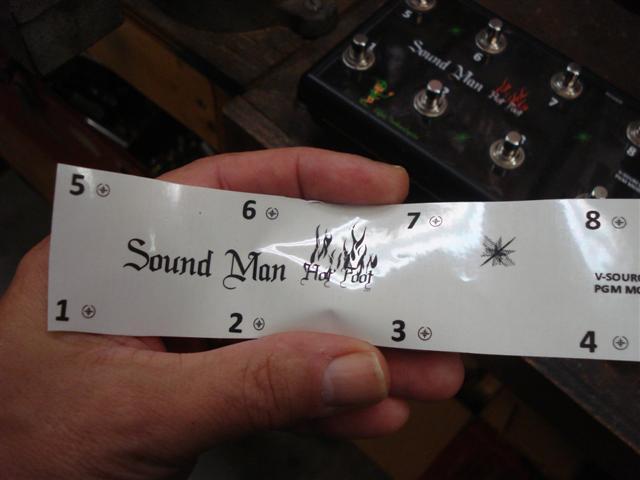
As you can see from that last pic, by sticking my clear label down so that the black text exactly hid the white text under it, I now had some cross hair drill patterns to work with. Bright light needed to see them of course, but usable. So next, I selected an appropriately sized drill from that "Harbor Freight" kit of Brad point drills I bought.
Now at this point let me say that Rundmaus was absolutely correct, especially in his third point. That is, these cheap drills were far from "straight and centered", which I could readily see looking at the fine brad point top of a small (3MM) bit, while spinning at high speed. I imagine the small bits will be less perfect then the larger, and it would pay for me to get better bits for this kind of work. For a trial run though, it wasn't a bad starting point (excuse the pun).
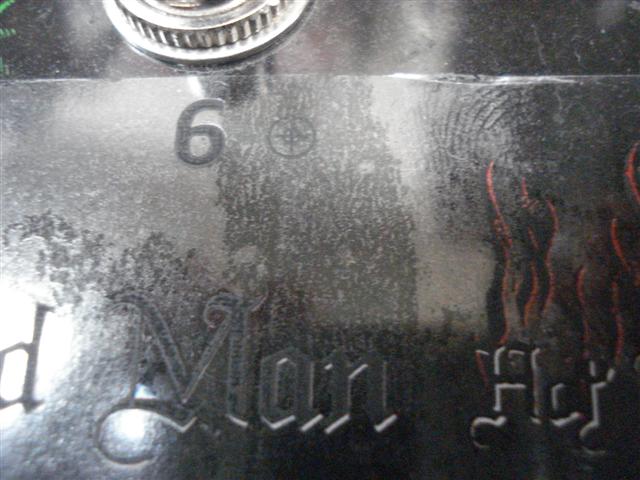
So now lets look at the best and worst. Honestly, out of 8 holes I needed to drill, 7 were fine. Here's an example with the overlay film peeled off. Its a nice clean hole, perfect for a small 3MM (T1) LED. The very best and worst looked like the below. First the best...
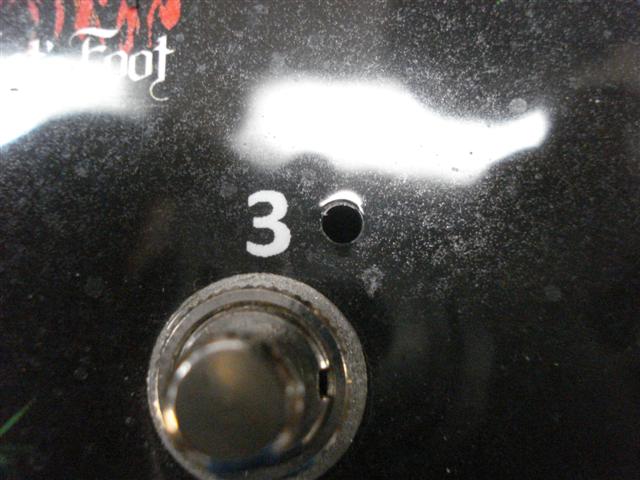
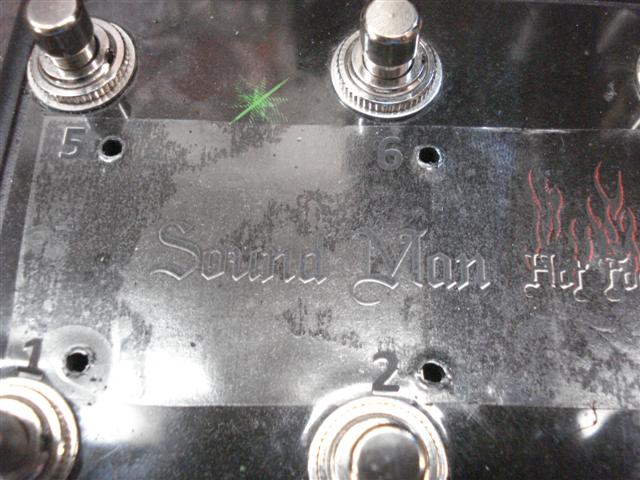
And the worst...
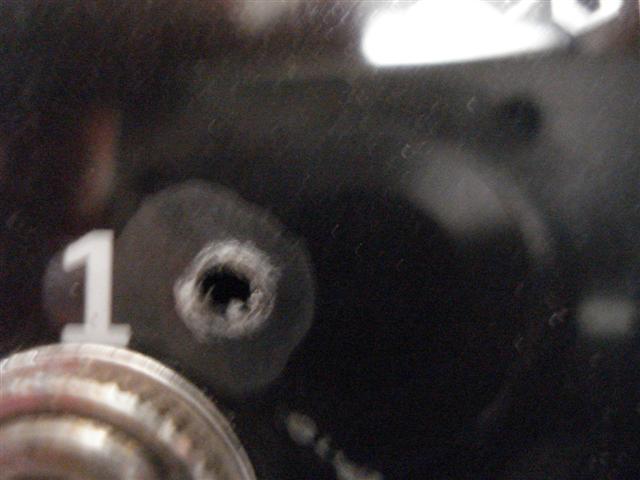
Its blurry, but you can see that the in this case the lamination was pulled slightly away, leaving an ugly air bubble effect. The rough edges are tell tale signs that in this case, the drill was "grabbing" slightly.
But this is all OK. Live and learn. I only have 4 prototypes of this, and so I think it would be easier to either remake these lablels, or add a bezel as Vasquo suggested. I have a tone of those chrome bezels. They stick up too much for my application and are too bright, but they come in plastic too. Even easier, if I can find these pre-asembled ones at a decent price...
I might re-make the faceplate labels either way. For anyone interested, I make them by printing on Online Labels.com product OL177WJ, which is a tough matte finish full size (8-1/2 x 11) self stick label. My inkjet printer does an excellent job on this material, which I then spray with a light coating of krylon, and then bring to staples for them to laminate. I then pre punch all my holes, which is the cleanest solution and always leaves a perfect result.
But I digress. Whatever I choose to do though, I still have learned a lot, and am very glad to have learned about brad point bits! What I was doing was a long shot anyway, and I'd be more worried if I had 40 to re-do instead of just 4. 🙂
As you can see from that last pic, by sticking my clear label down so that the black text exactly hid the white text under it, I now had some cross hair drill patterns to work with. Bright light needed to see them of course, but usable. So next, I selected an appropriately sized drill from that "Harbor Freight" kit of Brad point drills I bought.
Now at this point let me say that Rundmaus was absolutely correct, especially in his third point. That is, these cheap drills were far from "straight and centered", which I could readily see looking at the fine brad point top of a small (3MM) bit, while spinning at high speed. I imagine the small bits will be less perfect then the larger, and it would pay for me to get better bits for this kind of work. For a trial run though, it wasn't a bad starting point (excuse the pun).
So now lets look at the best and worst. Honestly, out of 8 holes I needed to drill, 7 were fine. Here's an example with the overlay film peeled off. Its a nice clean hole, perfect for a small 3MM (T1) LED. The very best and worst looked like the below. First the best...
And the worst...
Its blurry, but you can see that the in this case the lamination was pulled slightly away, leaving an ugly air bubble effect. The rough edges are tell tale signs that in this case, the drill was "grabbing" slightly.
But this is all OK. Live and learn. I only have 4 prototypes of this, and so I think it would be easier to either remake these lablels, or add a bezel as Vasquo suggested. I have a tone of those chrome bezels. They stick up too much for my application and are too bright, but they come in plastic too. Even easier, if I can find these pre-asembled ones at a decent price...
An externally hosted image should be here but it was not working when we last tested it.
I might re-make the faceplate labels either way. For anyone interested, I make them by printing on Online Labels.com product OL177WJ, which is a tough matte finish full size (8-1/2 x 11) self stick label. My inkjet printer does an excellent job on this material, which I then spray with a light coating of krylon, and then bring to staples for them to laminate. I then pre punch all my holes, which is the cleanest solution and always leaves a perfect result.
But I digress. Whatever I choose to do though, I still have learned a lot, and am very glad to have learned about brad point bits! What I was doing was a long shot anyway, and I'd be more worried if I had 40 to re-do instead of just 4. 🙂
Last edited:
I thought I'd drop in and explain what my final solutions was. In a way, its good that I was not able to drill holes reliably and cleanly through the laminated surface, because this is so much better. I obtained some sheets of 20 mil clear PETG plastic. This stuff is very tough, and yet flexible enough to punch holes in without shattering. So in a nutshell, here's what I did...
1) Disassembled my prototypes and removed the existing laminated labels.
2) Drilled holes in the enclosure to tightly fit 3MM LEDs, without any bezels.
3) Made some thin "strip" PC boards to hold my new LEDs and resistors, and wired them into my prototype.
4) Printed new self stick labels, did NOT laminate them.
5) punched holes for all switches and LEDs in the labels.
6) Punched switch holes in a piece of 20 mil clear PETG, cut to fit the label recess. DID NOT punch holes in the PETG for the new LEDs.
7) re-assembled, placed the new label, and placed the PETG layer over it.
My camera is crap, but here is a shot of the new version, showing one of the new LEDs lit (the red one). Those LEDs are now below the top plastic surface and so are nearly flush with the top. I haven't decide whether to do this with the other existing LEDs, as they need to be seen from a wider angle. As a side advantage, the whole assembly has a better chance of surviving a liquid spill now. I will probably have to add a small thin line of silicone around the very edge, where the plastic later meets the enclosure recess.
How about light pipes? Light pipes are cheap and come in a multitude of shapes and sizes (search Digi-Key). A pipe would provide a flat lighting surface to blend into that very nice enclosure and give you a shoulder to hide any marred edges from the drilling. the LED's then only need to be positioned under the pipe inside the enclosure.
How about light pipes? Light pipes are cheap and come in a multitude of shapes and sizes (search Digi-Key). A pipe would provide a flat lighting surface to blend into that very nice enclosure and give you a shoulder to hide any marred edges from the drilling. the LED's then only need to be positioned under the pipe inside the enclosure.
Hey theer dog! Good to hear from you again. Well for this project, I may have to put my finger down and stop the long playing record soon (remember records?) because as you know, there is NO end to possible improvements. But lets talk about these light pipes, because I'll surley want to use them in a future version or future project.
Now for the above prototypes, all those LEDs are hand wired. But having recently found a source of VERY affordable PC boards fab (pcbway.com), I'm eager to put all the electronics, including all the LEDs on one long PCB. With the current methodology, and provided I drill my holes to line up with the LEDs on the board properly, the whole thing will fit together like a glove, with a LOT less wiring or dangling parts that have to be glued.
But if I went to using light pipes, wouldn't that add a whole new complication to assembly? And also, I often need to rely on those little 3MM 2MA LEDs, which are bright enough for direct view, but are certainly not super bright (they are super cheap! ;-) ) Wouldn't an added light pipe tend to cut the visibility even more when using low power leds?
I don't get much time in the summer to spend in the lab but winters set in so I can deal with my own project creep. Crazy how that sets in.
The light pipes conduct very well but you're right a 2mA LED isn't putting out much. Do you need to go that low? There are surface mount LED's that are incredibly bright (look at your phone flashlight mode). I just mounted a very small 20mA green LED to a project and its actually to bright. I have to up the resistor to tone it down. Is this a battery powered device?
The light pipes conduct very well but you're right a 2mA LED isn't putting out much. Do you need to go that low? There are surface mount LED's that are incredibly bright (look at your phone flashlight mode). I just mounted a very small 20mA green LED to a project and its actually to bright. I have to up the resistor to tone it down. Is this a battery powered device?
I don't get much time in the summer to spend in the lab but winters set in so I can deal with my own project creep. Crazy how that sets in.
The light pipes conduct very well but you're right a 2mA LED isn't putting out much. Do you need to go that low? There are surface mount LED's that are incredibly bright (look at your phone flashlight mode). I just mounted a very small 20mA green LED to a project and its actually to bright. I have to up the resistor to tone it down. Is this a battery powered device?
HA!!! project creep! It may be the death of all my aspirations! The trouble, at least for me, is that it puts off the less fun "business" aspect of trying to market "finished" products, in favor of the arguably more FUN activity of seeing how much more you can improve something. And when there's an MCU involved that can endlessly have its coding extended and improved, I often wonder if I'm being a lousy project manager, while trying to be a good engineer. But I KNOW all to well about the garage work! Here in Florida, this is the only time of year to really get things done without suffering in a garage. But I digress...
The MCU in my case is a TI part, spec'ed to only have about 4MA available on its I/O pins. So yeah... unless I go for those bright low power SMT LEDs, I'll have to settle for what I'm doing. But since I am (as I mentioned) looking to cut a new board, now you're getting me thinking. If there is a light pipe that even just mimicked my 3MM LEDs, meaning I could just pop them into the enclosure, and make sure my SMP LEDs lined up with them, I just might be better off. AND... if I can get light pipes even smaller than 3MM, it may solve another problem for me. You see, I also have this "guitar strap mountable" version of this pedal!
This item does not yet have the nice top layer of PETG. Now I'd love to put in a tiny LED above each button here too. But even a 3MM LED would look stupidly big in this case (almost bigger than the buttons!). But... maybe a thin (1MM???) Light pipe, with a broad enough lower side to allow a little positioning tolerance, would allow me to use such SMT LEDs??!
OK... now you've got me stirred... but I find digi-key difficult to search sometimes. But now that you have an idea what you're "inspiring" me to look into next, please pass along any additional product links you know of that might fit the bill. 🙂
Ha! My wife wishes I was in the garage. I have over 20 feet of electronics and machining bench in a heated lab. My problem is the summer activities. We both ride motorcycles so my warm days are full.
Great looking projects you've got there. Let me know if the light pipe idea works out. I'd love to see some pics if it does. Meanwhile I'll keep you in mind if some other possible pops up. As for Digi-key, I find them tough to search as well but the delivery time for me is fantastic.
Great looking projects you've got there. Let me know if the light pipe idea works out. I'd love to see some pics if it does. Meanwhile I'll keep you in mind if some other possible pops up. As for Digi-key, I find them tough to search as well but the delivery time for me is fantastic.
- Status
- Not open for further replies.
- Home
- Design & Build
- Construction Tips
- Advise on NEATLY adding LEDs