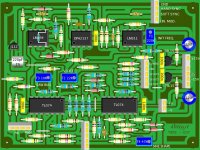
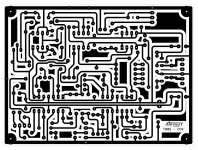
I would like this Schematic on Express PCB.
I tried the Laser printer method. I also attempted to
redo it with express PCB but gave up after 4 hours.
It was my first attemp with Express PCB. I would be will to pay.
Otherwise I would really appreciate some tips. Press and Peel?
More time with Express PCB?
Thanks
I tried the Laser printer method. I also attempted to
redo it with express PCB but gave up after 4 hours.
It was my first attemp with Express PCB. I would be will to pay.
Otherwise I would really appreciate some tips. Press and Peel?
More time with Express PCB?
Thanks
I'm not sure what schematic you are referring too because you didn't attach anything. Attach a schematic.
I would try using Cadsoft Eagle for PCB layout if you are new to this. There are plenty of tutorials on Cadsoft's website, YouTube, Sparkfun, Hackaday etc. This program is very intuitive for beginners, plus there is a free version that should be plenty sufficient for your projects.
I prefer ordering PCB's and waiting 3 weeks over etching.
reasons:
1) I rather not mess with the chemicals.
2) After etching, drilling the holes gets to be very tedious.
3) Solder bridges can happen very easily.
4) It is easier to pull up/ rip a trace.
5) No silkscreen.
6) you have to tin the entire board or else the copper starts to corrode
lists goes on...
Basically the only pro I can think of when it comes to etching is that you get the board right then and there.
I frequently use seeedstudio's Fusion PCB service. Its awesome, kinda slow, but its great quality for the price. My last order was a small audio amp that fit on a 5cm X 5cm square. I order 10 copies, 2 sided, silk screen on both, solder mask on both. Shipped to my house in the U.S.A. for $15.20. It took exactly 3 weeks on the dot to get them. When I opened the box i found 16 boards!
PCB service
Seeed Studio Bazaar,Boost ideas,extend the reach - Fusion PCB
Cadsoft Eagle
Free EAGLE PCB Design Software, Layout Software - CadSoft Freeware
Eagle Tutorial: ( watch all of them! this is only a link to the first one)
Cadsoft EagleCad Tutorial Lesson 1 - YouTube
Last edited:
For a one off, make a real good black same size photocopy on transparency paper or "vellum" (architect's semi transparent drafting paper, check at an architect's supply shop or a good art store) and use it to expose *positive* coated photo sensitive PCB material.
Very Pro looking results.
Or straight print onto same papers with a good , fresh toner Laser.
Practice first on small 1.5"square pieces until you get the exact exposure, timing, etc.
Probably 3 or 4 tries for perfect results.
By the way, you can leave the developed (blue or green) emulsion on the PCB, it will protect copper from corrosion and solder melts it away, so it does double work as soldering flux.
I silkscreen my own but it only pays for 20-up batches, so for small prototypes (say, an active Bass Preamp for a friend) I go straight to the photo etch material.
- Status
- This old topic is closed. If you want to reopen this topic, contact a moderator using the "Report Post" button.